
Video Editing Tutorial: Using Markers in Premiere Pro

Markers offer a lot of power in Premiere Pro to do things like communicate editing decisions to other editors or to trigger Flash actions. In this post we’ll show you how to get the most of markers in Premiere!

In this post we’ll discuss the different types of markers in Premiere Pro, as well as provide some unconventional uses for them in your video editing workflow. Let’s jump in…
One of the big additions to Premiere Pro CS6 with respect to markers is the new ‘Markers Panel’. It can be located at the bottom left with the Project Panel/Media Browser/Info/Effects and History tabs. As always, if you can’t find it you can get access to all panels through the window menu.
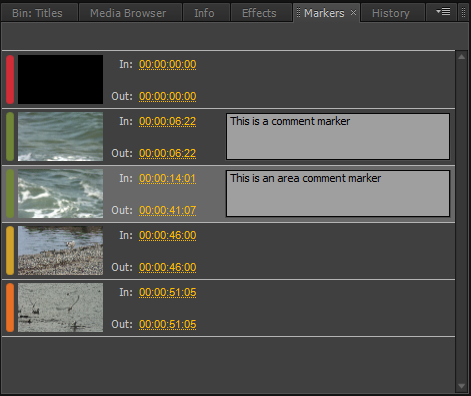
This new panel will display all the markers in your sequence and also what type of marker they are by color coding – another new and very welcome features in Premiere Pro CS6. Not only that, this panel will display any comments made in the markers and allow you to navigate to specific markers by simply single clicking on the marker in the Markers Panel. Double clicking on the grey/header part of the marker in the Markers Panel will open the marker dialogue box. Otherwise clicking in the text box will allow you to add/alter text as needed.
Markers Panel
Markers in the Timeline

Applying Navigation Markers in Premiere
The easiest way to add a marker in Premiere Pro CS6 is to move your playhead in the timeline to the place you want the marker to be and then hitting the ‘M’ key on your keyboard. Note, this is different from previous versions of Premiere Pro which required you to use the * key on your number pad (which is still the way to add markers in After Effects).
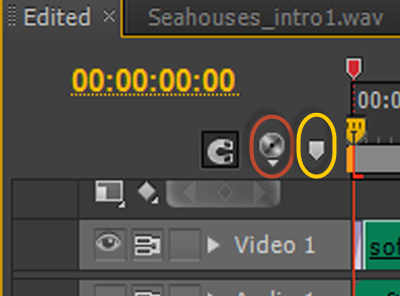
If you’re more mouse-oriented you can position your playhead where you’d like a marker on the timeline and hitting either the icon circled in red below to create an Encore Chapter Marker or the icon circled in Yellow below to create a comment marker. Alternatively, you can add a marker from the ‘Marker’ menu at the top of the UI.
Creating Markers in the Timeline
Navigating markers has also become more intuitive in CS6 with the simple keyboard short-cuts of Shift + M to go to the next marker in your sequence and Control + Shift + M (PC) or Command + Shift + M (Mac) to go to the previous marker. This will have you navigating to your markers very quickly which means you can be frame perfect when getting to any issues identified in your timeline.
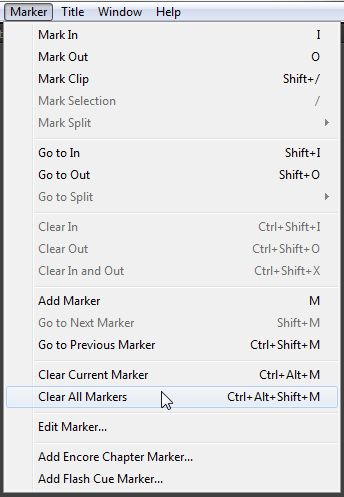
If you can’t remember these shortcuts (you should!) you can always get to them through the ‘Markers’ menu at the top of the UI. Here there’s also options to clear your current markers, clear all markers and add different types of markers.
Marker Menu
Let’s talk a little bit about the different types of markers in Premiere Pro.
Red = Encore Chapter Markers: These need a minimum distance from each other of at least 15 frames – although if you are creating chapter markers only 15 frames apart you are either doing something very specialized or not using these markers very well!
Green = Comment Markers (the default marker created when using the ‘M’ key or the marker icon in the timeline): These markers are especially useful to give feedback on a timeline and to mark and comment on any issues at the exact place of the issue in your timeline.
Note that the second green comment marker shown blow is shown both in the Markers Panel and in the timeline:
Comment Marker with a Duration as Seen in the Markers Panel
Comment Marker with a Duration as Seen in the Timeline
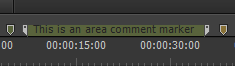
As you can see, any comments are shown in the Markers Panel and, as long as there is sufficient space to display it, also in the timeline. You can add to the comments in the Markers Panel as much as you like by clicking and typing your comments. This is a big improvement saving you the need to open the Marker Dialogue Box.
The advantage of using a Premiere comment marker with a duration is that a director or anyone involved in the editing process can specifically identify an area that needs work and then add appropriate comments to the marker that the editor can quickly pick up on and work on as needed.
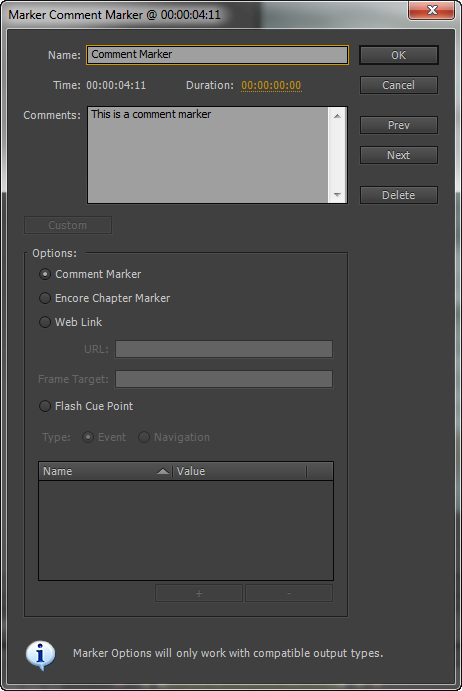
To add longer comments it can be helpful to open the Marker Dialogue Box by double clicking on the grey/header or color tag of the marker in the Markers Panel or simply by double clicking on the marker in the timeline. This will open the following dialogue box where you can change the type of marker and add comments.
Marker Dialogue Box
Here’s two more marker colors:
Yellow = Flash Cue Point: will work with a final output based on Adobe Flash technology.
Orange = Web Link: will require the use of an output technology that supports the feature, such as some Quicktime formats.
If you want to change the type of marker your created, for example, you use the ‘M’ key to create a marker but want it to be a Web Link marker instead of the default Comment marker, simply double click the marker in the timeline or the marker header in the Markers Panel to open the Marker Dialogue Box shown above and select the type of marker you want there. Any changes will be updated in both the timeline and the Markers Panel.
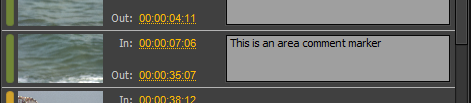
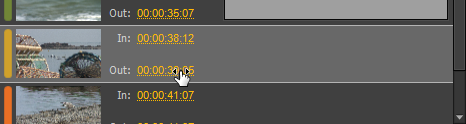
To add duration to a marker, you can either specify it in the dialogue box by typing a value or by clicking and dragging on the yellow text. You can also click and drag the ‘In’ or ‘Out’ point of the marker in the Markers Panel to set the marker duration.
Dragging an In or Out Point in the Markers Panel
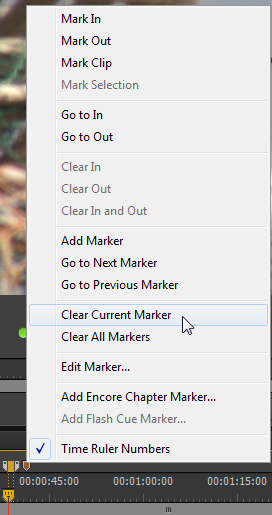
To move a marker, just click on it in the timeline and drag it to the new location you want it to go to. To delete a marker simply use the Marker Menu at the top of the UI or (my preferred choice) right click on it and choose ‘Clear Current Marker’ from the list.
Clearing a Marker in the Timeline
Uses for Premiere Pro Markers
Want to make the most of markers in your Premiere Pro projects? Here’s a few uses to consider during your video editing:
- Setting Encore Chapter Markers that move into Encore with the timeline as ‘Chapter Markers’
- Identify where clips should come in on a timeline (often linked with audio)
- Identify where there are issues with clips that need to be addressed
- Make it simple to quickly find and navigate places in your timeline that aren’t edit points (for instance if the project is broken into multiple acts or sections)
- Quickly note where changes should be made while playing back a timeline (as tapping the ‘M’ key will add a blank comment marker without stopping playback)
- Add comments and communications between editors as to what has been done and what needs to be done
- Note client comments, adding them to the timeline for review
- Log progress when dealing with editing issues
- Add web links and Flash cue points if the output file type will support it
With the new Premiere Pro Markers Panel, we not only can we quickly navigate to the markers by SINGLE clicking the marker in the Panel, but we can also see and edit the comments on that marker without the opening up the marker dialogue box. This is a huge timesaver and makes for more efficient editing!
Do you use markers in an unconventional way?
Share your thoughts/advice in the comments below!


