
Video Editing: Animation and Keyframe Basics in Adobe Premiere Pro

Animate and modify fixed effects in your Adobe Premiere Pro timeline to create basic animations. In this post we’ll show you how.

In an earlier post we took at look at the into the fixed effects options in Premiere Pro. In this post, we’ll learn how to animate them.
Simply put, you can quickly animate elements in your Premiere Pro timeline by clicking on the little stopwatch icon besides an effect name in your Effects Control panel:
![]()
But let’s dig deeper than that. How can you create animations using keyframes in Premiere Pro? What are keyframes, anyway?
A Bit of History on Keyframes
The term keyframe goes back to the early days of film, when the first animated film “Gertie the Dinosaur” was created. The keyframe signals the start and end of on-screen animation. The use of keyframes in animation was popularized by Disney, where many of the early principles of animation were worked out. In those days the senior animators would come in at the start of the day and create the keyframes. Once they’d finish creating those keyframes, they would go off leaving a junior animator to work the rest of the day creating the ‘inbetweens’, the intermediate frames between the keyframes that give the animation movement. I have heard these junior animators described as “tweeners”, for the type of time intensive work they were assigned to do.
Fast forward until today. Premiere Pro is going to assume that you are the ‘Key Frame Animator’ in that you are going to specify the starting and ending point of an animation by adding keyframes. Luckily, the in-between work is processed and Premiere Pro is going to take on the role of ‘tweening’ the intermediate frames so that the animation will look natural and smooth.
Nerd Alert: The technical term for this is called interpolation which, to quote Wikipedia, ‘…is a method of constructing new data points within the range of a discrete set of known data points’. The known data points are your keyframes and the interpolated points are what Premiere Pro creates.
Creating Keyframes in Premiere Pro
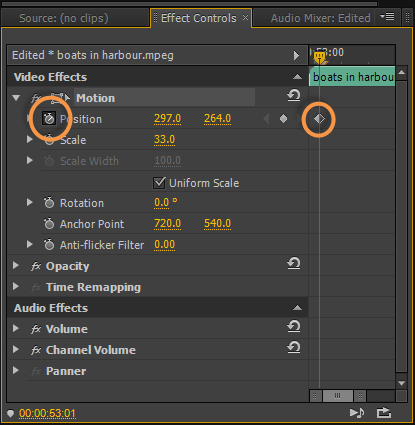
When you are ready to specify the starting point of your animation you click the stopwatch next to the property you want to animate. YOU ONLY PRESS IT ONCE!! Think about the stopwatch as an animation ‘toggle’ – you click it to say I want to animate and if you click it again you will be getting rid of any animation you have created. So press it once to toggle on animation for that property and your first keyframe will be created.
Stopwatch Depressed and First Keyframe Created
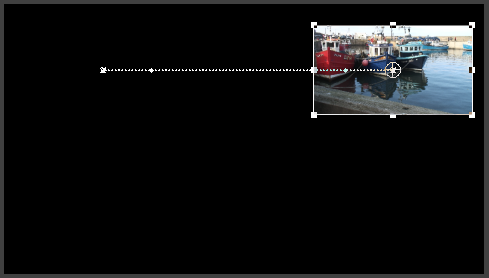
The next step is essential for you to create animation and is a step that is often forgotten when someone starts learning animation. What you MUST do now is move your playhead. If you do not move your playhead and then change the value you are animating you will not be animating but just changing the value of the keyframe you have just created. However, if you move forward in time and then change the value you will have created animation.
Animation Motion Path
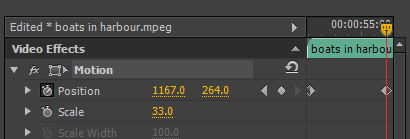
Play-Head Move and Value Changed Giving a Second Keyframe
As you can see from the above, two things have happened. Firstly, you have created a second keyframe telling Premiere Pro where you want the animation to finish and secondly, you have created a motion path which can be seen on screen if you have the word ‘Motion’ selected in the Effect Controls Panel.
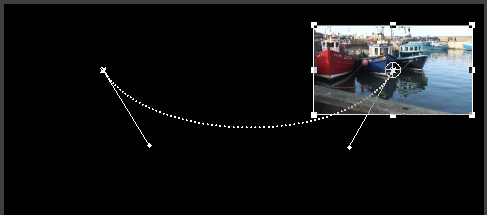
Motion Path Closer Look

The motion path shows you quite a few things about your Premiere Pro animation…
The little squares at the start and the end of the dotted line represent the keyframes. These can be selected in the program monitor and moved with the mouse if you want to reposition them.
The little dots on the line represent the ‘interpolated’ frames that Premiere Pro has created to give smooth motion to your animation.
Nerd Alert: You can tell the speed of an animation by the relative distance of these little interpolated frames. If the frames are close together then that means the item doesn’t have to move very far one frame to the next and so will move slowly. If these dots are wide apart that means the item is moving a long way one frame to the next and so will move quickly.
The other not so obvious thing you can see on this motion path are two solid circles a little after the first keyframe and about the same distance before the next keyframe. These are handles (known as Bezier Handles) which can be used to change the path of your animation.
Moving the Bezier Handles
Once moved, the path of the animation is changed. However, you can change both the position and the length of these handles. Longer handles create more dramatic curves while shorter handles smooth the curves off somewhat. Experiment with position and length to see what they do.
Nerd Alert: It is usually considered good practice to make sure that the total length of the Bezier handles on a path do not exceed the total length of that path.
To play your animation back, simply move the play-head back before the first keyframe and hit the spacebar. This is how you can see your animation and so make appropriate changes. There is however one ‘gotcha!’ that you need to be very careful about.
If you’re going to modify a keyframe, you must insure that the playhead is on the exact frame where your keyframe is placed. Otherwise, you will inadvertently create another keyframe. Oops!
Now you understand the basics of animation it is important that you play with it until you it becomes a natural process for you. Start by animating the Premiere Pro fixed effects and then move on to effects that you can add to your shot such as the ‘Lens Flare’ effect (this is a great one to learn).
One last note on animating rotation; if you keep increasing rotation you will get something that looks like the following…
Rotation Values in Premiere Pro
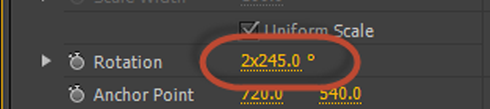
What this ‘2×245.0’ means is that the item had been rotated 2 complete revolutions + 245 degrees.
And if it all goes wrong? You will be pleased to know that there is a ‘Reset’ button next to most effects.
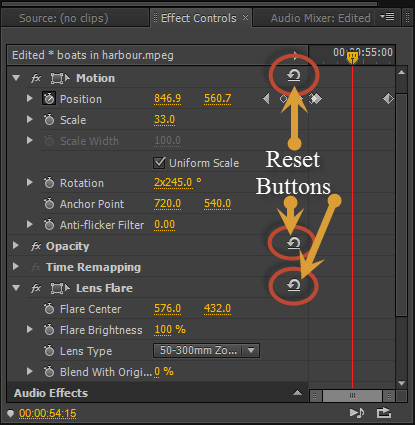
Just note, when you hit the reset button this will reset the values back to their ‘out of the box default values’. It WILL NOT turn off any animation stopwatches you have depressed and will actually add keyframes to your animation! So, if you want to reset and get rid of all your animation to start again, make sure you hit the reset button AND toggle any animation stopwatches off to get rid of all your keyframes.
Well, that’s the basics of animation in Premiere Pro. Experience is the best training tool, so start experimenting!


