
SmokeConnectFX: The Matchbox Node

Learn how to program your own effects using GLSL Shaders and create your own nodes with the Matchbox node inside Autodesk Smoke 2013’s ConnectFX.
With Smoke 2013’s ConnectFX Nodes there is almost nothing you can’t do. So you may be wondering if there is a way to script your own effects. Well, Smoke has a node to help with that too. The Matchbox Node is a scriptable node built around the OpenGL Shader Language (GLSL) to allow you to create your own shader effects. I am not a coder or programmer, so for me scripting my own effect isn’t really in my wheelhouse. But for those comfortable crafting code, the Smoke Matchbox Node can be quite powerful.
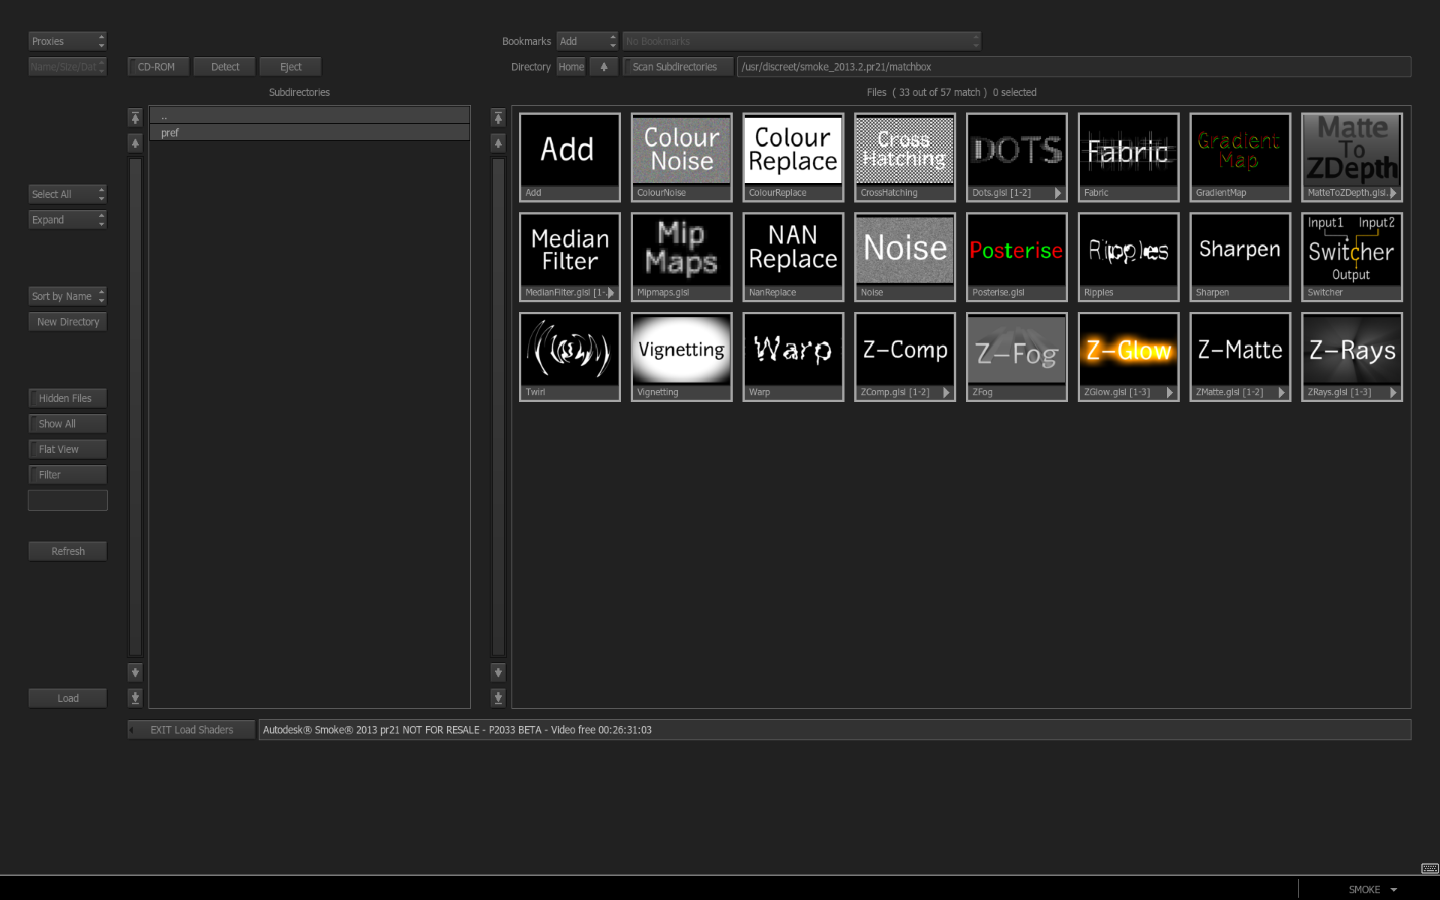
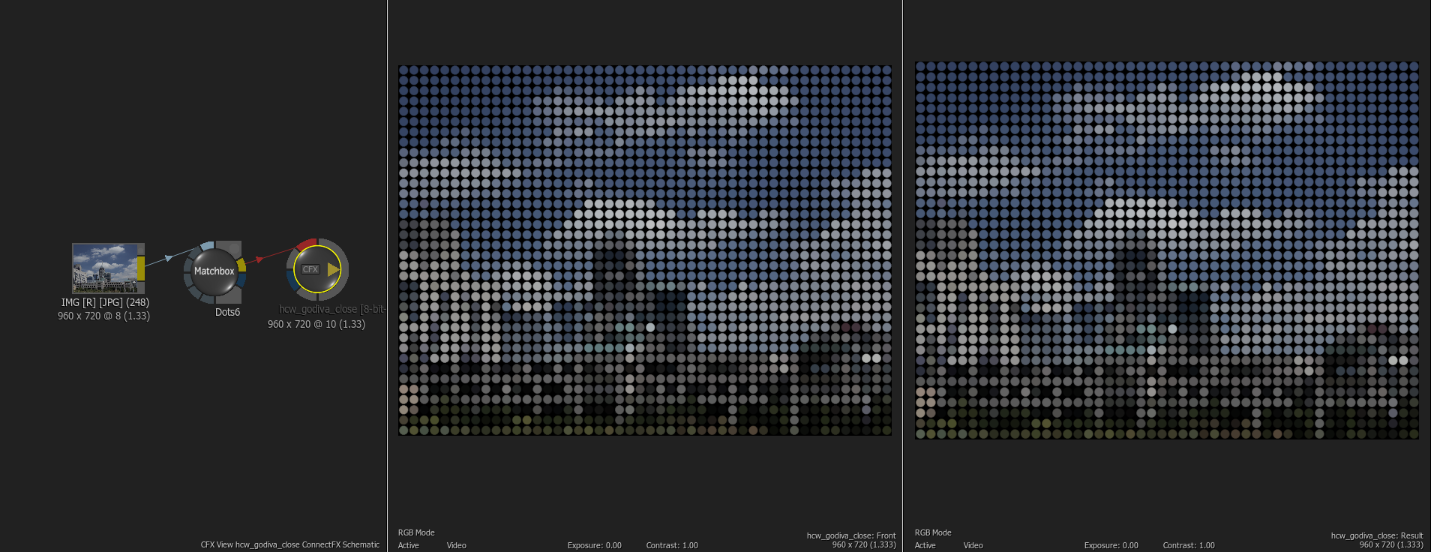
The Matchbox Node does come with a few interesting presets that can be useful. When you enter the Matchbox Node you are taken to the Matchbox effects located in /usr/discreet/<Smoke Version>/matchbox. The presets include Add, Color Noise, Color Replace, Cross Hatching, Dots, Fabric, Gradient Map, Matte to ZDepth, Median Filter, MipsMaps, Nan Replace, Noise, Posterize, Ripples, Sharpen, Switcher, Twirl, Vignetting, Warp, ZComp, ZFog, ZGlow, ZMatte, ZRays. You must choose an effect first. Then you will be sent to the Matchbox UI.
[Click on images for larger view]
Now a lot of these effects can be accomplished in other CFX Nodes, and can be done better there and with more controls. But these presets are more examples of what can be done. They are also there so that you can examine the code to see how the GLSL syntax works.

Some of the more useful presets are Dots & Fabrics that create some interesting visual effects not possible in other nodes. The ‘Z’ effects are also interesting, as they allow you some quick manipulations using a Z Depth output from Action.
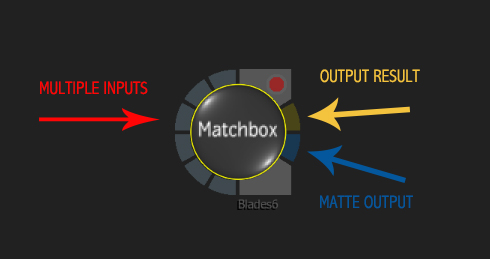
One very useful effect to use in your ConnectFX schematic is the Switcher. The Switcher allows you to pipe up to 6 different sources into the Matchbox Node and keyframe which input ultimately sent to the output of the node. This allows you to switch from inout to input, much like a router or video switcher. You can even dissolve between the sources, as well as cut. This Matchbox effect makes it very useful for doing some simple cuts or mixes in one path of your CFX pipeline.

How to create your own Matchbox effects:
The basic steps for creating your own effects are:
1. Write or Copy/Paste GLSL code in a text file and save with .glsl extension
Note: I had issues with the text editor app in OSX as it saves with a lot of hidden characters. I would suggest a programming text editor like
Text Wrangler.
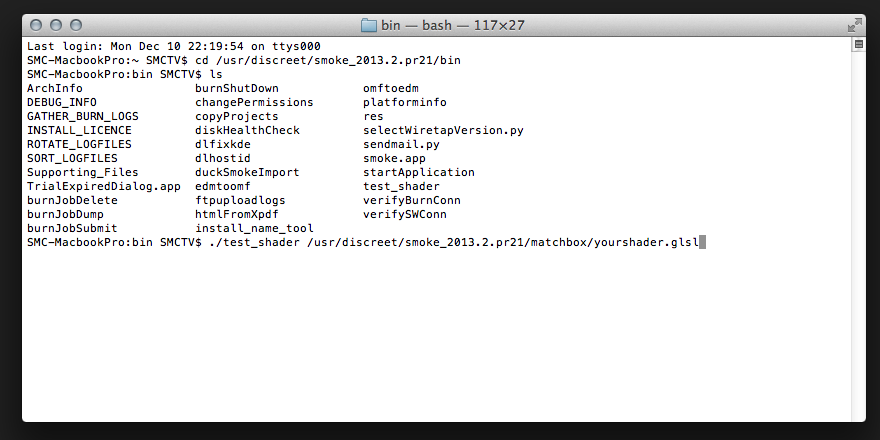
2. Test the code by running it through the test_shader script located in /usr/discreet/<Smoke Version>/bin/
Open up a Terminal in OSX, [Utilities >Terminal.app]
Type cd /usr/discreet/<Smoke Version>/bin [Enter] <Smoke Version> would be the folder name of your current version of Smoke. You can Shift+CMD+G in Finder and go to /usr/discreet/ to see what your current version of Smoke is. The Smoke 2013 retail release will be smoke_2013.2
Type ./test_shader /<location where you saved your .glsl file>
3. Fix any errors reported by the test_shader output and test again.
4. Package the GLSL code and the XML code together and place them in a folder for use later. You can use /usr/discreet/<Smoke Version>/matchbox, which will keep your effect with the presets or organize them wherever you like. You will just need to navigate to the folder when you want to load your effect.
When error free the test_shader output will give you XML information to help you set up the UI of the effect. Simply copy the XML shader node description section of the test output into a new file and save it using the same name, but with an .xml extension. Remember to save it with the .glsl file.
Autodesk’s Joe Billington has created a great video tutorial and takes you through the process of building a Matchbox effect. His demonstration is on Flame 2012 and Linux, but the same operations apply.
If you are feeling brave, or GLSL scripting makes some sense to you, check out the GLSL Sandbox Gallery for a wide variety of effects with cut/paste code. The code will most likely need to be adjusted to work within the Autodesk Matchbox framework but the test_shader tool should help you along.
More info on GLSL Shaders can be found on OpenGL.org


