
How to Create the VHS Look in Premiere Pro + Free VHS Effect Presets

In this video tutorial, learn how to create a retro VHS look entirely with Adobe Premiere Pro. Includes free VHS effect presets!
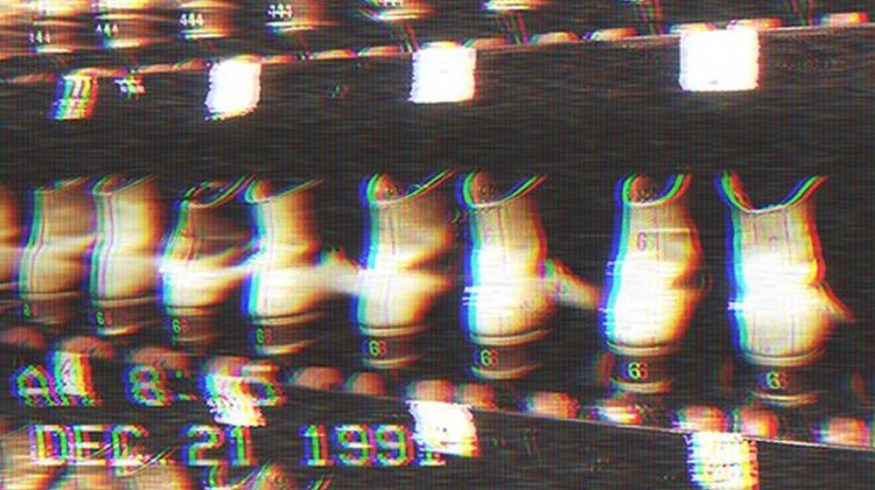
I’m a big fan of the VHS look. This nostalgic style was one of 2019’s biggest creative trends, and it remains just as popular today.
Most VHS look tutorials rely on After Effects, and then sending your footage back into Premiere Pro. If you’re not experienced with After Effects — or are just in a hurry — this can slow your workflow. However, in this tutorial, I’ll show you how to create a VHS-inspired look entirely using Premiere Pro. We’ll even look at how we can add imperfections to the footage that would usually require work in After Effects.
Now, it’s important to note: This is not a VHS overlay, meaning you won’t be placing a clip on top of your footage, rather, we’re going to learn how to manipulate the image you’ve shot. This will give you more room to tweak the image in a much more intricate way that’s meant to work closer with the information and colors in your shot.
Ready to see the world in VHS? Let’s get started!
Creating the VHS Look
Download the Project File
*These elements are free to use in any personal or commercial projects. By downloading, you agree not to resell or redistribute these assets.
In order to create a VHS look in Premiere Pro, we’ll need to use a combination of different effects. You can easily refine and customize these effects to fit the retro look you want. You can use these effects on any clips, but if you’re looking to create a real vintage feel, check out these retro-futuristic clips full of neon lights, light grids, and more from the “Yesterday’s Tomorrow” trend.
The free project file for this tutorial includes extra VHS assets that you can use to accent your footage even more.
Lumetri Color

Begin with Lumetri Color to make your basic color corrections.
The first effect we need to use is Lumetri Color. With Lumetri Color, we can make some basic corrections to the Contrast and the White levels. Then, we can make a variety of creative adjustments with the Faded Film, Curves, and Vignette settings. Lumetri Color is great because it allows us to dial-in the proper color tone with just one effect.
Channel Blur

Channel Blur not only allows you to blur each color channel individually, it also allows you to bleed colors together.
Next, we’ll need the Channel Blur effect. Channel Blur gives the footage that recognizable VHS appearance. It works very similar to a Gaussian Blur, but it allows us to blur each color channel individually (red, green, and blue.) Because we can blur single color channels, this allows us to “bleed” colors together and push them “outside of the lines.” Use multiple copies of Channel Blur, set to different Blur Dimensions, to customize the look even more.
Unsharp Mask
Using the Unsharp Mask effect, we can add over-exaggerated contrast to the edges and fine details of our footage. This gives our footage a “digitally sharpened” appearance that looks dated. Adjust the Radius setting to dial-in your desired look.
Noise and Grain
For adding noise to your footage, you have two options. The first is using Premiere’s built-in Noise effect. This can yield great “filmic” results when set to a low value. The second option is to use a VHS or film grain overlay. (I included one in the project file.) Just place this clip over your footage, set the blending mode to Overlay, then adjust the opacity, as necessary.
4:3 Aspect Ratio

Choosing the right aspect ratio is essential to getting that authentic VHS look.
If you want an authentic VHS look, you’ll need to set the aspect ratio to 4:3. My preferred method is to use a 4:3 image overlay on top of 16:9 footage. However, you can also adjust the Sequence settings to 4:3. I recommend a frame size of 1440×1080, if you use this method.
VHS Shake (Using Free Presets)

For that cool VHS look, add a subtle shake to your footage.
Finally, if you’d like to add some subtle VHS shake to your footage, you can do so with the Free VHS Presets in the project file.
To install the presets, right-click on Presets in the Effects window, then select Import Presets. Select the VHS Presets from the project file. Now you can drag-and-drop the VHS Shake preset onto your footage. (The VHS Shake preset is designed to work on HD 1920×1080 footage. If your footage is a different size, nest it in a 1920×1080 sequence first, then apply the preset to the nested sequence.) The VHS Shake preset works on video clips up to one-minute in length. However, if you have a clip that’s longer than one minute, just slice it in the middle using the Razor Tool, then add the VHS Shake preset to each half.
VHS Overlay

All aspects of the VHS look should be considered in your footage, including font. Image via RocketStock.
If you’re interested in an overlay situation, maybe you’re in a time crunch and you don’t want to mess with all of the tweaks required in the steps above? RocketStock is here with a few assets to give you that retro VHS aesthetic. Included with this download is the correct font used for “recording stats” that you’d normally find on a VHS tape. There’s also some glitch effects, which is an absolute essential requirement for your VHS overlay.
Download the Project File
VHS-Inspired Music

Put the final touches on your footage with some 80s-inspired music. Image via PremiumBeat.
You’ve got the VHS overlay or footage looking perfect. Maybe you even have a bit of distortion or fonts thrown on there. What’s next? Well, you certainly can’t have modern lo-fi music playing over it (or maybe you could?). So, here are a few playlists for 80s-inspired songs that will work perfectly playing under your retro footage:
- Retro Creepy Vibe 80s Synth Music Playlist
- Synthwave Tracks with a Retro Vibe
- Strange 80’s Synth Music
Interested in the tracks we used to make this video?
- “Stranger Things Among Us” by Julian Bell
- “Challenger” by Harrison Amer
- “All I Want Is You” by Luciano Music Co.
- “Back and Forth” by Hereafter Music
- “Retro Vibes” by Wolves
Looking for more post-production video tutorials? Check these out:
- The Audio Ramp-Up: The Best Transition You Should Be Using
- Video Tutorial: Create a Callout Graphic in Adobe After Effects
- Video Tutorial: How to Fine-Tune Keyframes in Adobe After Effects
- How to Create an Animated Circle Burst in Adobe After Effects
- How to Create a Stop-Motion Paper Crumple
Cover image via RocketStock.


