
Speed Up Your Color Workflow Using Scene Cut Detection

DaVinci Resolve’s Scene Cut Detection function chops a single file into multiple shots. Here’s how to how to use this time-saving feature.
Colorists occasionally work on projects that only exist as a single file with no accompanying project or EDL. It may also be easier to grade a single file when working with a previously conformed spot, a reel, or in scenarios where the client is located remotely and it’s not practical to upload gigabytes of material.
DaVinci Resolve’s Scene Cut Detection function can analyze a single file and chop it into multiple shots based on where it believes there are cuts in the program. This important feature saves hours of time from finding edit points manually. Let’s look into how to use this feature.
Before importing the single movie file in question, locate it in the Media Storage and right-click it. Select Scene Cut Detection.
Once you find the file that needs to be chopped up, right-click it and select Scene Cut Detection.

A window appears with several options. Click Auto Scene Detect in the lower left. Resolve will try to locate all of the cuts within the piece, which may take a little while depending on the speed of your computer and the piece’s duration.
After analysis, a bunch of lines are created across the timeline. The length of the line corresponds to how confident Resolve is in determining a cut. The purple line that cuts across the interface is your tolerance bar, which will include any lines above this line and exclude those below it. You can drag this tolerance bar to include or exclude shots.
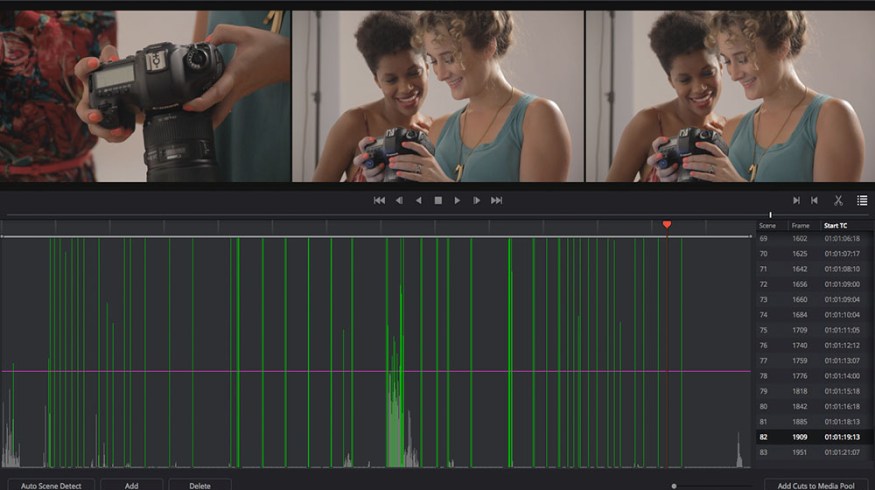
Once Resolve has analyzed the video file, the interface will resemble the image below. The green lines denote where Resolve thinks cuts occur. The purple line is the tolerance bar; all vertical lines above this bar will be included; those below will be greyed out and excluded. More on the image thumbnails below.

Here, Resolve is not as confident about the first green cut but is much more certain about the following cuts. It’s good practice to check each of the cut points to make sure those are actual cuts.

Scene Cut Detection is fantastic but not flawless. Always check the analysis by clicking through each of the edits by scrolling through them on the right-hand side.
The right side of the interface displays all of the cuts Resolve is prepared to make to the main video file. It’s good practice to check the automated analysis.
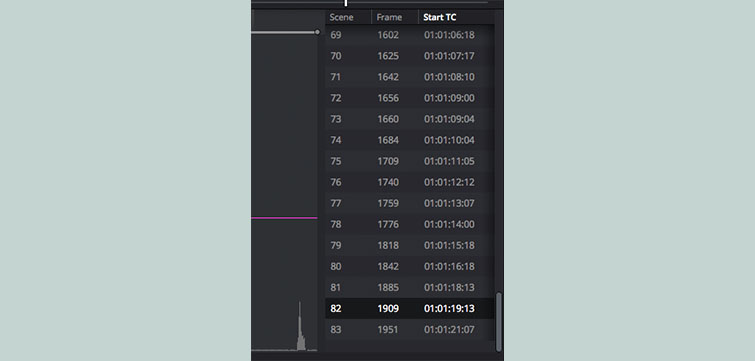
You can tell if an edit is accurate by the three frames that appear on the upper portion of the screen. This shows the frame before the edit point, as well as the two frames that come after. This interface makes it easy to evaluate if shots have ended or if Resolve has made a mistake. Be sure to especially check the shorter vertical lines above the tolerance bar, as Resolve is less sure of these.
Resolve shows the cut point between the first two thumbnails and the following frame to provide a visual representation of each cut point. Below is an example of correct edit point detection by Resolve.

Resolve may misinterpret cuts during camera flashes, very fast motion, or when objects pass in front of the frame. In these cases you can use the Add and Delete buttons as needed to create or remove edits. To remove a whole section of bad edit points, set your In and Out points using the markers or the I and O keys and click the Prune button, denoted by the scissors icon.
By evaluating the three frame layout, we discover an incorrect scene detection has created an unnecessary edit. This is why it’s important to check Resolve’s analysis. Click the Delete button (circled in blue) or use the Prune tool (also circled in blue) after setting Ins and Outs to remove a range of bad edit points.

When every edit point has been checked, click Add Cuts to Media Pool in the lower right, which will create multiple short clips of the larger project.
The media in our Master bin shows the slices of the original video file. Each clip’s timecode ends where the next one picks up.

During grading, if it’s discovered a scene has been missed, navigate to the Edit page and use Razor Edit Mode to separate the clip into two sections.
Razor Edit Mode can create additional edits if you miss some.

Was this DaVinci Resolve tip helpful? Got any workflow advice for your fellow colorists? Let us know in the comments below!


