4 Tips on Integrating GoPro Shots with Cinema Footage

Embarking on a multi-camera video shoot? We run through 4 tips on how to ‘trick’ your audience by effectively mixing GoPro shots with cinematic footage.
GoPro has come along way since the first version was released back in 2004. Until the last few years, the pint sized cameras were use sparingly if not at all in Hollywood and professional productions, but that all changed with the GoPro HERO 3 & 4 series. In fact, GoPros were the go-to camera for documentary films like 2012’s Leviathan, which uses GoPros almost exclusively to capture a commercial fishing boat at sea.
Now these nearly indestructible cameras are being fitted to just about everything, giving the audience a point of view we’ve never had before. But the thing to remember: the cinematographer didn’t just strap the GoPro to just anything and let it go. No, they planned and tested certain shots to ensure the cams were being used most effectively.
Here are 4 tips that will allow you to integrate your GoPro footage with cinematic footage.
Tip #1 Coverage
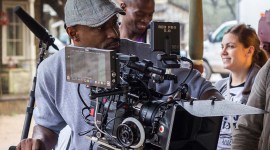
Whether shooting for sports, nature, documentary or feature film, you have to have coverage – a group of shots that give a sense of space that you can cut to. With this in mind, many filmmakers are using GoPros for this purpose, specifically in actions sequences. Below we have images from Need for Speed that show how cinematographer Shane Hurlbut used GoPros attached to cars to give a sense of immersion. Placement of each GoPro was planned out meticulously for each scene and Shane, along with his assistants, carefully placed each camera in order to give the editor as many angles as possible.

Image courtesy of Hurlbut Visuals

Image courtesy of Dreamworks SKG
Having the option of several angles in post production allows the editor to find footage that will cut seamlessly with the main cinema footage. For a look into capturing this type of coverage, take a look at this video from Movie Maker Magazine as they talk with Wolf Creek 2 cinematographer Toby Oliver about his use of GoPros during stunt sequences for the film.
Tip #2 Film Flat
The GoPro has a setting called Protune. The adjustments that can be made here are minimal, but really effective. You can adjust white balance, ISO, sharpness and exposure. On top of this, you can set the color to flat which really captures shadows and highlights, but gives you an image that can be matched to your cinema footage through standard color grading processes. The visually stunning Watchtower of Turkey by Leonardo Dalessandri uses the GoPro HERO 3 in conjunction with the Panasonic GH3 and we can see a nice integration between GoPro and cinema footage through successful grading and capturing a flat image.
Tip #3 Narrow and Wide
When setting your format, whether it be 1080, 2.7k or 4k, you have choices. These options allow you to capture video in either a narrow, medium or wide angle. Using a narrow or medium angle will allow you to mix your footage more seamlessly in with cinema footage (Camera A), but even using 4k with the wide angle will work in many cases. As Wolf Creek 2 cinematographer Toby Oliver said…
If you have a 4K file in post you can zoom in to find a tighter frame and lose the fish-eye feel, without sacrificing resolution.
In films such as 2013’s Into the Mind, the crew used the GoPro HERO 3 alongside RED Epics and utilized both the narrow and wide angle feature. By using the GoPro they were able to capture intimate timelapses as well as in-your-face action sequences. While the wide angle lens will usually queue the audience to the presence of a GoPro, limiting its use can be extremely effective and work alongside cinema footage without issues.
Tip #4 Let’s Clean Things Up
Another way to effectively integrate GoPro footage with cinema footage is to run post processes other than grading. For example, the GoPro footage shot in Need for Speed was run through an After Effects Plugin called Dark Energy by Cinnafilm. This plugin allows for noise and film grain reduction or additive. Dark Energy was used specifically to clean up the GoPro footage and to bring in the natural grain look that is closer to what the Canon C500 and Alexa footage that was shot for the rest of the film. Currently though, Dark Energy is only available as a plugin for the Windows version of After Effects.
There are other noise reduction solutions that are compatible with Mac OSX such as RE:Vision Effect’s DE:Noise or GenArts Sapphire, which has a grain removal. There’s also Neat Video which ‘packs a powerful punch’. See our previous article on Neat Video here.
Have you had success integrating your GoPro footage with your cinema style footage?
Tell us all about it in the comments below.