Color Grading in Layers in Adobe Premiere Pro, After Effects or SpeedGrade
Use different layers in Adobe Premiere Pro, After Effects, or SpeedGrade to organize your grade and make easy adjustments, even on a large scale!

One of the biggest advantages the Adobe suite has in color grading is the adjustment layer. When you use adjustment layers to your advantage in color grading, you’d be amazed at how easily you can organize your grade and set yourself up for success in future revisions.
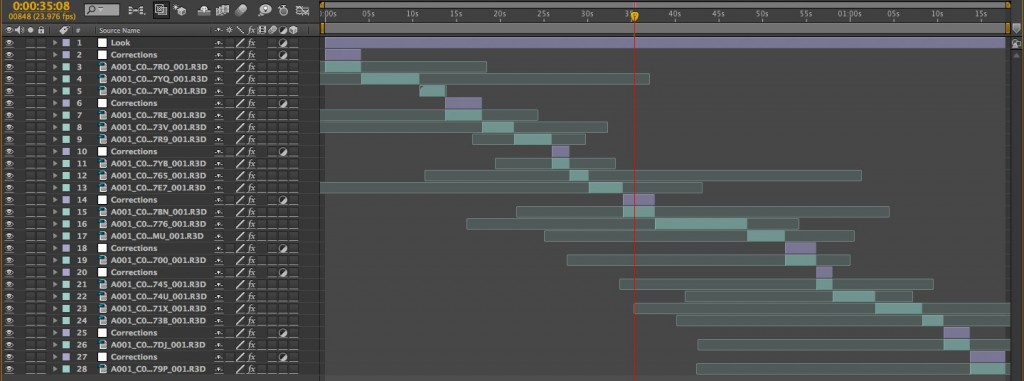
Here’s the trick: Remember how you grade in passes? Put the first pass (balancing and matching) directly on each clip. Put the look itself on an adjustment layer above the scene, extended to cover the entire scene, and use a different adjustment layer for each separate scene. Put the corrections from the last pass – fixing and enhancing the shots – on adjustment layers trimmed to the length of each clip that needs adjusting. You can put these above or below the look depending on what correction or enhancement you’re making.
Premiere Pro, After Effects, and SpeedGrade all support adjustment layers, and can be graded in this method, as you can see in the examples below:
Premiere Pro:
After Effects:
Speedgrade:
It’s pretty common practice to do something like this by using multiple instances of a color correction plug-in in an NLE or in a program like After Effects to keep the different passes of your color grading separate. By taking this a step further and separating these passes out between the clip and multiple adjustment layers, you give yourself maximum flexibility for changes. Need to make adjustments to the look? If your look was a separate filter on each clip, you would have to go through the entire piece, clip-by-clip, and delete/paste/overwrite/adjust the look filter to change it to the new look. The scene-wide “look” adjustment layer makes changing the look super easy; you only have to update the effect once!
You can use adjustment layers below the look but above specific clips to make the minor adjustments to the clip so that the look remains consistent across the scene. Not every shot will respond to the look in the same way, so making look-specific corrections on separate adjustment layers means that if you decide to change the look, you can easily identify the layers that were corrections based on that look and delete them or adjust further for the new look.
If after a few revisions you notice that one shot just isn’t fitting right into the scene and the balancing and matching is slightly off, you know just where to look for that as well. Since the balancing and matching should be creatively independent (i.e. objective), you can put the balancing and matching directly on the clip and it should never need to be removed, just very rarely adjusted.
It’s worth noting that you can do this effect in a few other NLEs like Smoke 2013 or AVID by using “gap” effects– FCP being a notable exception. Any program that has adjustment layers or gap effects can be leveraged in the color grading phase in this manner. Organizing and labeling your grade like this lets you come back to it at a much later date, or handle multiple crazy revisions with ease – without the chance of screwing up your balancing/matching or doing tedious clip-by-clip work repeatedly.
Got your own color grading tips?
Please share in the comments below!


