Part 2: Making Metadata Work for you—Performing Sorts and Sifts in Avid Media Composer

Quickly reorder your shots via sorts, and create dynamic filters via sifts to isolate exactly the clips you want to find in Avid Media Composer!
Bins chock-full of clips can be daunting when you’re trying to find just the right shot for your show. In Part 1 of this two-part tutorial series, we learned how to create custom column information to help define specific clip information. Now, in Part 2, we’ll take a look at how to sort and sift material to really burrow down to exactly what we want to find.
So, once you’ve set up your bins with customized information per the techniques outlined in Part 1, you can then sort (reorder) and/or sift (filter) this information within the bin to help you find exactly what you need.
Performing Sorts
You use sorts to reorder material within a bin. So, if you need to group together material in a certain way—for example, if you need to group all of your Rating or Shot Types together—you can do so via a sort, which will rearrange your data alpha-numerically.
Sorting Clips in Your Bin
- In Text view, click the heading of the column that you want to sort.
- Right-click the Column heading and choose Sort on Column, Ascending, or Sort on Column, Descending.

This bin's Rating column has been sorted in descending order.
The objects in the bin are sorted.
Note: You can also sort multiple columns in a bin at once. Just Command+click on adjacent columns to include each in the sort. The left-most column will serve as the primary sorting column, so Avid will fully sort the left-most column, and then will sort the other included columns within that initial sort. (If needed, you can rearrange the columns in the bin by dragging a column heading to the right or left, in order to establish which column is the “primary” one.)

Performing Sifts
Sifting goes beyond simple reordering. When you sift, you set up a filter to display only those clips that meet certain criteria. For example, you might want to sift the clips in your bin to display only the clips that contain “LS” (long shot) in the Shot Composition column. You can also use the sift function to perform much more complex sifts, which we’ll explore in a bit.
Setting up a Custom Sift
- Choose Bin > Custom Sift. The Custom Sift dialog box opens.
- Choose “Contains,” “Begins With,” or “Matches Exactly” in the Criterion pop-up menu.
- In the Text to Find box, enter the desired text to filter.
- If you want, choose the column that you want to search from the Column or Range to Search popup menu. Otherwise, Avid will search across all columns.
- Click Apply. The results of the sift appear in the bin, and the Custom Sift dialog box remains open.

- Revise your sift, if necessary.
- When everything looks good, click OK. The clips that meet your criteria appear in the bin, with the word “Sifted” added to the bin name.


Sifting Multiple Criteria
You can sift more than one set of criteria, using one of the following methods.
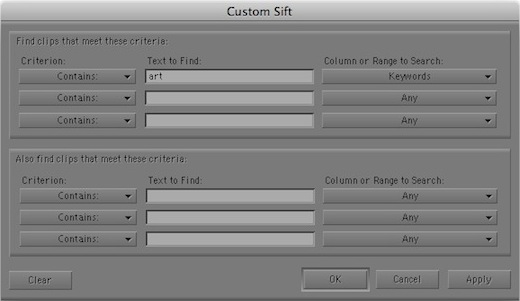
- OR (inclusive) sift: This sifts more than one piece of criteria (in one or more columns), where a clip must meet only one of the listed pieces of criteria to appear in the sifted bin.
For example, you might want to sift for clips that contain either art or motivation:
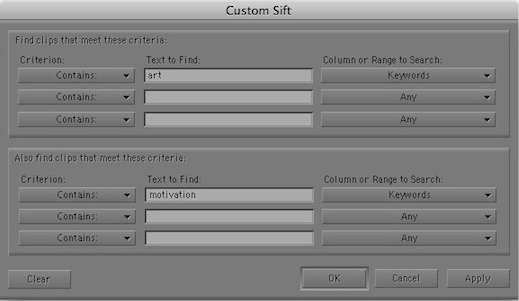

- AND (exclusive) sift: This sifts more than one piece of criteria (in one or more columns), where a clip must meet all criteria to appear in the sifted bin.
For example, you might want to sift for clips that contain both art and motivation:


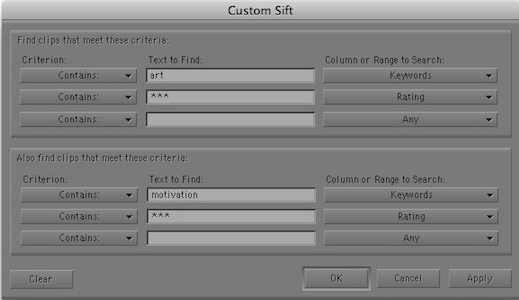
- Combined AND and OR Sifts: You can also combine AND and OR sifts to broaden the selection pool in general, but to narrow down each selection individually. For example, if you want to perform an OR sift, but you want the “best” shots in each of your OR categories, you can set up a combined AND and OR Sift where all art and motivation shots must also have at least three stars:
This is what the resulting sifted bin would look like:
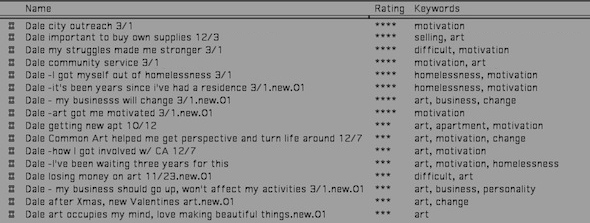
So here, we have all of our “best” (3-and-4-star shots) that mention art or motivation.


As you can see, Custom Sifting is a tremendous way to quickly burrow down and isolate exactly the clips you want. While the examples in this tutorial only involve a couple dozen clips, imagine if you were dealing with many dozens or even hundreds of clips. In this way, you can use your user-defined data in conjunction with sorts and sifts to quickly locate exactly what you need.