Premiere Pro Tutorial: Pull Selects Faster Than Ever!
When you’re going through b-roll to pull selects, a few simple keyboard shortcuts can save you a ton of time. Get the scoop in this Premiere Pro tutorial.
A b-roll selects timeline is a great way to organize all of the best parts of your footage into one accessible place (and it works particularly well in conjunction with a pancake timeline setup). These days, with digital cameras instead of film or tape, crews are shooting more and more footage. Going through all of that footage (and especially tons of b-roll) to get the best clips is a time consuming but necessary process.
Luckily, in Premiere, there are a few shortcuts and one specific setting that can dramatically increase your speed in this process.
The Setup
First, we need to make sure one of our preferences is set up correctly for this process. Under the General preferences, you’ll see an option named “Set focus on the Timeline when performing Insert/Overwrite edits.”
What this means is: when you have an in and out range selected on a clip in the source monitor and you hit your Insert/Overwrite key, the clip is placed in the timeline and the Timeline windows is selected instead of the Source Monitor, allowing you to reposition your playhead or set new Ins/Outs for your next edit.
In this particular case, this is not what we want to happen. We want to keep the Source Monitor selected at all times, so make sure that box is not checked:
Next, you need to set 3 specific keyboard shortcuts (along with your Insert/Overwrite keys, which you probably already have mapped):
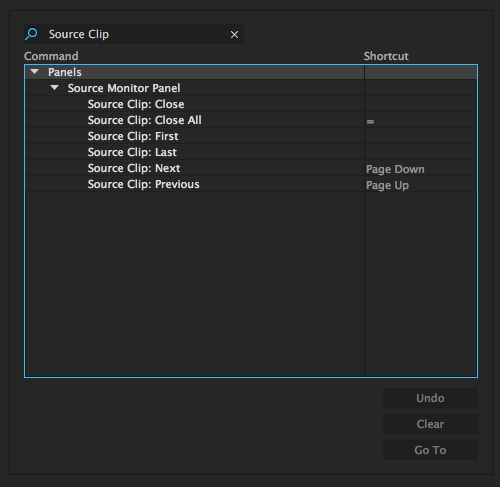
The first two are called “Source Clip: Next/Previous.” When you have multiple clips open in the Source Monitor, these allow you to navigate back and forth between them. I like to map these commands to Page Up (Previous) and Page Down (Next).
The last one is called “Source Clip: Close All,” which does what it says on the box – it closes any source clips you have open in your Source Monitor, effectively making your Source Monitor empty. I originally wanted to map this to “clear” (to the right of Page Up/Down), but that wasn’t possible, so I have it mapped to “=” on the number pad.
You may have better places for these commands depending on your keyboard setup. The above is just my recommendation.
The Workflow
In this process, you start with your selects timeline open and the playhead at the beginning. I also like to have any bins of footage that I’ll be pulling selects from open in a separate window or tab, just so that’s it’s easily accessible without having to navigate my entire project structure (you do organize your projects, right?).
Next, you grab a bunch of clips from your footage bin (I usually do however many I can see without scrolling) and drag them onto your Source Monitor, which will open them all up. You’ll know they are all open because the dropdown on the Source Monitor will show a list of open clips:
Now all you have to do is go through each clip, setting In/Out Points as needed and inserting those into the timeline. Since you have “Set focus on the Timeline when performing Insert/Overwrite edits” unchecked, you never lose focus from the Source Monitor, and can continue pulling as many selects from that clip as you’d like uninterrupted.
When you reach the end of a clip, just hit Page Down (or whatever you set “Source Clip: Next” to be) to load the next clip on the list into your Source Monitor and repeat the process. Need to go back a clip? Just hit Page Up (“Source Clip: Previous”).
When you’ve gone through every clip you loaded into the Source Monitor (you’ll probably know because you’ll Page Down to a new clip and see that it already has an In/Out Point set), it’s time to clear the list of clips from the Source Monitor and drag in a new batch. That’s what the “=” key on the number pad is for (“Source Clip: Close All”).
Just hit that and all of the clips you dragged into the Source Monitor are closed, allowing you to drag a new batch of clips in from your b-roll bin without getting clips you’ve already look through mixed up with new ones.
Hopefully this method will help you plow through tons of footage very quickly (whether it’s b-roll, interviews, or anything else) and save the best parts in an easily accessible place. Happy selecting! While you’re in the learning mood, why not check out a few of the these Premier Pro articles on PremiumBeat?
- Smoothing Keyframes in Premiere Pro
- Premiere Pro Tutorial: Setting Poster Frames
- Quickly Applying Default Transitions in Premiere Pro
What’s your method for efficiently digging through footage? Got any tips for speeding up the process? Let us know in the comments below!


