Cinematography Tip: Creating the Illusion of Speed

Creating the illusion of speed can be surprisingly difficult, regardless of whether or not your subject is actually moving quickly. Here are some common techniques you can apply to your filmmaking to turbocharge on-screen action.
Making action appear faster than it is, or even simply as fast as it is actually occuring, is a bit more complex than one might think. Visible speed depends on a variety of factors, ranging from camera settings to framing. In most cases, you can’t shoot a real car chase at breakneck speeds, so let’s take a look into some of the Hollywood trickery involved in high-speed action.
Motion Blur
We’ll start with the basics. Motion blur is one of the most important things to consider when exaggerating motion. It is generally the result of an object moving very fast or slow in comparison to the camera. The larger the difference in speed between an object and the camera filming it, the more motion blur that object will create.
In most cases, motion blur is best applied to background objects, rather than the subject of the shot. For instance, motion blur is great for tracking shots in which the camera is traveling a similar speed to the subject. However, you would want minimal motion blur when your subject is quickly flying by the camera.
The viewer’s focus should never be on a blurry object or person, so be sure to limit its use to unimportant, passing objects, unless there is a specific exception in which you want to draw attention to the blur.

Image: Incorrect use of motion blur via Shutterstock
Technically speaking, high motion blur is achieved with a low shutter speed, and vice versa. For example, if shooting at 24 fps, a shutter speed of 1/50 would produce a lot of motion blur, whereas a shutter speed of 1/2000 would virtually eliminate it. Be sure to always set your shutter speed to at least twice your framerate (For 24fps, set to 1/48 or higher. For 60fps, set to 1/120 or higher), as anything lower will result in choppy, unnatural-looking footage.
 Image: Good motion blur via Shutterstock
The iconic speeder bike chase of Star Wars Episode VI: The Return of the Jedi is a classic example of effective application of motion blur. Interestingly enough, this sequence was shot by walking through the forest and shooting one frame at a time, then superimposing the speeder bikes over the resulting footage. Because photos aren’t restricted by a frame rate, they can use very low shutter speeds to increase motion blur beyond the limitations of reality, which was great for depicting the blisteringly high speeds of the futuristic speeder bikes.
Framing
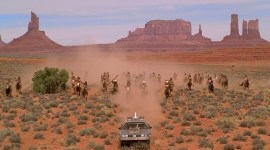
The way a moving object is framed can drastically affect how fast it appears. When shooting a moving object, especially from the side, tighter shots such as a medium shot or close up will emphasize speed. This is because usually objects appear faster when close, and slower when far away. This optical illusion is the reason that passing airplanes tend to appear very slow despite moving very quickly.
The smaller the subject is in the frame, the smaller the distance it will appear to travel. When the subject takes up the majority of the frame, less of the background will be visible at once, resulting in the illusion of covering more distance. Narrower lenses are best suited for these types of shots. The opening motorcycle sequence of Skyfall demonstrates this idea perfectly.
Conversely, when shooting a moving object from behind or in front, a wide-angle lens would be more appropriate. Narrow lenses tend to compress visual depth, while wider lenses expand it. What this means: if you were to film the same object approaching the camera directly, with both a 250mm telephoto lens, and a 14mm wide-angle lens , the object would grow in perceived size much more quickly and drastically with the wide angle. This accentuation of distance on the Z-axis is great for fly-bys, close-ups of the moving subject, and again, any shots of the front or rear of the moving subject.
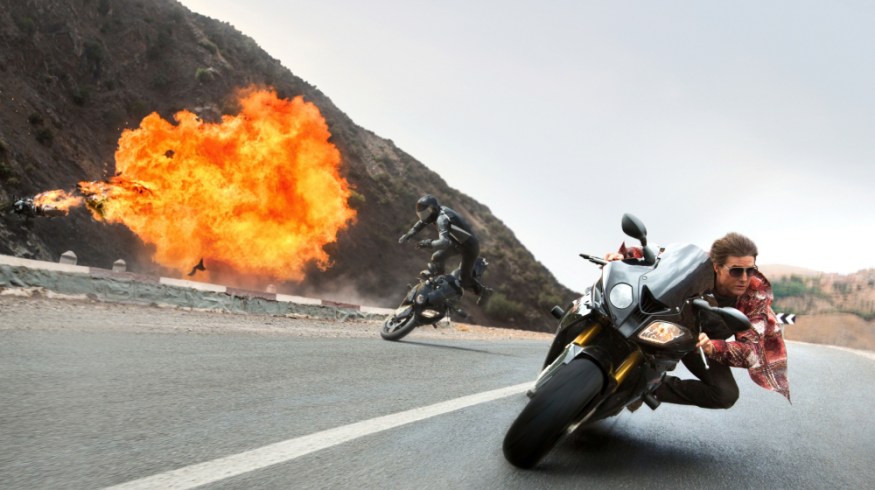
For this, let’s look at another modern motorcycle chase shot quite differently from the James Bond sequence, from another action film centered on espionage. This year’s Mission Impossible: Rogue Nation featured one of the best motorcycle chases in cinematic history, if not the best. As you can see, the shots that illustrate the most speed utilize wide angle lenses and are shot behind or in front of the subject.
Setpieces and Camera Placement
Another way to highlight speed is by placing and moving the camera correctly. As mentioned before, objects appear to pass more quickly when close to the camera, and in turn generate more motion blur. Because of this, it’s often best to include objects that pass very close to the camera or subject. Having things such as cars passing both behind and in front of your subject can add familiar points of reference for the viewer to interpret the rough speed of said subject.
Note that high-speed sequences in films avoid bland environments with few nearby objects, as such locations make it hard to tell how fast anything is traveling. Even this scene from Star Trek: Into Darkness is sure to include debris for reference, as in reality, outer space is mostly empty and very difficult to accurately judge speed in. Lacking setpieces can be compensated for to an extent, by giving the camera more movement instead.
If shooting a subject traveling on land, placing the camera lower to the ground will further indicate motion. This is why many car chases are largely shot at bumper level, such as this awesome introductory chase scene from Mad Max 2: The Road Warrior.
Camera Movement
Camera movement is arguably the most crucial factor in establishing the frantic tone of a high-speed situation. While shaky cam has recently become an overused staple of modern Hollywood action films, employed to mask poor choreography, its effectiveness should not be underestimated, as it adds a sense of urgency and chaos.
Additionally, camera movements such as pans, tilts, dollies, and trucks that follow the direction of the subject will emphasize velocity. The camera being unable to keep up with the subject and seeming to fall behind is another nice touch to further diversify your scene’s visuals. The 1998 thriller Ronin demonstrates some great camera movement, as does the aforementioned Mission Impossible: Rogue Nation.
Fly-by shots like these are perfect for visualizing urgency and pedestrian perspective, especially when cut to very briefly (quicker cuts infer less time for characters to see the action). On the contrary, moving the camera toward an approaching object or away from a retreating object can increase perceived speed, as demonstrated in this shot from Harry Potter and the Deathly Hallows: Part 1.
Keep in mind that these techniques are best used in moderation; abusing any of them can break the audience’s immersion, as seen in this absurd, unconvincing scene from The Fast and the Furious. It applies the majority of the previously discussed tricks to such a drastic degree, that they draw attention to themselves and result in a cheap-looking, over-stylized mess — though the cheesy visual effects don’t help its case.
Using cinematography to manipulate the audience into seeing something that isn’t quite real is critical to maintaining suspension of disbelief — and the illusion of speed is no exception. Audiences are constantly improving their ability to recognize falsity, so simply fast-forwarding your footage won’t cut it. Hopefully, with these tips, you can bring your high-octane ideas to life.
What scenes do you think did a great job at depicting speed? Let us know in the comments below.