How to Recreate Star Wars Practical Effects

Recreate the groundbreaking Star Wars practical effects with this fun collection of tools and tutorials.
The special effects of the original Star Wars film pushed the boundaries of what was technologically possible. Fortunately, those effects are much easier to pull off today. Let’s take a look at how the artists behind the original Star Wars created their groundbreaking visuals and discuss a few ways to create similar effects from the comfort of your editing station.
1. Greebles
How They Did It in the 70s

Image via Tested
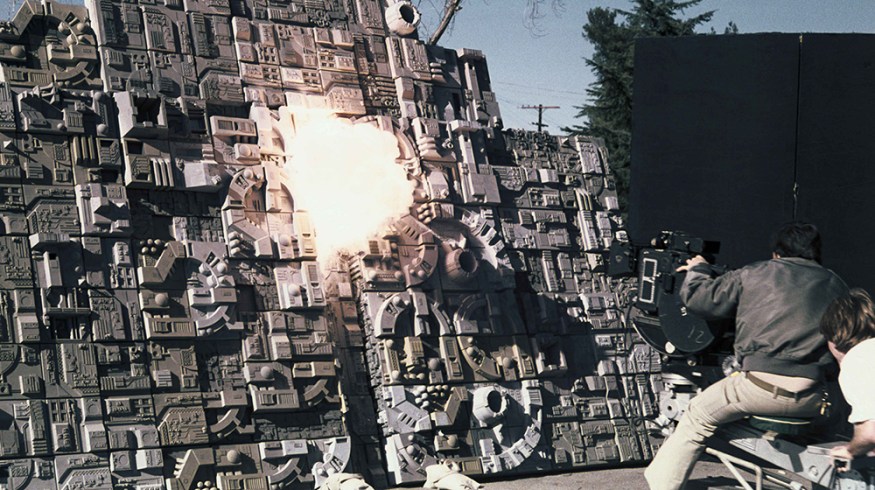
There are few scenes in film history as iconic as the chase scene at the beginning of A New Hope. Besides simply being a visually spectacular scene, the cinematography highlights just how outgunned the rebels are against the Empire. Since a full-sized Star Destroyer is hard to come by (especially in 1975), model-builder Lorne Peterson had to come up with a clever way to show the illusion of scale.

Image via Reddit
In order to simulate scale, Star Wars artists took pieces from model kits, painted them, and put them on the smooth surfaces of the ships. This created ‘fake’ details which, when lit correctly, looked like they were a part of a massive ship. These small details came to be known as greebles.
How You Can Do It Today
You can actually create simulated greebles in Cinema 4D using the appropriately titled Greebler plugin. The plugin can automatically create simulated details and save you a ton of time in Cinema 4D.
2. The Death Star Explosion
How They Did It in the 70s

Image via The Nerdist
The original Death Star explosion is one of the greatest explosions in film history. It really is the perfect combination of particles, fire, and smoke. However, creating a great explosion in the mid-70s wasn’t as easy as simply recording a firecracker.
Special effects artists had to create actual bombs and record them at 120fps on 35mm film. The explosions were shot on a sound stage with a massive 40×40 blue screen lit by eight blue carbon arcs. In the words of Bruce Logan, the explosion supervisor for the original Star Wars movie:
We let off massive explosions with very little safety equipment and no fireman. I remember wiping burning napalm off my arms after a particularly large explosion.
After recording, the explosion would be keyed out and placed over the background plate. Here’s the final result:
How You Can Do It Today
It’s incredibly difficult to create realistic explosions on a computer, especially if you’re using a midlevel particle generator like Trapcode Particular. A better, and more practical, method is to use a pre-keyed explosion element just like the original Star Wars. There are a lot of decent elements out there, but by far the best is Action Essentials 2 from Video Copilot. The real-world elements were all recorded in camera, making them incredibly believable.
3. Matte Painting
How They Did It in the 70s

Photo via Gizmodo
Modern filmmakers will find it quite easy to do a set extension these days, thanks to compositing software and reference photographs. But when George Lucas sat down to craft the original Star Wars sets, he quickly realized that matte paintings were going to be essential to the film’s success. From this decision, craftsmen like Harrison Ellenshaw, Ralph Mcquarrie, and Christopher Evans began their careers as artists on one of the most important films in history.
 Photo via Gizmodo
On the original film, ILM artists painted sets on glass with extraordinary detail. Moving elements could then be rotoscoped into the final shot to create a realistic sci-fi set.
How You Can Do It Today
While you could always paint a background in Photoshop and then bring it into a digital compositing software like Nuke or After Effects, most modern VFX artists prefer to composite real-world photos together to create fake environments. The following tutorial from GWSFilms shows us how to create fun matte paintings in After Effects. If you want to learn more about matte painting in AE, our friends at RocketStock have created a cool matte painting roundup.
4. Lightsabers
How They Did It in the 70s

Image via PetaPixel
Lightsabers were difficult to craft for the original Star Wars movie, mainly because rotoscoping technology was still very primitive. In the beginning, they tried using reflective light that could be enhanced when processing the film, but this technique had its limitations. George Lucas and company would later go on to physically rotoscope in the lightsabers by hand and then add in the glowing effect. It was tedious, but the result was iconic.
The physical body of the lightsaber was actually created from an antique camera flash tube (The Graflex 3 cell flash tube to be specific). You can actually pick up these antique tubes online. They can be pretty expensive, but if you’re a big fan of Star Wars, it might be fun to make your own authentic lightsaber at home.
This wonderful video from the Star Wars YouTube channel explains how the original lightsabers were crafted.
How You Can Do It Today
Normally rotoscoping isn’t a very exciting thing to do. However, there are few things more exciting than rotoscoping lightsabers in After Effects. There have been multiple methods laid out online for creating lightsabers, but the easiest in my opinion is simply using a masked solid with a glow effect. This tutorial from Legacy Entertainment shows us how to create a very convincing lightsaber using the mask technique.
Quick Note: It’s better to use a fully extended lightsaber when shooting your battle sequences. This will make your Jedi’s actions look more realistic and give you a reference for simulating motion blur.
5. Scrolling Text
How They Did It in the 70s
 Photo via Gizmodo
In an pre-VFX era, one couldn’t simply create rolling text on a computer. Instead the Star Wars SFX artists had to slide a camera across a printed plate. The final result was quite amazing for not having been created digitally. Eventually, the original text technique was replaced with CGI.
How You Can Do It Today
Creating scrolling Star Wars text is really easy in modern video editing applications. All you need to do is simply rotate a 3D text layer along the x-axis. If you want to get the specifics about which font and color to use, I highly recommend checking out The Force’s article on the opening titles.
This tutorial created by Nick Khoo shows us how to easily create the rolling text.
What are your favorite Star Wars practical effects? Share in the comments below.