Workflow Tip: Storyboard Your Animations in Adobe Illustrator
Doing an involved motion graphics piece? Use Illustrator to create your storyboards and style frames, setting you up to easily move to After Effects!
If you work in After Effects a good bit, you’re probably familiar with Adobe Illustrator (if you’re not, then get familiar with it! It’s probably one of the most powerful and versatile tools Adobe has created). You probably know how to create and modify assets for use in After Effects, but have you ever thought of using it to plan a whole motion graphics piece from storyboard to style frames? With a little bit of setup, you can easily create client-ready storyboards and style frames that will transition perfectly over to After Effects when the time for animating comes.
Creating the Artboard
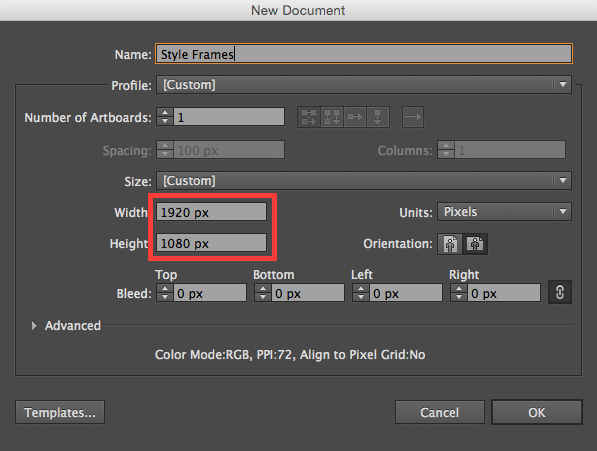
The first step is to set up your initial artboard. One of the great things about Illustrator is the ability to have multiple “pages” – called artboards – in one document. If you save the file as a PDF, each artboard shows up as a separate page in the PDF – perfect for sending to clients! Set up your initial artboard at your desired animation resolution (1920×1080 in the example below):
You’ll end up with one artboard in the middle of your canvas (the total area Illustrator allows you to have artwork in). There’s a tool called the “Artboard Tool” (Shift + O), that allows you to select and move artboards around. I like to use that and shift the first artboard up to the top left corner of the canvas, allowing me to work from left to right, top to bottom from there.

Illustrator does give you ability to create multiple artboards at once and can auto-arrange them into a grid for you, but I like to duplicate each artboard as I work, since style frames often use many of the same assets of the board before it (more on that in a bit):


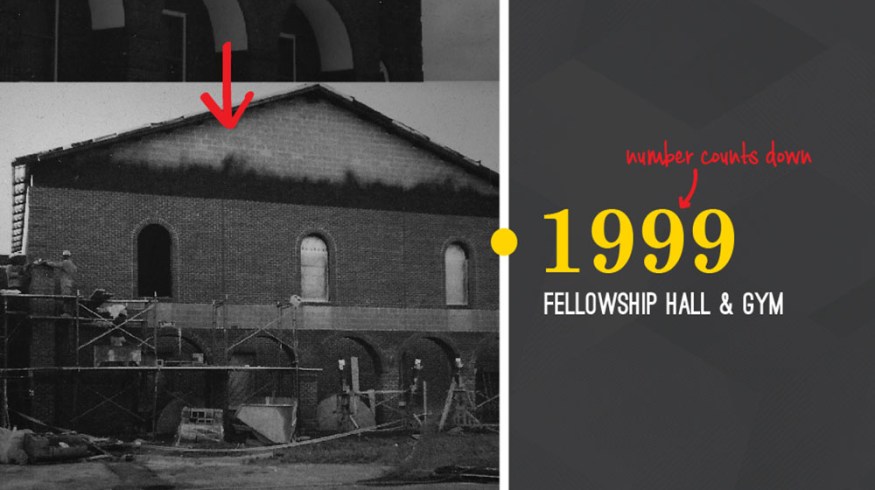
Starting with your first board, you can use Illustrator’s awesome toolset to create infinitely scalable vector art for your animation. If you take the time to make it as close as possible to what you want it to look like now, your client will be able to see a nearly-finished look, and you’ll have your graphics already created for you when you move to After Effects! Here’s an example from part of project I’m currently in the middle of:

You’ll notice a few things in this setup:
- I have the relevant script lines above the board.
- There are red arrows and comments that give direction and notes for the client.
- My designs are pretty close to what the final will be.
Script Lines
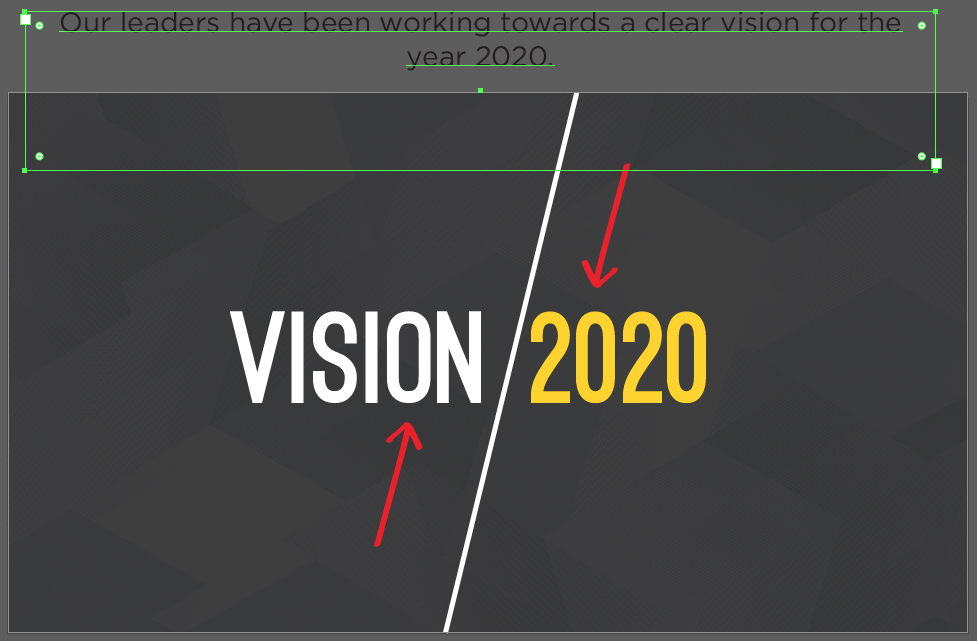
For my reference, I put the relevant script lines above each artboard in a text box. This helps me know what lines this panel references, and it’s easy to make a few changes and have these included for the client if needed. Also, even though the script lines are currently outside the artboard, I’ve created the text box to overlap with the artboard just a bit, which will make sure the script box is duplicated when I make a new artboard.
Arrows and Notes
When creating storyboards and style frames, bright red arrows and notes are a great way to indicate motion and give some context to your panels. I wanted my arrows to stand out from the rest of the art and make it obvious that they were notes, so I made them bright red, and grabbed a set of stock arrows that had a hand-drawn style as a differentiator (If you’re interested, the set I used was royalty free, and you can find them here). I also put my note text in a handwriting font, though of course that’s entirely optional.

Polished Designs
The typical animation workflow is to do some hand-drawn storyboards, then create a couple of key style frames, then move to animation. That process works well with this set-up. You can import your scanned storyboards and place one in each panel to easily create a multipage PDF (or just draw your storyboards right in Illustrator if you’d like). When it’s time to create your style frames, you have your storyboards in the right panels as a reference. Once you get your general style, however, I’d suggest finishing out your design in Illustrator rather than jumping right over to After Effects – while it might take you a little extra time, you’ll have a better set of drawing tools, a clear overview of what your whole project will look like, and you can easily transition your artwork over to After Effects when you’re finished.
Setting Up Layers
Keeping your file organized will save you some headache later. I’d recommend splitting everything into at least four layers:
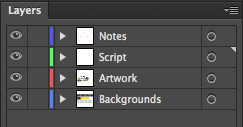
- Notes – This is where red arrows and text for the client’s reference go. Having them on a separate layer allows me to easily turn them off when moving over to After Effects.
- Script – Keeping your script on a separate layer helps for the same reason as notes: you can easily lock or turn off the layer when copying/pasting assets or moving over to After Effects.
- Artwork – All of the actual designs go in this layer, except for…
- Backgrounds – I like to keep the backgrounds for all of the panels on a separate layer so that I can lock it when I’m working on a particular panel. If it wasn’t on a separate layer, the background would interfere with drag selecting objects and moving things around. One quick lock of the layer and this is no longer a problem. Just don’t forget to unlock it when duplicating an artboard or copying the panel to a new file for After Effects.
Duplicating Artboards
When you’ve got a panel finished and you’d like to make a new one, you can easily duplicate an entire artboard, allowing you to use a previous artboard as a starting point for your new panel. Using the Artboard Tool, and click and drag the artboard you want to duplicate to where you want the new artboard to be. Before you let go of the click, hold down option/alt, which will make a duplicate of the original artboard instead of moving it. A few things to note when doing this:
- Objects on locked or hidden layers aren’t moved/duplicated
- Only objects that intersect with the artboard are included. This is why I made sure the script text box overlaps with the artboard just a little – so that it would get duplicated with each new artboard.
- If you’re a neat freak and want everything to line up, hold shift as well when dragging to lock the move to one axis, then use the smart guides to line it up on the other axis.
Moving Over to After Effects
When your artwork is all finished up, it’s a relatively simple process to move everything over to After Effects. One of the easiest way to do it is by by copying each frame to a separate .ai file, then following these steps to split each object in your artwork into separate layers for use in After Effects. Just make sure your Notes and Script layers are locked or hidden, and your background layer is unlocked.
Hopefully this helps you create great looking style frames for your clients, then easily move over to After Effects for animations. Happy animating!
Here are a few more articles that might help you up your After Effects game:
- 5 Ways to Preview Audio in After Effects
- Remove Warp From Warp Stabilizer Using After Effects
- After Effects Quick Tip: Cropping a Comp
Short on time? Can’t fit storyboarding or animating into your schedule? No problem. Just head over to RocketStock and grab one of their curated customizable After Effects templates. They even have some freebies available!
Do you ever incorporate Illustrator into your workflow? If not… What’s keeping you from doing so? Let’s talk about it in the comments below!


