

Audio Meters in Adobe Premiere Pro CS6

Discover the recent changes to the audio meters in Adobe Premiere Pro CS6. The improved meters are much easier to use and able to provide better info for audio editing. Here’s the scoop…
Audio is a very important part of video production simply because good audio carries the message and reinforces the images we work with. Don’t make the mistake of overlooking the audio in your video editing project! In this post, we’ll cover the changes made to the audio meters in Adobe Premiere Pro CS6 and how they can be used to improve the audio quality in your video editing.
As you can see from the following pictures there have been big changes to the audio meters in Premiere Pro CS6 from previous versions.

One of the biggest changes is that the meter in the main user interface now fits whatever size you make it whereas in previous versions it always stayed the same size and orientation.
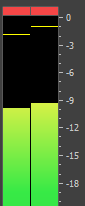
CS6 Audio Meters Wide
CS6 Audio Meters Placed Wide at the Bottom of the Work Space

You can see at once that this ability to re-size and fill whatever gap it is given aids tremendously in getting a far better layout for you work-space as well as allowing you to have a greater sensitivity in your view (i.e. in general longer bars are easier to see and work with than shorter bars).
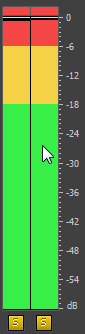
Another great change is that this ability to resize has been added to the whole Audio Mixer Panel which means that no matter how large you make it the meters will scale accordingly. While not going beyond a certain point, the meters will also scale into a very small space and still be visible in CS6:
CS5.5 Audio Mixer Panel Lengthened

CS6 Audio Mixer Panel Lengthened

CS6 Audio Mixer Panel Shortened
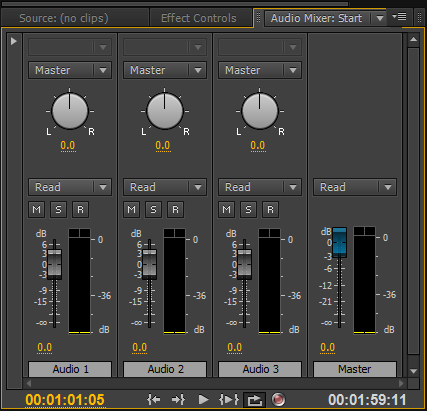
Premiere Pro Audio Mixer Panel
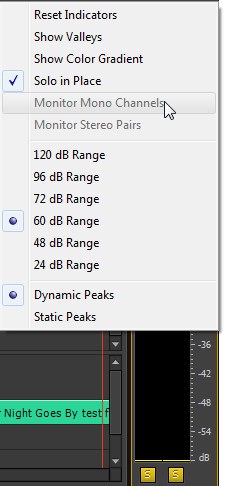
As well as making the graphs much easier to use, Adobe have also added a new right-click menu which means we can have even more feedback and use out of these meters.
NOTE: Make sure you are right-clicking on the black bar in the middle and not on the scale to one side as the only option you will get at that point is the ‘Safe During Write’ option.
New Right-Click Menu (Audio Mixer Panel)
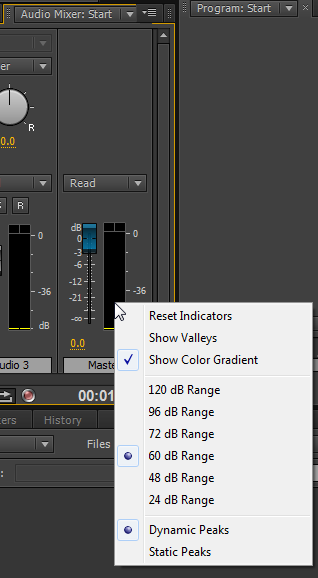
If you choose any of the other ranges than the default 60 dB Range it won’t change the audio. Instead it will show either a wider or a more limited range in the meter itself. So, if you have some very sensitive audio you want to work with you may find having a wider range such as the 120 dB Range easier to work with than the typical 60 dB range.
Dynamic and Static Audio Peaks
Peaks
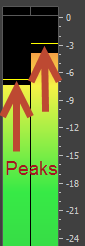
The default setting in Adobe Premiere Pro is as shown above – Dynamic Peaks. What this means is that the little lines shown above will move to show the highest level that your audio gets to for a short time before falling back or moving up to a new level several seconds later. The idea behind this is to give you feedback as to how dynamic your audio is being with a peak staying put for a short while as an indication while the rest of the meter moves.
However, if you want to see the maximum values for the whole piece you can change this to ‘Static Peaks‘ from the right-click menu which will mean that these peak indicators will move to the maximum level your audio gets to and simply stay there for the rest of the playback or until you right-click again and choose ‘Reset Indicators’. This can be helpful, but my own preference is to use dynamic peaks and keep the audio below the RED limit level.
RED Distortion or ‘Over’ Indicators
If you get either of these RED indicators showing at the top of your audio meters it means that your audio for that channel has distorted and should be turned down. It is very bad to get audio peaking in this RED zone as it will play back very badly on any equipment further down the line and so should be avoided.
Show Valleys in Premiere Pro
‘Show Valleys‘ is very similar to the peak indicators mentioned above. The only real difference is that these indicators show the lowest point of your audio instead of the highest point. Once again, if you choose Dynamic or Static Peaks this will affect both the high peaks and the valley peaks making them persistent or transitory as needed.
Audio Color Gradients
The last right-click option on an audio meter in the Premiere Audio Mixer Panel is that of either showing a color gradient or having the colors in the bar change in steps. The image below shows what it looks like with the option in steps (unchecked).
Color Gradient Unchecked
As you can see, the -18 dB and the -6 dB levels are really clear if you uncheck this option. However, I prefer to leave this option checked in general as it gives a nicer look to my eye and I don’t generally need to be too precise about these levels – that said, should I need to be more precise I now have the option to turn off the gradient if I wish.
Lastly, if you right-click on the main Audio Meter in the normal user interface you will find that you have a couple of extra options that don’t come up when you right-click in the Audio Mixer Panel. These include:
Extra Options in the Right-Click Menu for the Main UI Audio Mixer
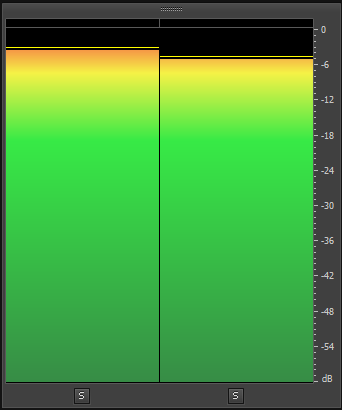
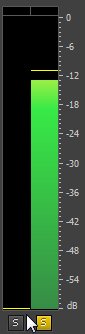
Solo Channel Options
Another interesting feature Adobe has added, which is especially helpful when dealing with multi-channel masters and 5.1 surround-sound masters, is the ability to solo selected channels right from the audio meters. As you can see from the image below, the default setting is to have all the channels ‘soloed’ such that hitting any of the little ‘S’ buttons will turn that channel off.
Monitor Mono Channels
This option will only work with adaptive clips played in the Source Monitor and for sequences which have multichannel masters played in either the Source Monitor or the Timeline. What it does is allow you to play mono clips through both speakers at the same time – which can be a lot easier on the ear!
Monitor Stereo Pairs
This function will only work if you have a multichannel master played from the Timeline and what it does is allow you to listen to stereo linked channels instead of all the channels at the same time. For example, if your stereo pair was on channel 7 & 8 you could select to just listen to them with this option.
Well, that’s a quick look at the very well redesigned audio meters in both the main user interface as well as in the Audio Mixer Panel. As you can see, these audio improvements in Premiere Pro CS6 can be quite useful in working with audio in your video editing projects.


