

Basic to Advanced: Resolve’s ‘Deliver’ Window Demystified

Better control your project’s workflow and delivery by tweaking the options available in Resolve’s ‘Deliver’ window.
To developing colorists, some choices available in the Deliver page may be confusing. The Advanced tab contains many specific options for rendering a finished project, and while some of these are straightforward, others are a bit esoteric. For many projects, the Basic tab may be sufficient, but in this post we’ll delve into the features in the Advanced tab of Resolve’s Deliver window.
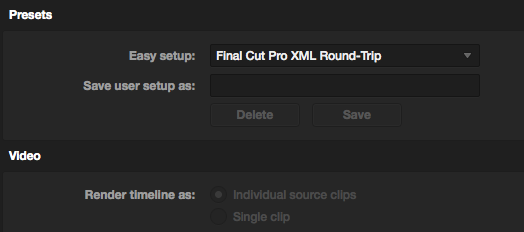
Deliver > Advanced > Presets
All of the tabs have an Easy Setup option. Depending on how the project was edited, selecting the corresponding Easy Setup will highlight and lock certain settings found below. Choosing Final Cut Pro XML Round Trip, for example, forces you to output individual source clips as opposed to a single clip.
The Avid AAF Round Trip can only output MXF files. Colorists can save their own Easy Setups as presets in the Intermediate and Advanced tabs.
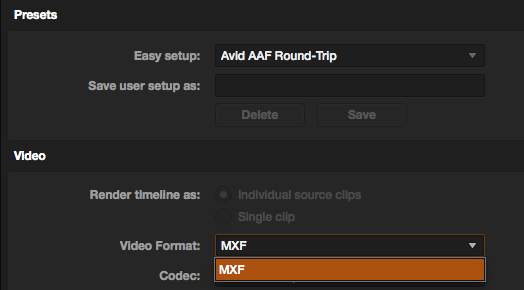
Deliver > Advanced > Video
In Video, you can choose to output files as Individual Source Clips, used in the majority of outputs where you want to conform in a nonlinear editing software. The timeline can also be rendered as a Single Clip, an option for sending an off-site client a color pass for review.
Once you’ve chosen one of the two options we’ll need to decide what video format we’ll be outputting. This’ll be dependent on the post workflow for the job. For round-tripping back to Premiere, Final Cut or Avid, Quicktimes or MXF files are the norm. If a compositing machine is the next step in the post pipeline, outputting DPX files is preferred. Output options for cinema projection are also available.
The codec selected will determine the quality of the output. As much as possible, I push for clients to output to Prores 4444 when working with Quicktime, but again, depending on the workflow Prores 422 HQ or Prores 422 may be acceptable to the client. I can also output to a web-ready H.264 at half resolution straight from Resolve for client review.
The Field Rendering checkbox pertains to interlaced footage, not often encountered with progressive signals becoming the norm.
I can’t imagine a scenario where you’d want to stray from the Auto setting on Video/Data Level. Resolve recognizes the output format and sets the levels so you don’t have to. The last option in the Video section concerns data burn-in, which you can choose to disable here. You can set the parameters for the burn-in back in the Color tab.
Deliver > Advanced > Audio
Audio is pretty self-explanatory, with an option to include it in the export. You can also set the number of channels and bit depth. Sequential image outputs don’t have an audio output option.
Deliver > Advanced > File
In File, alternate filenames can be chosen, which can be great for organizational purposes. If unique filenames are not given, new renders can overwrite old renders. Setting custom filenames and choosing Render Unique Filenames can avoid this. This is always highlighted when performing a round-trip to an NLE. This section is where the destination path for the renders is chosen, as well as the render speed. Only an insane person would want to wait longer for renders, but the speed is an option here in case your rendering to a networked storage solution will slow others down.
The manual instructs that Resolve is capable of recognizing specific text tags to add pertinent information to each clip:
|
Tag |
Description |
|
%L |
Reel name |
|
%T |
EDL reel |
|
%V |
Version name or number |
|
%I |
Shot number in timeline |
Deliver > Advanced > Options
One of the most essential considerations in the Options section is the Handles. Having unlocked cuts on the day of the color session is becoming the norm. It’s customary to add 24 or more frame handles to each shot in service of tweaking the edit further after the session. It’s not a bad idea to have handles in case the round-trip process is not exactly frame-accurate too.
Disable Edit and Input Sizing is something I use when I’m panning shots around the frame to compare them to stills in my gallery. In case I forget to move them back, this feature avoids rendering the shot nudged left or right. If you’re resizing something like Red footage into an HD frame, you’ll want to keep this option off.
Force Sizing to Highest Quality relates to an option in the preferences of the Image Scaling tab that scales the image based on a bilinear filter. Clicking this checkbox renders with the sharpest image-resizing filter inside Resolve. You may want to enable it when in doubt.
Force Debayer Resolution to Highest Quality is an option I’m glad had made it to the Deliver page several versions ago. Most often this will be relevant when working with Red footage at a lower debayer in the interest of smoothest playback. Make this checkbox active to render at Red’s premium full resolution.
Now that the Render Cache is behaving as it should, Use Render Cached Images can save render times by pulling from the cached images. Make sure you set caching resolution to your output resolution in General Options in the Preferences, since you can cache to lower-quality resolutions as well.
While your grades may look beautiful, they may not be optimal for pulling information in a visual effects context. If compositors prefer to pull information from the ungraded, raw footage, you can turn on Enable Flat Pass, which disables the grade when rendering. You can also set individual clips to render in this manner by right-clicking a shot in the timeline, selecting its version, and clicking to enable its flat pass. You can then select the radio button for With Clip Settings.
Place Clips in Separate Folders can assist in the automatic organization of image sequences by throwing each shot’s hundreds or thousands of images into their own folder. Can you imagine life with this workflow but without this feature? Preserve Levels retains the filepath of the clip, useful for preserving camera roll and reel information. Resolve can take advantage of the Alexa, Red and some DSLR cameras that capture footage with this folder structure.
The Use Commercial Workflow option also has the ability to place clips as well as reels in their own folders. When footage was still laid off to tape (gasp) an offset of a half hour was typically given to alternative scene passes, which can be input here. Ending this section are a couple of options for stereoscopic projects.
Deliver > Advanced > Additional Outputs
You can create more outputs at the very bottom. This is useful if the footage needs to go to two different departments. I could output my timeline to DPX sequences for the compositors, but the editor may want to post a rough conform of the color correct for client approval, so I make another output for Quicktime or MXF files. Here, it’ll be important to change the subfolder to organize the different sets of renders.
While some of these options may not encounter daily usage, it’s important to understand them for those atypical jobs that throw us a curveball and require their utilization. Understanding these options isn’t meant to clutter your mind with more technical knowledge. It’s about streamlining the conform process and preventing headaches.


