
Blockbuster Looks in DaVinci Resolve: The Matrix

The green tint of the Matrix universe drips with dystopian atmosphere. Learn how to achieve this look in DaVinci Resolve.
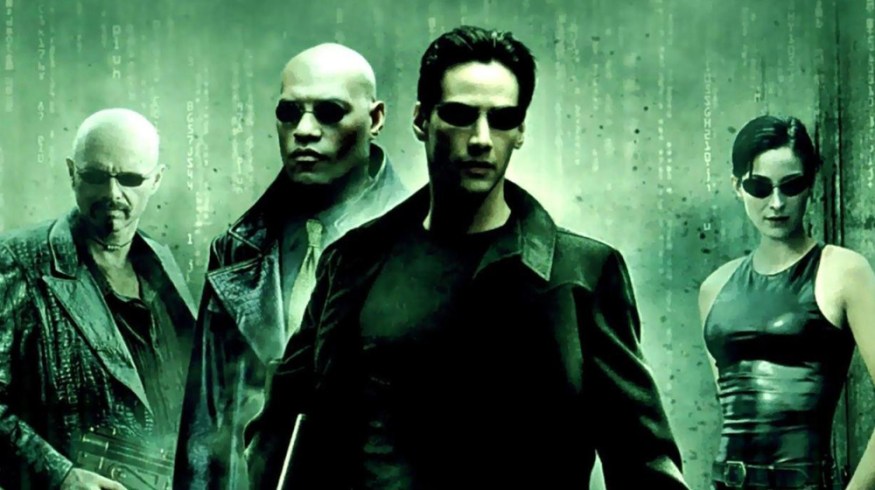
Above image from The Matrix
In an previous article, I analyzed the orange-teal look, a style popularized by the Transformers series that’s now featured in numerous Hollywood films, regardless of genre. Before Transformers, there was The Matrix, which showcased its own distinct look.
The Matrix depicts a technological dystopia, so the filmmakers decided the overall green tint was a nod to the monochromatic green of command-line computing, one of the first images used in the movie.

The most interesting aspect of the film from a color perspective is that The Matrix runs contrary to traditional styles of rendering skin tones in healthier yellow, orange, or magenta registers. Skin is colored by the epidermis’s melanin as well as red-colored hemoglobin in the blood. Green skin, on the other hand, evokes decomposing or dead flesh.
Most skin complexions fall in a general range that is approximated by DaVinci Resolve’s Skin Tone Indicator, which can be activated in the Vectorscope preferences. The indicator line runs between red and yellow, the combination of our skin and blood.
DaVinci Resolve’s Skin Tone Indicator shows roughly where most healthy skin tones will fall, at least on typical jobs. Access this feature by clicking on the lower right preference button.

Certainly you wouldn’t see a Matrix grade on most fashion jobs, where healthy, vibrant skin tones are the name of the game. Many artists who use Photoshop’s Curves to manipulate a fashion image tend to steer away from the green slider, instead opting to utilize the red and blue to create distinct looks. The Matrix is the furthest thing from a fashion job though, so the Wachowskis went in a different direction by addressing the science fiction tone of the film.
When referencing The Matrix, consider your project’s material and how much healthy skin tones matter. It may seem an obvious choice if you’re grading a fantasy, noir, or science fiction movie, but why not experiment with other genres?
Bringing in one of the stills from the film shows a definite bias toward green, and the image deviates from the Skin Tone Indicator as we suspected.
 An iconic still from the film, via Unreality Mag
Here are the above image’s scopes. The skin is below the indicator, indicating more green. The other blob at about 7:00 is edged towards green as well, consistent with what we had suspected.
Below is the image I’ll be working with. This image is pretty normalized. It’s got a bit of blue in the midtones but otherwise has a nice exposure.

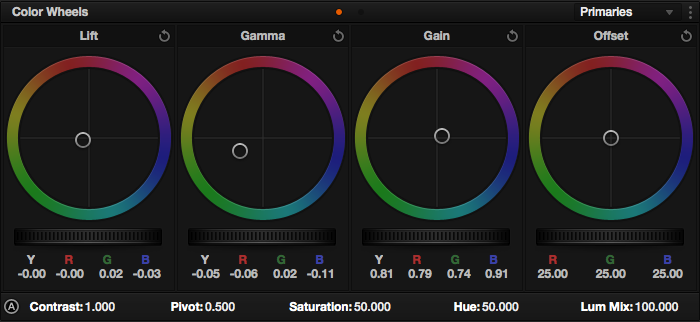
After performing an initial balance on the shot, add green to the midtones, paying attention to where the highlights are heading, maybe adding a touch of green into them as well. Play around with a slight green or cyan in the blacks. Apply extreme moves to the grade to see how much your footage can handle, and then dial it back to taste.

Here’s the color wheel “answer key” for my grade.
Here’s what the scopes look like. Notice I’ve darkened the image to give it that dark sci-fi tone.

To control the skin tones, create a node before the green-tinted Matrix node. Click and drag to qualify a key across the major skin areas. Once you’ve pulled a good qualification, you can change the saturation and hue to affect the skin warmth.
I’ve brought the skin tones back so she looks a bit healthier, if you absolutely can’t stand to have that green shade in her skin.

The Matrix look can be pretty easy to execute once you know what you’re going for. Again, the trick is in losing normal looking skin tones in favor of the overall look to the piece.
Think you can pull this look off? Show us your Matrix looks in the comments.


