FCP X Audio Tutorial Part 2: Using Final Cut Pro X’s Audio and Music Fading Tools

In this second post in our series on working with sound in FCPX, we’ll take a look at the new tools for fading audio in and out on the project timeline.
Final Cut Pro X has made significant improvements for working with audio, including more automated audio keyframing and advanced fading interpolation choices. Whether your working with dialogue, sound effects or music…you will benefit from the audio upgrades in Final Cut Pro X!
Let’s first look at how to adjust the overall levels in an audio clip:
- Notice the black line that runs through all audio clips.
- Mousing over this line will reveal the level of that particular clip.
- Pull the line up or down to increase or decrease the level (volume) of that clip.


Now, let’s add a fade in at the top of a clip — as you’ll see, fading audio in FCP X is a breeze!
- Place audio into your project’s timeline.
- Insure that your timeline settings are optimized for viewing audio:
a. As a general rule I always turn on waveforms when working with audio in a timeline. If they aren’t already showing, choose View > Show Waveforms from the top menu bar.
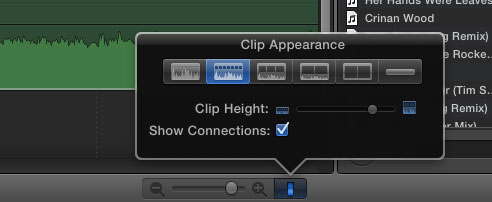
b. Enlarge audio clips in the timeline. Click on the “Clip Appearance” button on the bottom right of the timeline. Choose the second to left button. It will show small video tracks and large audio tracks, whereas the left button will just show your audio tracks (your choice on which you use). Here you can also adjust the FCPX track height if you want to get an even more detailed view.
 c. From the Menu Bar choose View > Expand Audio/Video Clips > For All
- Now, navigate to the beginning or end of an audio clip you’d like to fade. Notice the “button” at the top / bottom of the clip. This “button” is actually a keyframe that is automatically generated by FCPX. Drag this keyframe forward or backward in the timeline to instantly add an audio dissolve.

- Right click (or CONTROL + click) the keyframe to control how the audio fades in and out (known as interpolation).

a. Linear: will fade the clip at a constant rate between the beginning of the clip and the “out” keyframe. It appears as a straight line.
b. S-Curve: Will start the fade slowly, ramp up in the middle and end slowly.
c. +3db: Fades slower at the beginning and quickens through end.
d. -3db: Fades faster at the beginning and slows through end.
a. As a general rule I always turn on waveforms when working with audio in a timeline. If they aren’t already showing, choose View > Show Waveforms from the top menu bar.
b. Enlarge audio clips in the timeline. Click on the “Clip Appearance” button on the bottom right of the timeline. Choose the second to left button. It will show small video tracks and large audio tracks, whereas the left button will just show your audio tracks (your choice on which you use). Here you can also adjust the FCPX track height if you want to get an even more detailed view.
 c. From the Menu Bar choose View > Expand Audio/Video Clips > For All


a. Linear: will fade the clip at a constant rate between the beginning of the clip and the “out” keyframe. It appears as a straight line.
b. S-Curve: Will start the fade slowly, ramp up in the middle and end slowly.
c. +3db: Fades slower at the beginning and quickens through end.
d. -3db: Fades faster at the beginning and slows through end.
Sure, Final Cut Pro X has left off some important features, a point that continues to be reiterated throughout the media and web. But it’s not all bad… the upgrades to working with audio in FCPX projects are a huge improvement over previous versions (in my opinion, audio tools in Final Cut Pro have always been a weakness). I welcome these audio advancements as they will quicken and improve the experience of working with sound in Final Cut X. Looks like Apple got at least one thing right this time around.