How to Create A Vintage Effect in After Effects + Free Presets

Learn the secret to creating vintage looks in After Effects — both by hand and with seven FREE After Effects presets!
Creating convincing vintage effects in After Effects is more about subtle tweaks than over-the-top color changes. However, many artists feel like simply applying a preset is all you need to create a great vintage effect — but that’s simply not the case. Sure, presets can be a great starting point, but if you really want your vintage effects to look convincing, it’ll require patience and an eye for detail.
Let’s take a look at how to create a custom vintage effect in After Effects by hand and discuss a few proper ways to use presets to create compelling vintage looks in AE.
Tutorial: Create a Vintage Effect in After Effects
In this lesson, we’ll discuss in detail how to create a convincing vintage effect using native plugins and effects and share a few free After Effects presets to use when working on vintage projects.
The presets aren’t meant to be a professional alternative to color grading, but if you need to quickly create a vintage effect, they are a fantastic place to start. Here’s how it’s done:
Download Vintage Effect Presets and Footage
Quick note: These effects presets only work for After Effects CC 2012 and above.
How to Create a Vintage Effect in After Effects By Hand
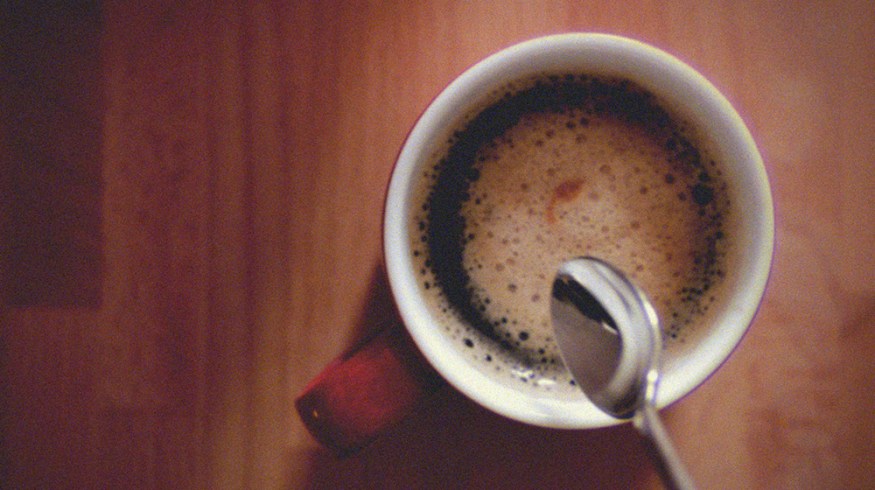
Now let’s take an in-depth look at how to create a vintage effect by hand in this step-by-step tutorial. We’ll work with the image below to create our effect.

Step 1: Duplicate Footage in Timeline

First, you’ll need to create a new composition and drop your footage inside. The best way to do this is by simply dragging your video clip to the Film Strip icon at the bottom of the Project Panel — or you could simply hit Command+N to create a new composition.
Once your new composition is created, drag your video footage to the timeline and hit Command+D twice. This will duplicate your footage in the timeline. You should end up with three total clips.
Step 2: Shift One Layer’s Channel to Red

Apply the Shift Channels effect to one of the footage layers in your timeline. You can rename the layer by selecting it and hitting the Return key. Change the Take Green From and Take Blue From to Full Off. This should yield a red-only image.
Step 3: Shift One Layer’s Channel to Green

Now we’re going to do the exact same thing for the other two layers in our timeline. Apply the Shift Channels effect to one of the remaining footage layers in your timeline. Change the Take Red From and Take Blue From to Full Off. This should yield a green-only image.
Step 4: Shift One Layer’s Channel to Blue

Apply the Shift Channels effect to the remaining footage layer in your timeline. Change the Take Green From and Take Red From to Full Off. This should yield a blue-only image. Place the blue layer on top of the red and green layers.
Step 5: Apply Radial Blur to Blue Layer

Apply a Radial Blur effect to the blue layer in your timeline. Change the Amount to 13 and the Type to Zoom.
Step 6: Create Adjustment Layer for Colors

Create a new Adjustment Layer by going to Layer>New>Adjustment Layer. You can rename the adjustment layer to Color by selecting the Return key. Make sure your Adjustment Layer is on top of the other layers in your timeline.
Step 7: Apply Brightness and Contrast Effect

Apply the Brightness & Contrast effect to your Adjustment Layer in your timeline. This effect will serve as our “film flicker” effect. Hold down Option and select the Stopwatch icon next to Brightness. This will pop up the infamous Expression Editor box, but have no fear! Simply type in the following expression: wiggle(5,2);
This will cause your composition to blink five times a second to be 1% brighter or darker than the original composition.
Step 8: Change the White, Black, and Blue Points

Now apply the Curves effect to your Adjustment Layer. Instead of making a curve, we’re going to simply bring up the black points and bring down to white points (see below). This will make your final image less contrasted. Apply a similar curve to the blue channel.
Step 9: Reduce Vibrance

Apply the Vibrance effect to your Adjustment Layer. Change the value of Vibrance to -10.
Step 10: Soften Everything

Apply a Fast Blur effect to your Adjustment Layer and turn up the Blurriness to around 2 or 3.
Step 11: Add Grain

Apply the Add Grain effect to the Adjustment Layer in your composition. The easiest thing to do is simply select the Kodak Vision 500T preset under the Presets menu. You can adjust as needed.
Step 12: Create Adjustment Layer for Vignette

Create a new Adjustment Layer by going to Layer>New> Adjustment Layer. Rename the Adjustment Layer to Vignette.
Step 13: Apply Fast Blur Effect

Apply the Fast Blur effect to the Vignette Adjustment Layer and turn the value up to around 60. Make sure Repeat Edge Pixels is selected.
Step 14: Apply Brightness & Contrast Effect

Apply the Brightness & Contrast effect to your Adjustment Layer. Turn down the Brightness to around –67.
Step 15: Mask the Adjustment Layer
Create a Mask around the edges of the layer by using the Pen Tool (G). Change the Transfer Mode of the Mask to Subtract and Feather the edges to around 400.
You should now have a convincing vintage effect.

How to Create a Vintage Effect in After Effects Using Free Presets (Download Link Above)
Using the free After Effects presets included in this post, you can create a similar vintage effect in a matter of seconds. Here’s how to quickly get a vintage look using the presets.
Step 1: Duplicate Footage 3 Times

Duplicate the footage in your timeline three times. To do this, simply hit the Command+D keyboard shortcut twice.
Step 2: Apply Shift Effects and Change Transfer Mode

After you’ve installed the presets included in this post into After Effects, simply apply Shift Red, Shift Blue, and Shift Green onto one of the three clips in the timeline. After you’ve applied a single effect onto all three layers, change the transfer mode to Add.
Step 3: Apply Radial Blur to Blue Layer

Set the Shift Blue layer on top. Apply a Radial Blur effect, change the value to 17 and the type to Zoom.
Step 4: Create Adjustment Layer and Apply Vintage Preset

Create a new Adjustment Layer by going to Layer>New>Adjustment Layer and name it Colors. Select either Vintage Color or Vintage B&W for your footage. For our example, we will use Vintage B&W. This will quickly colorize your footage. Adjust as you see fit for your project.
Step 5: Create Adjustment Layer and Apply Vignette Preset

Create a new Adjustment Layer by going to Layer>New>Adjustment Layer and name it Blurred Edges. Apply either the Vignette Blur or the Petzval Vignette Effect to the Adjustment Layer. The effect will likely look strange at first.
Using the Pen Tool (G), create a Vignette Mask around the edges of your frame. You don’t need to create a perfect circle; the effect usually looks better when it isn’t perfectly elliptical. After you finish your shape, change the Mask function to Subtract and Feather out the edges. A value of around 400 should work nicely.

That’s all there is to it! A fourteen-step process has been reduced to only five. Just export your project and you’re done!
Great Places to Find Vintage Inspiration

One of the most important things to remember when working on vintage film emulations is to use reference images and footage when deciding on a look. A few of my favorite places to look for vintage film inspiration are Shutterstock, Offset, and Pinterest. All three of these sites feature a wide array of professional vintage looks. If you do a lot of photography work, VSCO is also a great place to look for color grading presets.
How do YOU create vintage color grades? Share in the comments below.