

Automating Clips to Sequence Markers in Adobe Premiere Pro

Automate your clips to fall at specific predetermined places in a Premiere Pro timeline!

If you’re looking to create a quick down and dirty edit cut to a beat or time interval, this very handy editing trick for Adobe Premiere Pro is the way to go! In this tutorial, you’ll discover how to mark points where you would like new clips to start and then bring a batch of clips down to a Premiere Pro timeline at those spots. It’s actually much easier than you may think!
The beauty of this function is that it allows you to set up a complete timeline with predetermined edit points, and moves any existing footage on the timeline down after your inserted clips. This preserves any editing you may have done up to that point (just make sure you choose the ‘insert edit’ option).
So, how does it work?
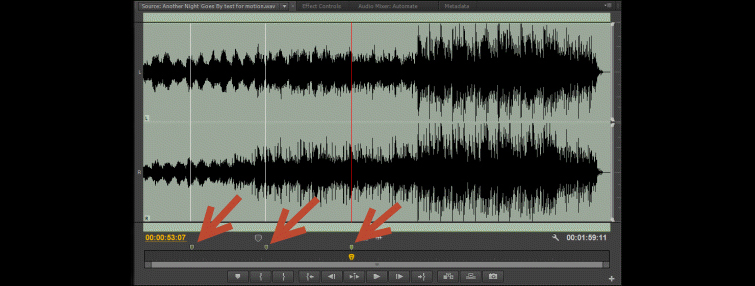
The first thing you need to do is specify the points where you want your clips to fall in a Premiere Pro timeline. This is done with unnumbered sequence markers. Note, the following method will not work with clip markers linked to a piece of music. If you want to set insert points for your clips based on music cues, you will first need to place the music track in your sequence and then add markers to the sequence. Essentially, sequence markers are added in the timeline while clip markers are added in the source monitor and cannot be used for this process.
In Premiere Pro CS6 markers are added with the ‘M’ key, while in previous versions of Premiere Pro markers were added with the ‘*’ key on the NUMBER PAD – not the main keyboard! If you didn’t have a number pad you had to add them through the ‘Marker’ menu at the top of the screen – a slow and rather annoying work-flow!
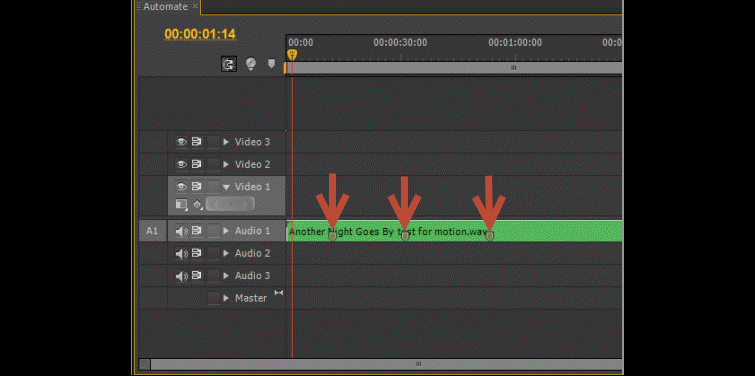
These photo examples give examples of the difference between clip markers and sequence markers:
Clip markers in the source monitor – this won’t work:
Those same markers shown in a timeline (still not usable for this method):
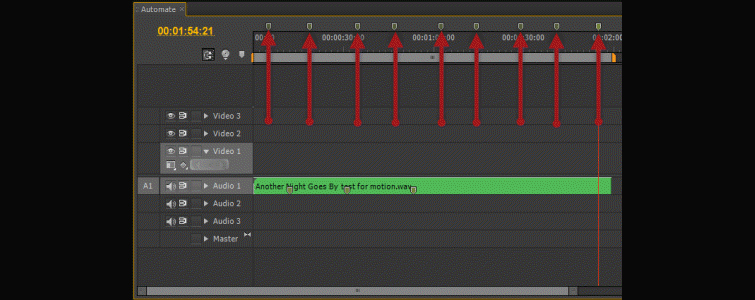
Sequence Markers in the Timeline (added with the ‘M’ key)
This is what you need to make this method work!
Now that you have set your Premiere Pro sequence markers you are ready to automate your assets from the project panel to the timeline. Premiere Pro CS6 allows for very easy setting of ‘in’ and ‘out’ points in the project panel. However, if you set these ‘in’ and ‘out’ points you need to bear in mind that it is likely that one of two things will happen:
- If the sequence markers are widely enough spaced, then your clips will end before they hit the markers. You will end up with space in your timeline.
‘In’ and ‘Out’ Points Shorter than Marker Intervals
- If the sequence markers are closer than your ‘out’ points then you will loose your ‘out’ point for the clip which will be overwritten with the ‘in’ point of the next clip. The next clip will start at the next marker, even if the end point of the previous clip has not been reached yet!
Clips Longer than the Marker Intervals Will Have Their Ends Cropped Off

Bear this in mind, as it may not be preferable to set out points for your assets in your project panel if you are planning to use this method.
AUTOMATE TO SEQUENCE IN PREMIERE
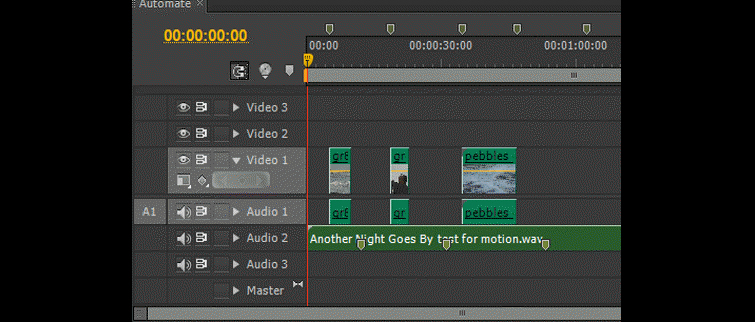
Once your sequence markers are set you’ll want to automate your clips to your Premiere Pro sequence, so that your clips are laid in-line with the in points you placed in the sequence markers.
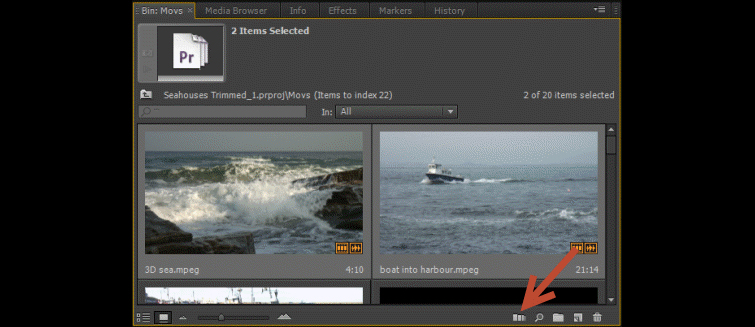
Select your clips in the program monitor in the order you want to drop them into your sequence. Do this while holding the CONTROL key on a PC or the COMMAND key on a MAC. Or, in the project panel arrange the clips in the order you want them to drop onto the timeline and then either click this button…
Automate to Sequence Button
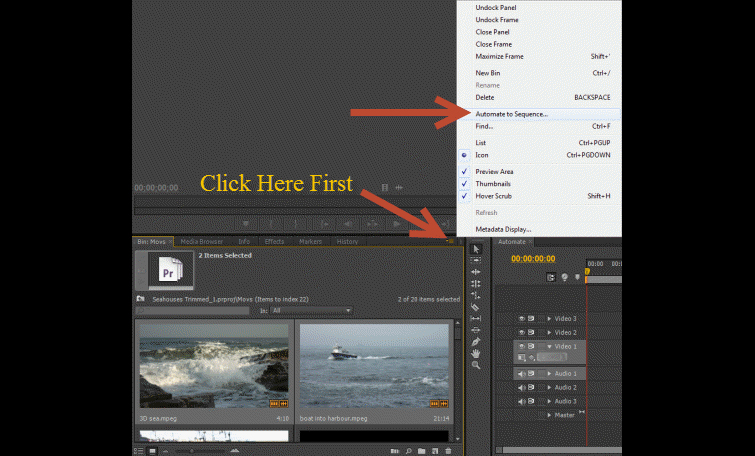
Chose the option from here…
Panel Menu Automate To Sequence
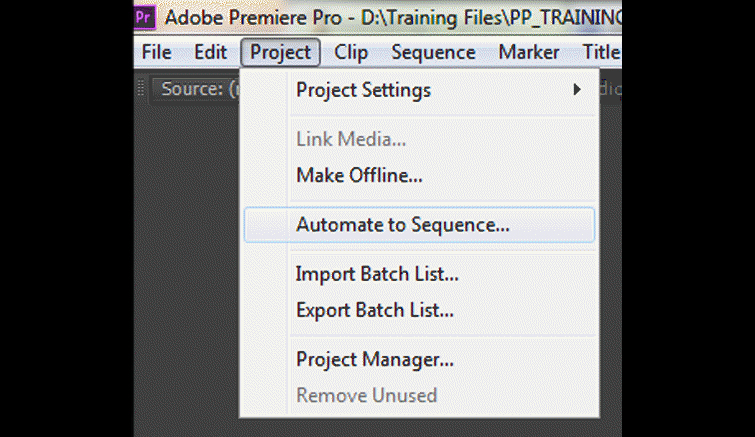
Or chose this menu option.
Project Menu Option
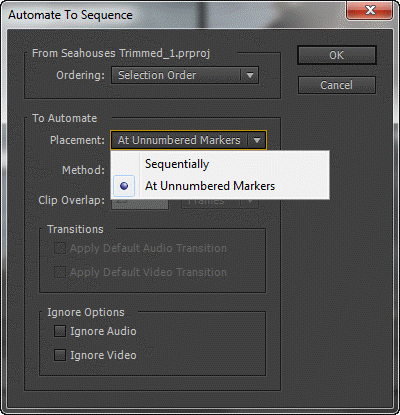
Now look at the dialogue box and make sure you choose the following option, “At Unnumbered Markers”.
Automate to Sequence at Unnumbered Markers
Click ‘OK’ and you will find that your clips will drop into your Premiere Pro sequence with the method you chose (‘sort order’ or selection order’), with their edits points falling at the markers you specified. This Premiere Pro trick is a very quick way to get your timeline filled with timed out footage. Big time saver!


