Using Premiere Pro’s Audio Automation Modes
Discover a quick way to adjust your audio levels in Premiere Pro with Automation Modes!
Want to create audio keyframes in Premiere Pro on the fly? In this tutorial, we show you how to take advantage of the Automation Modes in Premiere Pro — the quickest way to set audio levels in your video editing project. Let’s start by taking a closer look at the Premiere Pro Audio Mixer Panel.
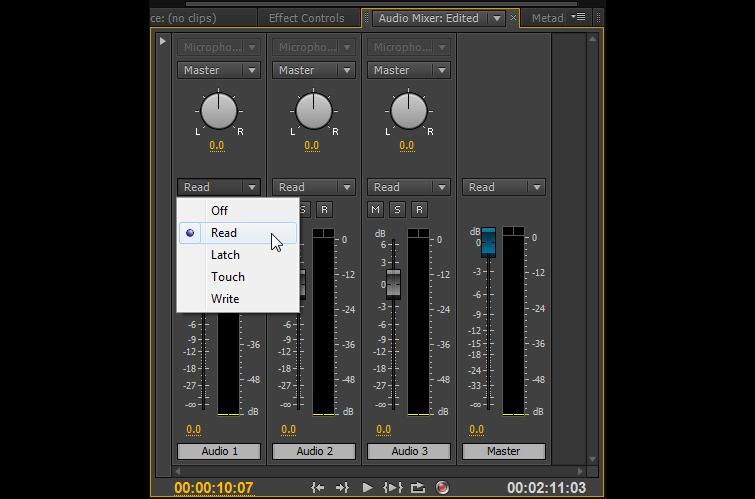
Automation Modes in the Audio Mixer Panel
Read — The default setting for every audio channel, Read simply reads whatever audio level animation there is on the channel. Because you start without any animation, this means the fader stays at 0 until you change it. While using Read, you can change the value and the fader will stay where you put it — but no animation will be made. You are simply setting a value, not changing it over time.
Off — Simply turns the fader behavior back to the same as Read before any animation has been added. In other words, Off will ignore all audio animation on that track and just look at whatever value you’ve set the fader to.
Write — Perhaps the most fragile of all the automation modes, in that wherever you’ve put the fader and wherever you move the fader once playback has commenced, will be recorded and will overwrite any animation that may have been there before.
The big issue with Write is that recording starts as soon as you hit the spacebar — and that recording will write over whatever has gone before. Because of this, there is a default behavior in that once you hit the spacebar again to stop recording, the automation mode will change from Write to Touch, as this is a non-destruction automation mode. It won’t write over any previous animation until you make a change.
You can change this default behavior if you want by unchecking it in the Audio Mixer Panel’s panel menu as shown below. However, I wouldn’t advise turning it off until you are used to using these modes. It is meant as a safeguard. Personally, I like the default behavior and would only turn it off for specialized audio work and not for general projects.
We’ll cover Touch and Latch later.
Switch to Touch After Write Option in the Panel Menu
When you make any changes using an automation mode, you’ll be adding keyframes to the track. However, the default behavior of Premiere Pro is to show Clip keyframes rather than Track keyframes. So if you want to see the keyframes you’re creating when you animate with automation modes (or when you animate track audio in the timeline), you will need to select the option in the track header as shown below.
Showing the Track Keyframes
Touch is perhaps my favorite automation mode, in that it has a built-in option that automatically returns it to its start value when you let go of the fader. It works like this…
Before selecting Touch, it is also best to set the starting point for your fader (as this will be the value the fader will automatically return to). Then, when you hit the spacebar and move the fader, the fader will move to whatever value you take it to. Once you let go, the fader will automatically drift back to that starting value over a predetermined amount of time.
We can set this amount of time in our preferences by changing the Automatch Time to a different value in seconds. This is found at the top of the Audio tab in your preferences.
Automatch Settings for Touch
Depending on your production, one second may be too fast or too slow, so having this extra control is very valuable for editors. Latch is very similar to Touch in that it always returns to the starting value you give it — but only when you stop and then start again.
Keyframe Optimization in Premiere Pro
There is one more somewhat hidden option for Automation Modes in the Audio section of your preferences. This is the Automation Keyframe Optimization.
Automation Keyframe Optimization Option in the Audio Section of Preferences
Automation Keyframe Optimization is a way to control the number of keyframes that are created when you animate the faders. For me, the default behavior is usually fine, but sometimes (especially on older machines) lots of keyframes can cause some problems.
As you can see from the greyed out box above, the default minimum time between keyframes is 20 milliseconds, creating a typical animation curve in the timeline something like the following…
Default Keyframe Production
It is unlikely that you would need to create keyframes even closer than this, but, of course, it is always possible. Thus, this option is most often used to create less keyframes which would mean increasing the value from 20 milliseconds. For example, here is what the timeline would look like if I changed that value up to 200 milliseconds.
Increasing the Value to 200 Milliseconds
Keyframes in the Timeline at 200 Milliseconds
While this is an option, the end results tend to be a little too clunky for my liking. Seen side by side, you can clearly see which value (20 and 200) will give the smoothest results.
20 Milliseconds and 200 Milliseconds Automatch Keyframes
Like all things, these modes will take some practice. At first you will move the fader too much or too little and need to try again. So, keep at it and enjoy using these powerful Automation Modes in Premiere Pro. As always, if you’d like to dig deeper into the Premiere Pro workflow, PremiumBeat’s blog has everything you need to up your video editing game.
Got any go-to Premiere Pro video editing tricks? Please share them with the community in the comments below!


