

Dynamic Editing & ‘Play Around’ in Premiere Pro

In this post, discover how to make precise edits during playback in Adobe Premiere Pro – this is dynamic video editing!

Premiere Pro makes it possible to dynamically trim your edit points while playing through your timeline. As playback loops around an edit point you can make precise cuts – especially useful for more complex projects as well as timing edits to music cues. To make this possible we’ll need to modify our ‘Play Around’ and ‘Loop’ settings in Premiere. So, let’s dive in…
The first step is to know how to use the ‘PLAY AROUND’ function. You can either add a button to the program monitor for this function or learn the keyboard shortcut for it. I’ll show you both:
The ‘Play Around’ Button in Premiere
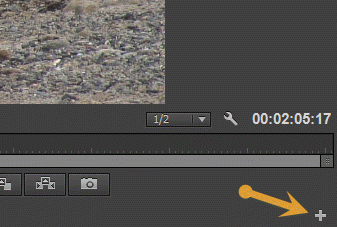
When you click on this button at the bottom of the program monitor (or the source monitor) …
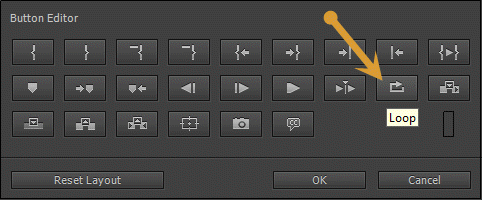
Button Editor
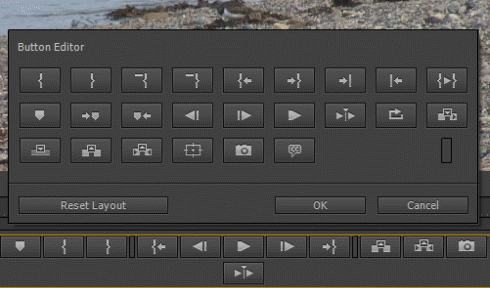
… you get the following optional buttons which you can drag and drop alongside or underneath the present buttons in your monitor.
Button Options
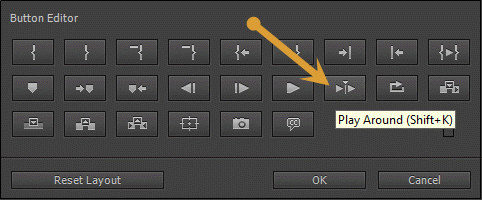
While you can add the button to your present set of buttons and then click ‘OK’ to close the box, if you hover over any of the buttons you get a tool tip telling you what the keyboard shortcut is (if that button has one). Below I have hovered over the ‘Play Around’ button and you can see that its shortcut is ‘SHIFT + K’
‘Play Around’ Button and Short-Cuts
Now you know what the shortcut is there’s no need to add the button and clutter up your monitor panel (but you certainly can if you choose).
How Does ‘Play Around’ Work?
In Premiere Pro, ‘play around‘ will will play a predetermined amount of seconds before and after a playheads starting position. The ‘play around’ default in Premiere Pro is set at 2 seconds before and 2 seconds after – giving a total play time of 4 seconds.
This figure is set in your Premiere Pro preferences and can be changed to any length you wish. Simply go to your preferences: Premiere Pro > Preferences > Playback (on a MAC) or Edit > Preferences > Playback (on a PC). You can change that number here:
Play Around Timings
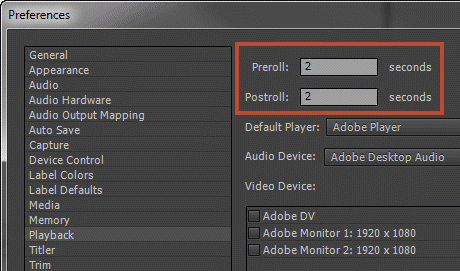
Pre-roll is the amount of time in seconds Premiere Pro will play before the starting point of the playhead and post-roll is the amount of time in seconds that Premiere Pro will play after the starting point of the playhead.
For me, 2 seconds for both pre-roll and post-roll is a little long and I often find that 1 second for each is sufficient – but set it to whatever works best for you. Just as a side note, you can’t set these to fractions of a second – only to whole seconds.
Looping Playback in Premiere Pro
Presently, we can use ‘Play Around’ with our SHIFT + K shortcut but it will only play once and then stop. What we want is for ‘Play Around‘ to continuously loop as we work on the edit point so that we don’t have to keep starting it over and over again. This is done with the ‘LOOP’ function.
Once again you can add a button from the Button Editor to have a button for ‘LOOP’ in your monitor (and if you need to turn it on and off often then this may be a good option). This is the ‘LOOP’ button if you want to add it …
‘LOOP’ Button
If you really do end up using this function a great deal it may be worth creating a keyboard shortcut for it.
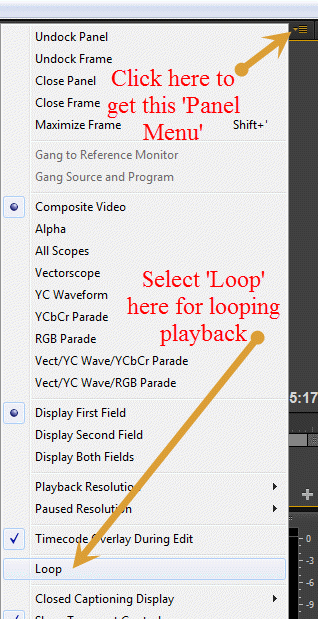
However, there is another way to set the ‘LOOP’ function through the panel menu and this is a good way to set it up so that it keeps looping. This works well if you don’t need to keep turning the ‘LOOP’ function off and on.
Panel Menu ‘LOOP’ Option
Now that we have both ‘Play Around’ and ‘LOOP’ set up – when we hit SHIFT + K our play-head will keep looping around the place ut was originally set, until we hit the spacebar or K to stop playback.
Now, let’s move on to editing.
Dynamic Editing in Premiere Pro
To start dynamic editing in Premiere Pro we need to get into the edit mode and this is done by simply hitting the ‘T’ key. This will snap the playhead to the nearest edit point and give us the ‘ROLLING EDIT’ tool by default.
Entering Trim Mode
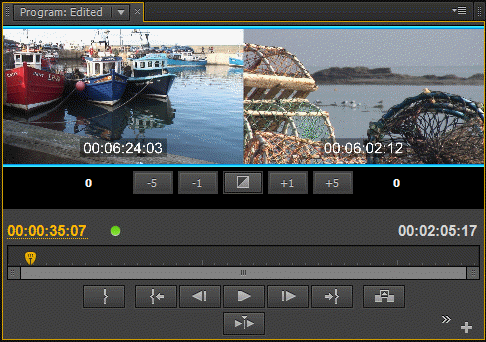
Our ‘Program Monitor’ will look something like this:
Program Monitor in ‘TRIM’ Mode
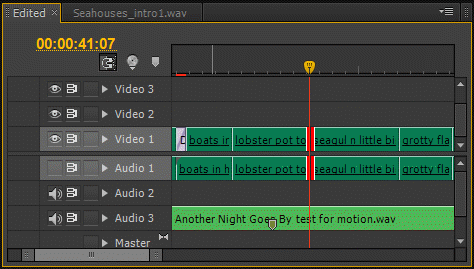
However, when we hit SHIFT + K to start ‘Play Around’ it seems that we may have exited TRIM mode because our program monitor starts to show the 2 seconds before the play-head and the 2 seconds after the play-head and the TRIM display has gone. But do not be deceived, if you look in your timeline you will see that the edit point it still active (shown in red – see above) and available for editing.
Trimming Shortcuts in Premiere
What we need now is the ability to move the edit point right or left as needed and while this can be done with the mouse (click and drag on the edit point), the whole point of this editing technique is to get as fine control as possible over the dynamic edit. So, the best way to do this is with keyboard shortcuts while in the ‘Play Around’ mode.
For a quick reminder of what the trimming keyboard shortcuts are, go back to TRIM mode by pressing ‘T’ again and getting the Program Monitor window shown above. Then hover over the buttons shown below to get the appropriate keyboard shortcut (+1 frame, -1 frame, etc). See our previous post on using “Trim Mode” in Premiere Pro for more details on trimming shortcuts.
Here’s how dynamic trimming should work….
- Hit SHIFT + K to start ‘Play Around’ and look at your edit in the Program Monitor.
- Then, use ALT + Right/Left Arrow keys (on PC) or OPTION + Right/Left Arrow Keys (on Mac) to trim your edit point frame by frame.
- You will see it update ‘live’ as the playback continues (because you have the ‘Loop’ mode activated).
If you end up trimming a clip beyond the present view, simply stop playback, reset the placing of your playhead and hit SHIFT + K once again.
Then, when you want to get to the next edit point use the DOWN arrow to go down the Premiere Pro timeline or the UP arrow to come back up the timeline, hit SHIFT + K and off you go.
This type of dynamic trimming in Premiere Pro can become second nature if used regularly. Happy editing!


