

Trim Mode in Premiere Pro CS6

One of the big additions in Premiere Pro CS6 is the enhanced trimming features. In this post you’ll learn how to trim quickly with the new Trim Mode and keyboard shortcuts.

Discover how to use the new Trim Mode in Premiere Pro CS6 to speed up your edits! In this post, we’ll cover trimming in Premiere including how to perform an edit in trim mode and modifying the large trim offset. Lastly, we’ll take a look at trimming with shortcuts in Premiere Pro – a surefire way to streamline your editing workflow.
Performing an Edit in Trim Mode
In Premiere Pro, you can edit in trim mode by putting your playhead near the edit point you want to trim and pressing T.
Remember: T is for “Trim”

This selects the nearest edit point and puts you in Trim Mode. The Program window will change to show you the outgoing and incoming clips, with trim backward and trim forward buttons below the clips (-5, -1, and the default transition button):
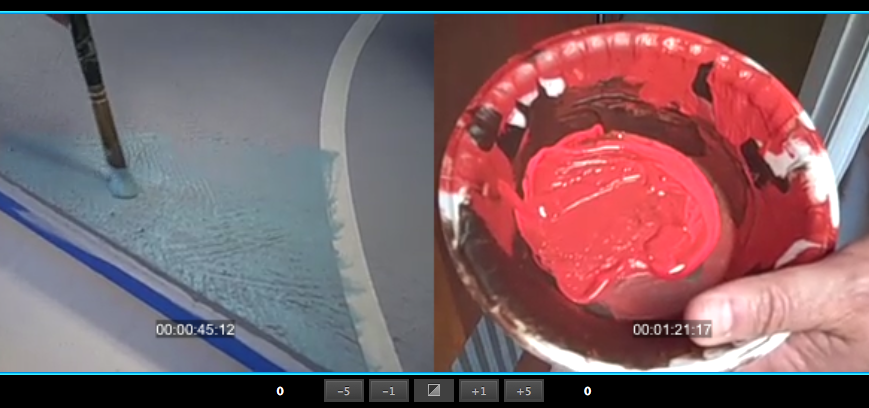
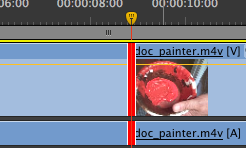
This puts you into a Roll (displayed as dual sided Red). Toggle through the trim tools by using the shortcut Control + T (on a Mac) or Shift + T (on a PC. This will toggle you to a Ripple (displayed as one-sided Yellow) and Regular Trim (displayed as one-sided Red). Unlike Final Cut Pro, Premiere Pro also toggles to the selection editing tool (displayed as one-sided Red arrow) which will leave a gap. Watch out for that!
To perform a Trim, click the -1 or -5 numbers in the Program Window. You can also add the default video/audio transitions by clicking the default transition button.
The white numbers on the far left and right show you the total frames you have trimmed (if you clicked the -5 trim backwards 3 times, the total would be -15).
I personally like trimming while the edit is looping by clicking the Play button (your view will change to the clip that is playing), and pressing the trim backward/forward buttons. This type of real time editing allows you to really fine tune your edit while visualizing the result. Remember there is no right or wrong way to trim. That’s why Premiere Pro offers various methods of working.

Set the Large Trim Offset in Preferences
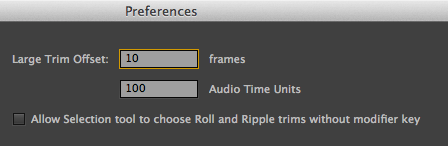
Want more trim offset? Premiere Pro allows you to change the Large Trim amount (the default is 5)
On a Mac go to Premiere Pro > Preferences > Trim. On a PC its Edit > Preferences > Trim PC. Change the Large Trim Offset to 10 frames. After changing the Offset, you will see the new values in Trim Mode (see example below).
![]()
Trimming with Keyboard Shortcuts
Using shortcuts are the fastest way to trim in Premiere Pro. They may take some dedication to stick in your workflow, but force yourself to use them and after a while they’ll become second nature.
You can trim 1 frame to left with the shortcut Option + Left Arrow (on Mac) or Alt + Left Arrow (on PC). Similarly, trim 1 frame to the right with the shortcut Option + Right Arrow (on Mac) or Alt + Right Arrow (on PC).
The shortcuts for trimming with the large trim offset are Option + Shift + Left Arrow or Option + Shift+ Right Arrow (Substitute Option for Alt on PC).

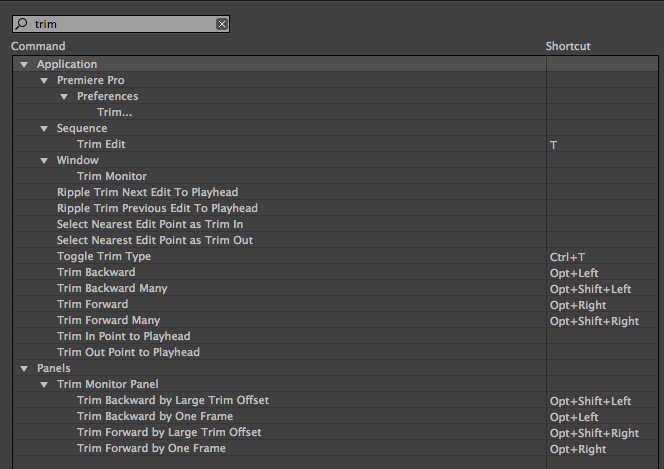
You can also modify the Premiere Pro keyboard shortcuts to add ones you like. Below you can see all the trim commands that aren’t mapped to a keyboard shortcut. If you’re doing a lot of repetitive trimming its more than worth it to take the time to map the shortcuts that are most useful.
Check out the complete list of default Premiere Pro shortcuts here.
Are you using the new Trim Mode in Premiere Pro CS6?
Got tips to share? Let us know in the comments!


