Make The Most of The New Features in Adobe Speedgrade

Discover the updates to Adobe Speedgrade 2014 and learn from the pros that are using it.
With the constant updates pouring out of the Adobe Creative Cloud coding team it can be tough to keep up with the latest developments, but in this demonstration from the IBC convention in Amsterdam, Jason Levine takes you through the latest features in Adobe’s color grading software – Speedgrade CC 2014. These features are available today in the October release of Speedgrade. The previous update to Speedgrade was two months prior in June 2014. Do these people ever sleep?
Some of the highlights include:
- Refined user interface with HiDPI support
- Grading layer grouping
- Curve adjustments
- Hover preview Looks
In this 10 minute walkthrough, Dave Andrade talks you through some of the key updates from the June release of Speedgrade CC 2014.
If you want to give Speedgrade CC 2014 a whirl for yourself you can download a free trial right here. Also to get you started here is a quick tip from colorist Mathieu Marano.
Thanks RT @AdobeSpeedGrade: Shift+Cmd+Up Arrow (or CTRL on Win) – complete list of #SpeedGrade keyboard shortcuts – http://t.co/5AG9JIEKz6
— Mathieu Marano (@ilovehue) May 7, 2014
Adobe Speedgrade CC Tutorials and More
In this short tutorial and accompanying write up, Bart Walczak demonstrates how to perform a quick primary adjustment on a clip in Adobe Speedgrade in under 5 minutes. This is the foundational process for creating a look in Speedgrade.
One of the key features of Adobe Speedgrade CC is it’s tight integration with Adobe Premiere Pro CC. In this step by step guide from Wolfcrow you can learn how to send a project from Premiere to Speedgrade and back again. One thing that is important to understand is the difference between dynamic link and direct link. In this handy blog post from the Speedgrade blog you can discover the differences between the two and how you might use either, depending on your workflow.
With Direct Link, the whole Premiere Pro project (.pproj) can be opened in SpeedGrade. No file conversions or XML-based translations are involved; you get the complete native Premiere Pro timeline, except that it’s in SpeedGrade.
Dynamic Link works between two applications running in parallel on the same machine (and sharing the same memory). Dynamic Link is great for doing work on specific clips. You get immediate feedback and can make changes on the fly moving back and forth between After Effects and Premiere Pro while you perfect a composition within your editing project.
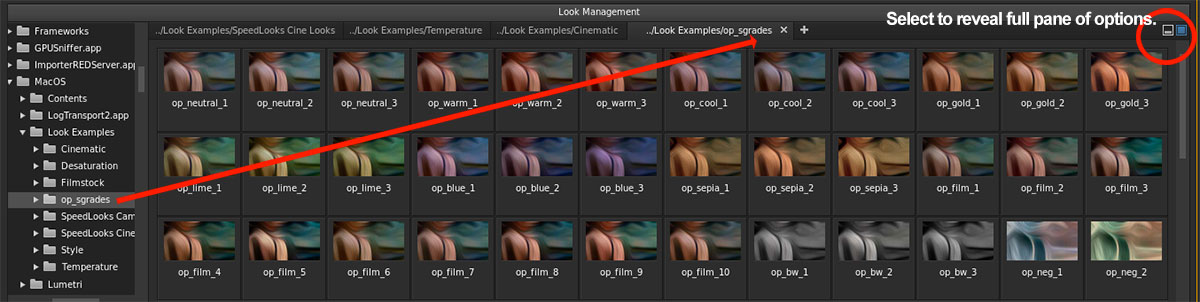
One of the core features of the Speedgrade/Premiere CC workflow is the Lumetri deep colour engine which underpins the sharing of Looks (colour grading presets) between both applications. In this post from writer and editor Oliver Peters you can download a stack of free Speedgrade Looks to use in your projects. In the post Oliver explains how to install and use the presets in a few clicks. Who doesn’t love free!
Since each of these presets was built on the same log-encoded (flat) image, you will need to adjust the grade according to the image you apply it to. In all of these, the first Primary layer (bottom of the stack) will be the same and is used to neutralize the image. The sliders I adjusted include input saturation, pivot, contrast, temperature and magenta. Only the global settings were adjusted in this layer. You can tweak it, hide/disable it or replace it with a LUT adjustment instead. I have stayed away from camera LUTs, as a way of neutralizing the image, because these will drastically affect the other corrections in the stack – often in unpredictable ways.
Lastly, be sure to head over to the official training site from Adobe for a whole host more free training on Speedgrade CC 2014.
Grading a Feature Film in Speedgrade

Filmmaker and Editor Vashi Nedomansky has been working to finish feature film The Grind for the past five years. In this extensive post he details how he has made use of the entire Adobe Creative Cloud filmmaking suite of applications to edit, mix, create visual effects and colour grade his film. The entire post is well worth a read but I found this quote on why he chose to use Speedgrade over something like DaVinci Resolve to give his film it’s final polish.
I’ve used Davinci Resolve to grade my last 3 feature films but will be switching to SpeedGrade to finish THE GRIND as I won’t have to deal with XML exports, conforming the different formats, aspect ratios, lack of timecode in DSLR footage and many other bumps in the road that extend my already long days.
At the end of the day, creatives just want to get the job done and done well, and the most frictionless path to achieving that goal, wins.