Getting Started with Keyboard Shortcuts in Premiere Pro
Learning keyboard shortcuts may seem daunting, but it’s worth the effort in speeding up your workflow! In this post, we’ll take a look at some of the most important Premiere Pro keyboard shortcuts.

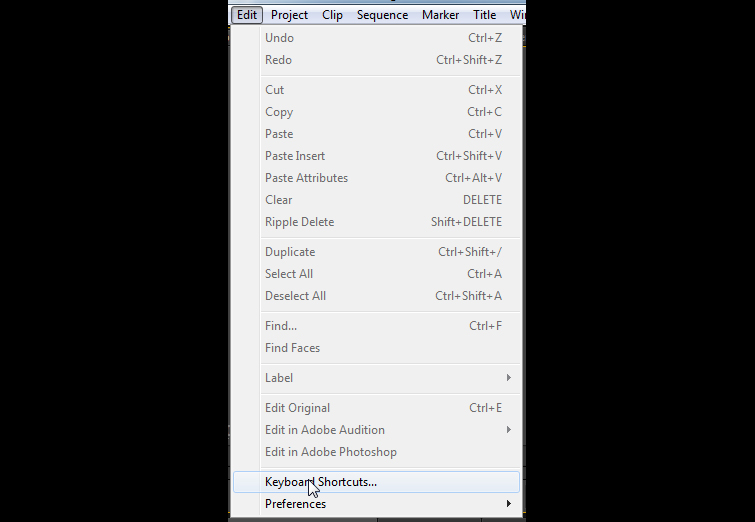
Any professional video editor will tell you, knowing keyboard is integral in having a speedy video editing workflow. You may already be familar with using shortcuts to edit in Final Cut Pro or Avid, and may not be keen on learning a new set of shortcuts for Adobe Premiere Pro. Do not fear! Premiere Pro offers the option of using either the FCP or Avid shortcuts if you prefer. To access these shortcuts from the menu bar click on Edit (on Windows) or Premiere Pro (on Mac). Then, select the Keyboards Shortcuts option:
This will open the keyboard shortcuts option box. From here you can select which format you’d like to use from the top drop-down menu (includes CS6, CS5.5, Avid Media Composer 5 and Final Cut Pro 7 layout options).
Selecting a Different Keyboard Layout
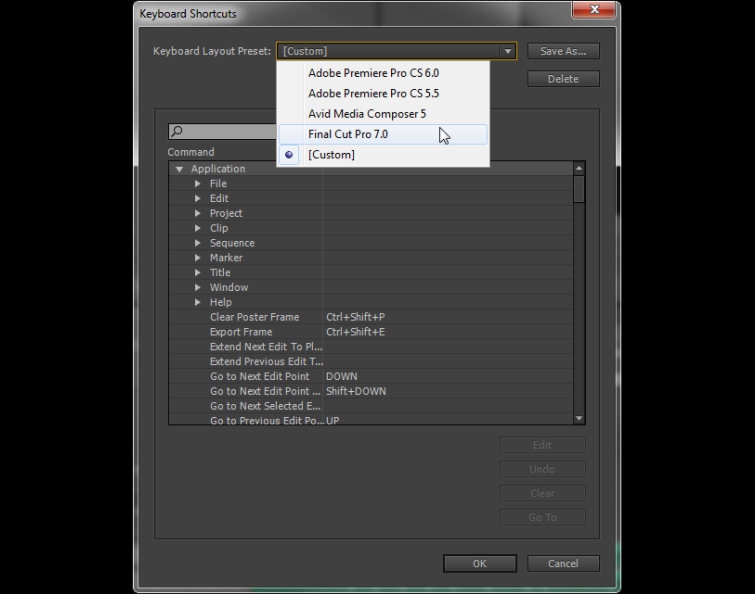
It should also be noted that keyboard shortcuts are editable in Premiere Pro. To edit a shortcut, simply find the property you wish to add a shortcut to or change a shortcut for, and then select it. This will then bring forward the ‘Edit’ button:
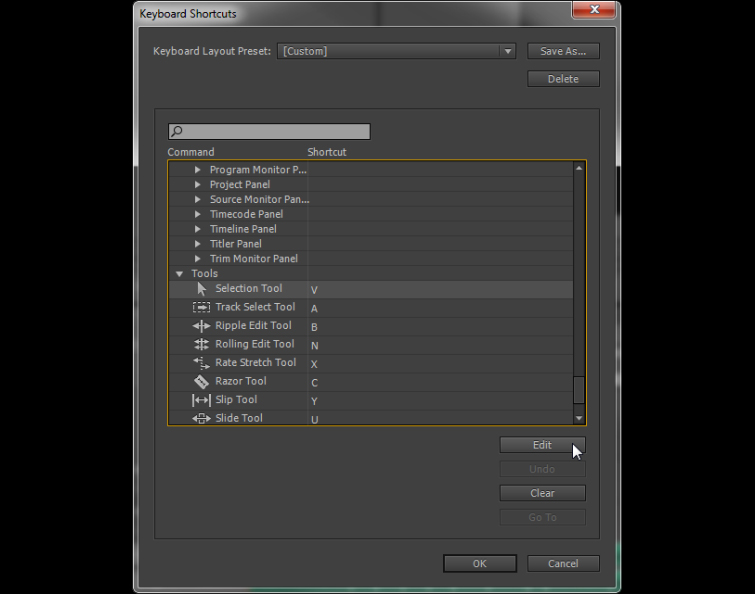
When you click the ‘Edit’ button the shortcut becomes editable and you can choose a new shortcut as needed. However, if you choose a shortcut that already exists you will get a warning message telling you that you have removed that shortcut from another tool! If this is OK, then click OK and carry on.
Warning Message When Selecting An Existing Shortcut
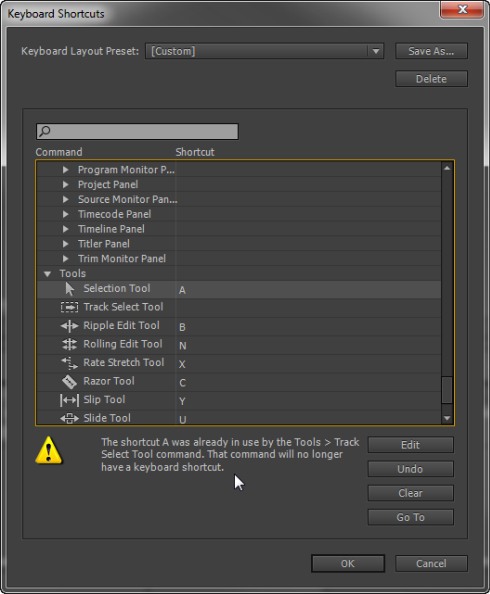
Otherwise, hit ‘Undo’ to take things back to how they were and then choose another shortcut.
Essential Premiere Pro Shortcuts
Where should you start? Check out these must know shortcuts for navigating the timeline and choosing clips in Adobe Premiere Pro. Import: CTRL + I (PC) or CMD + I (Mac) Quickly import media into your Premiere Pro project with this handy shortcut. CTRL/CMD + I will bring up the import media dialog box. It is the same as choosing File>Import from the menu bar.

Note that the shortcut is shown in the drop-down menu to help you learn it.
When you see these, try and start to use them so that over time they can become a natural way of working.
Choosing In and Out: I or O The next set of shortcuts have to do with selecting which parts of a clip you would like to use. If you are either hover scrubbing in the project panel (or you’ve double clicked the item to have it open in the source monitor) it is likely that you won’t want the whole clip. Instead, you’ll just want to select a portion of a clip. This is where you can use the I and O keys to select the IN and the OUT points of the clip you are looking at.

For example, if hover scrubbing in the project panel – tap “I” to signal where you’d like to clip the start and “O” when you get to the part where you’d like it to end. Then, when you click on the clip in the project panel you will see an orange line denoting where you hit the I key and where you hit the O key (your in and out points).
In and Out Points Selected For Clip in the Project Panel

The premise behind using the I and O keys is that you can use a combination of mouse and keyboard to quickly and easily select the portions of the clips you want. However, if you are finding that hover scrubbing isn’t precise enough for you then once the clip is selected you can use the next set of shortcuts.
Video Editing Shortcuts for Premiere
Note, the next set of Premiere Pro shortcuts are right under the I and O keys on a standard keyboard – this is not by accident!

First, select a clip in the project panel, the source monitor, the timeline OR the program monitor. Tap L and the clip will play. Tap L again and the clip or timeline will play back faster. Tap K and it stops. Tap J and the clip or the timeline will play backwards. Tap again and it plays backwards faster and so on. These three keys are the basis of all video editing keyboard shortcuts and should be being used all the time in your workflow. In fact, you can even use them to play your clip or timeline in slow motion! Hold the ‘Shift’ key while you tap J or L and the timeline will play forwards or reverse in slow motion. Under the K/L keys are the ‘,‘ and ‘.‘ keys. When you’ve selected an In and an Out point for a clip in the project panel or the source monitor, the next thing you want to do is drop it on your Premiere Pro timeline. That is where these keys come in.

The , key will cause an ‘Insert’ edit to take place. In other words, it will insert the clip into the timeline wherever your playhead is, while cutting and shifting down any clips to the right of the playhead (to make room for the clip you are inserting). The ‘.’ key will cause the selected clip to go to your timeline from the position of your playhead, overwriting any clip that may already be on the timeline. This is called an overwrite or overlay edit. These shortcuts are important because they enable you to select the portions of the clips you want to use and get them to your timeline quickly for editing. Now, with lots of clips in your timeline, start to use the up and down arrows to quickly move up and down the edit points in your timeline.

There are obviously lots of other shortcuts that I could mention, but these are the essential shortcuts you must know to get started. You can always hover over the tools with your mouse in Premiere Pro and get a tool tip telling you what the keyboard shortcut is for that particular tool. Export: CTRL + M (PC) or CMD + M (Mac) The last shortcut I’ll give you for this post is Ctrl + M (PC) or Cmd + M (Mac). This will open the Export Settings dialogue box for a selected sequence, ready for you to set up for final export.

Learn these simple shortcuts and you will quickly learn how much time using these can save you. I suspect that once you integrate them into your video editing workflow you’ll start looking for them more and more!


