

Smoke ConnectFX: The Color Warper & Secondary Color Correction

We dive deeper and deeper into the effects nodes inside ConnectFX on Autodesk Smoke. In this post, learn how to match color & do secondary color correction using the Color Warper.
Smoke’s Color Warper:
In a previous post, we looked at the original Color Correct Node, which is fine for doing primary color correction and grading work. However, the Color Warper is THE color node to perform complex color correction or artistic color grading on your clips inside Autodesk Smoke.
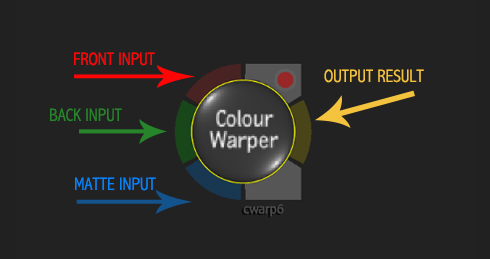
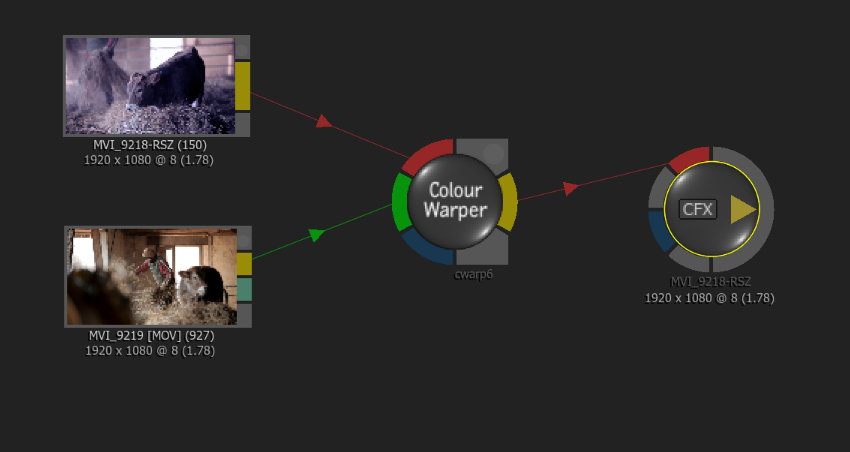
The Color Warper node allows you to perform both primary and secondary color correction. It contains the same Front/Back/Matte inputs as the Color Correct Node, and all of the same basic workflows regarding referencing colors from one clip to another work in the Color Warper as well. But what makes the Color Warper the better choice to use in your ConnectFX workflow are the 3 way color wheels, the use of secondaries, the 2D and 3D vectorscopes in the viewer, and the saving of subsetups. With these tools the Color Warper is better at matching and balancing colors.
The complexity of your color needs will determine whether you choose the Color Correct Node or the Color Warper. If you are unsure how deep you want to go, it’s always best to just jump right in to the Color Warper as all of the tools you need are there, from basic to advanced.
The Smoke ‘Color Warper’ Interface
[Click for larger image]

In Smoke’s Color Warper there are 3 trackballs which operate like the color wheels in many other 3-way color tools or plugins you may be familiar with. The trackballs control the hue of the Shadows, Midtones, and Highlights of an image without affect the luminance. With the Histogram, you can adjust the range controlled by the Midtones. Therefore, when you adjust the Midtone trackball, it will pop back to 0 after the adjustment is made.
The Black and White level sliders control the intensity of the Shadows and Highlights. The Hue and Saturation work like the do in the Color Correct node.
The Gamma controls for RGB will affect the midtones. When you adjust the sliders the curves display will reflect the changes. To adjust all RGB together, CTL+ALT while dragging the sliders.
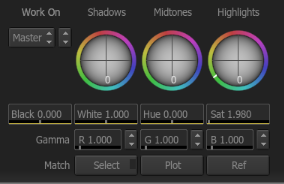
The Match tools, allow you to select, sample, and plot colors which will show up in the Vectorscope to assit you in matching colors.
This button allows you to select the 4 separate operations of Gamma, Saturate, Suppress, and Warp. The trackball underneath then makes the adjustment.
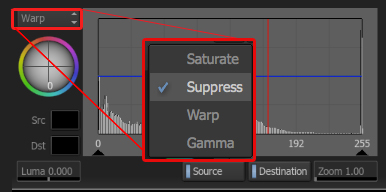
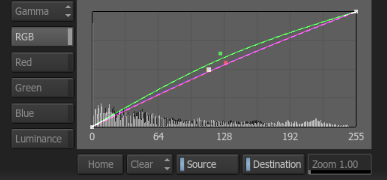
The 2D histogram returns, and when the Gamma option is selected this area switches to the Curves Display. The Histogram and Curves perform like they do in Color Corrector.
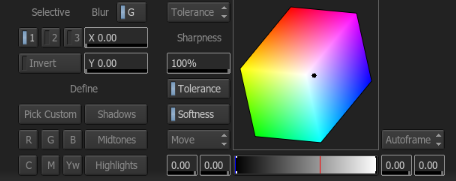
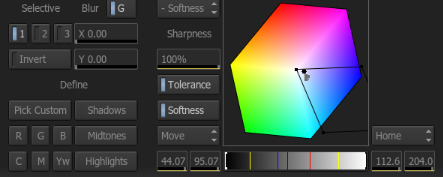
This area is for working with the Secondary Selectives. There are only 3 selective adjustments available with each Color Warper node, but you can stack them, by feeding the output of one CW node into another. You can pick a custom color selection in our image or choose a range of tones – Shadows, Midtones, or Highlights, as well as RGBCMYw channels.

When you pick a selective color operation, a matte is generated to isolate that color in the image for color adjustment. The creation of a matte, means that a key operation was performed. The keyer inside the Color Warper is known as the Diamond Keyer. When a key is made, you will see 2 diamonds appear in the Color Cube. The inner gray diamond, can be used to refine the Tolerance of the key, and the outer black diamond can be adjusted to adjust the Softness. The selective controls also allow you to blur the matte.
The Vectorscope and be changed from the traditional 2D view to a 3D Color Cube by double clicking the scope.
[Click for larger image]
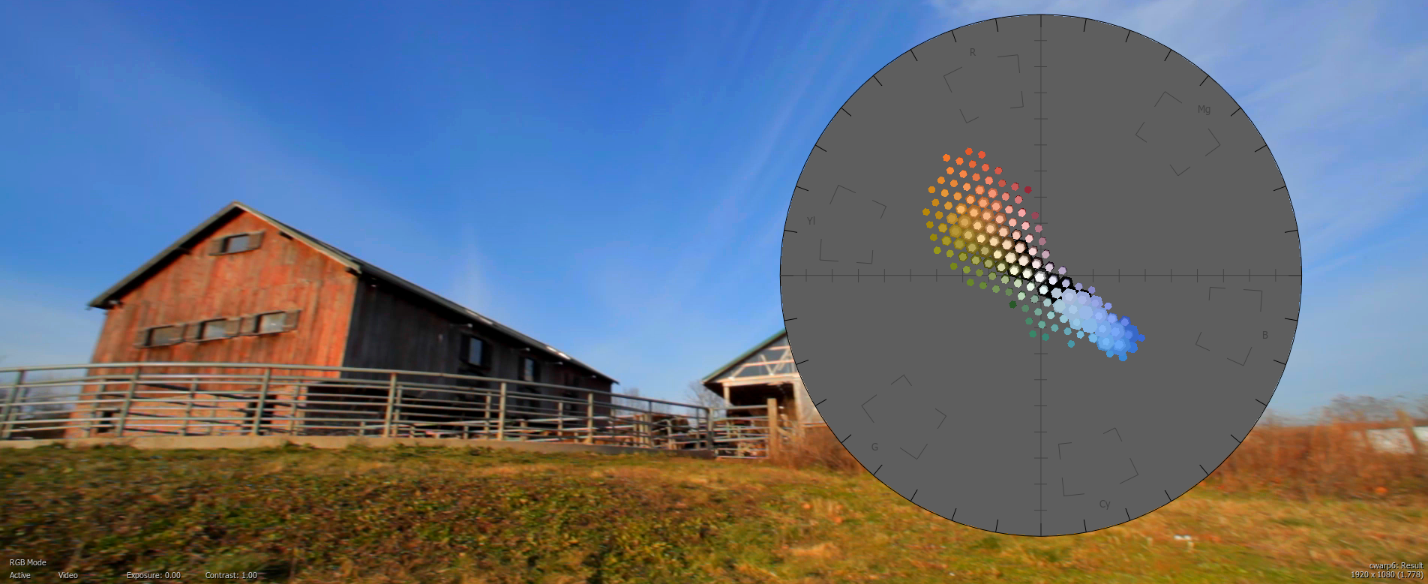
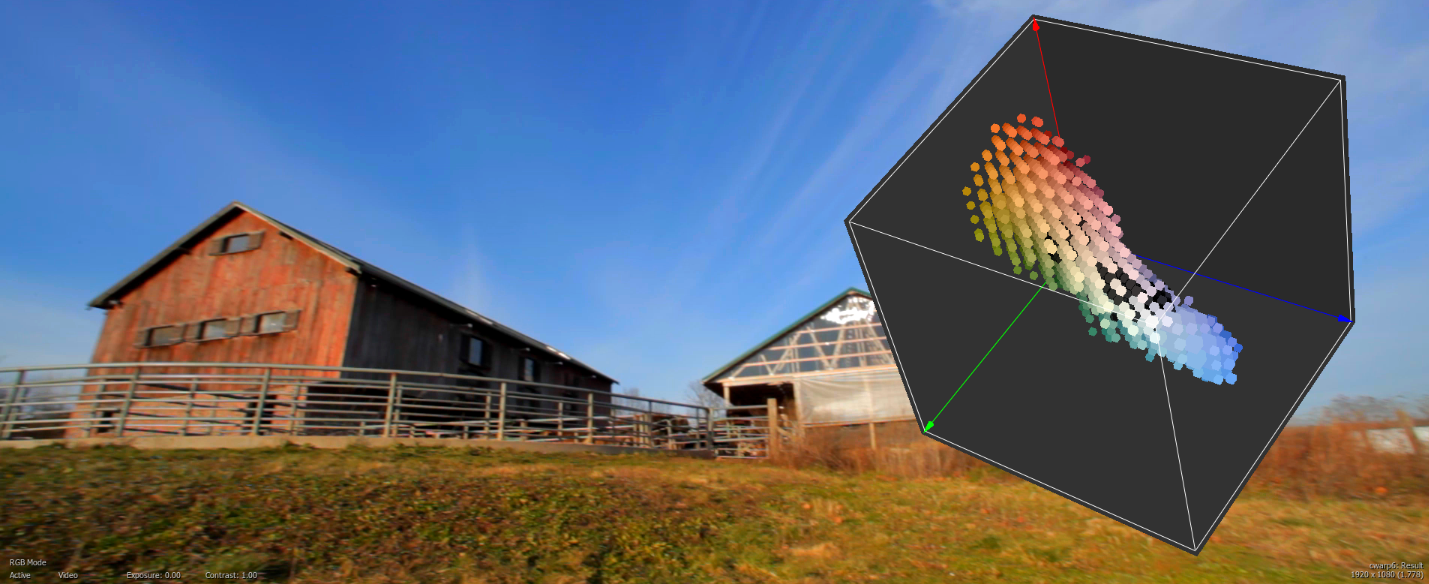
When you plot a color sample you will see it appear highlighted in the vectorscope. CTL+Drag to rotate the cube, SHIFT+Drag to scale it, and ALT+Drag to move the scope.
How to Cancel Out a Color in a Single Image
Here’s a handy track for removing a color cast or suppressing a color in your Smoke project:
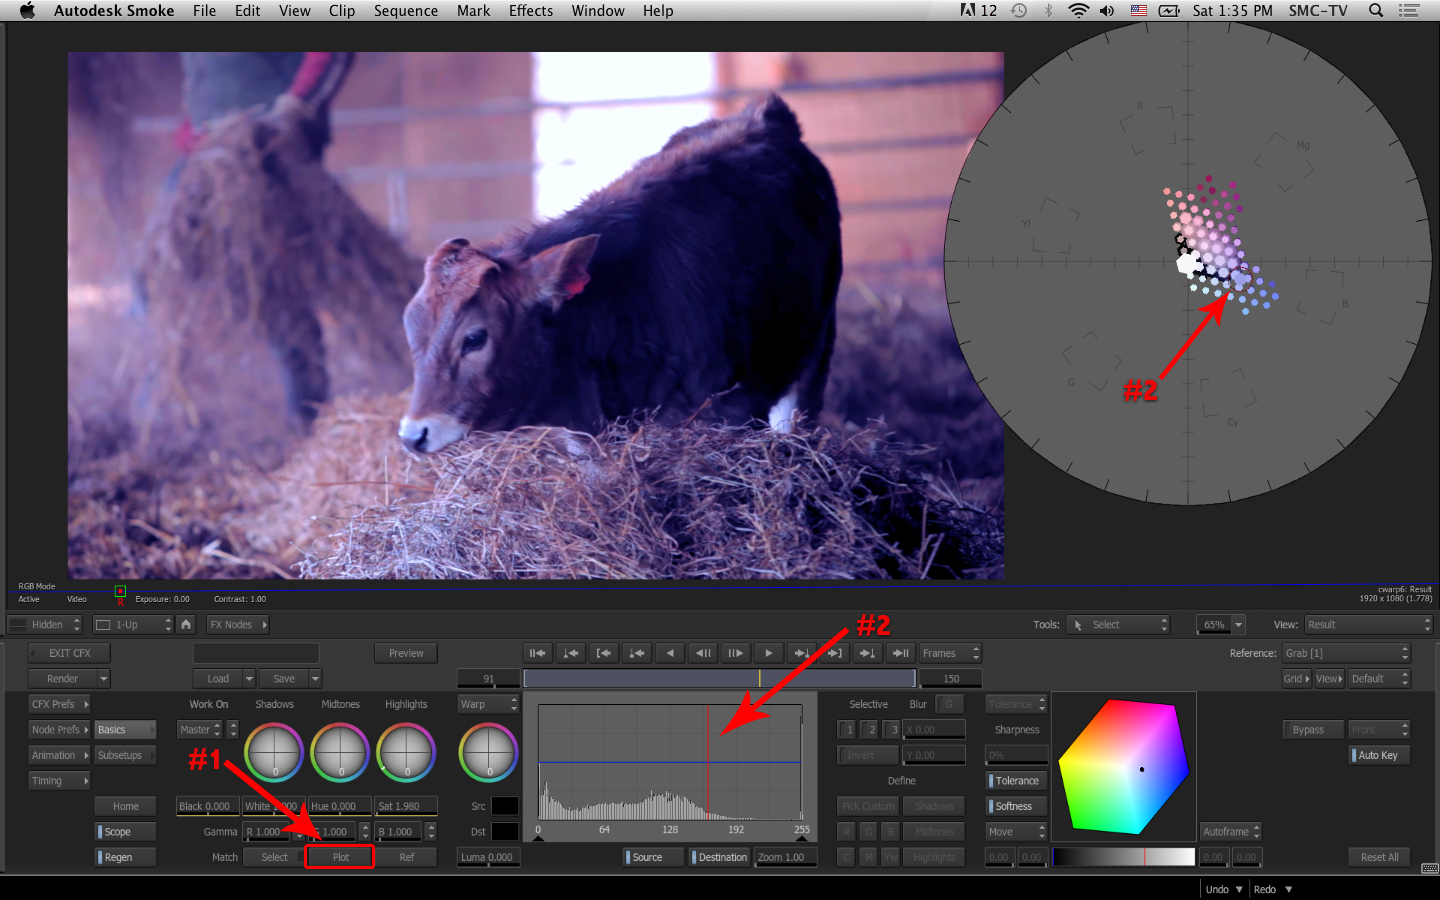
1. Select Plot and then sample the part of the image that you would expect to be neutral.
2. You will see the polt sample appear as a color in the 2D vectorscope with a RED ring around it. You will also see the color plotted in the histogram with a RED line.
[Click for larger image]
3. Adjust the Midtones trackball away from the color cast. You will see the dot in the vectorscope move towards the center.
4. Keep adjusting the trackball until the dot reaches the center point. The color cast is now gone and the image is normal.
[Click for larger image]
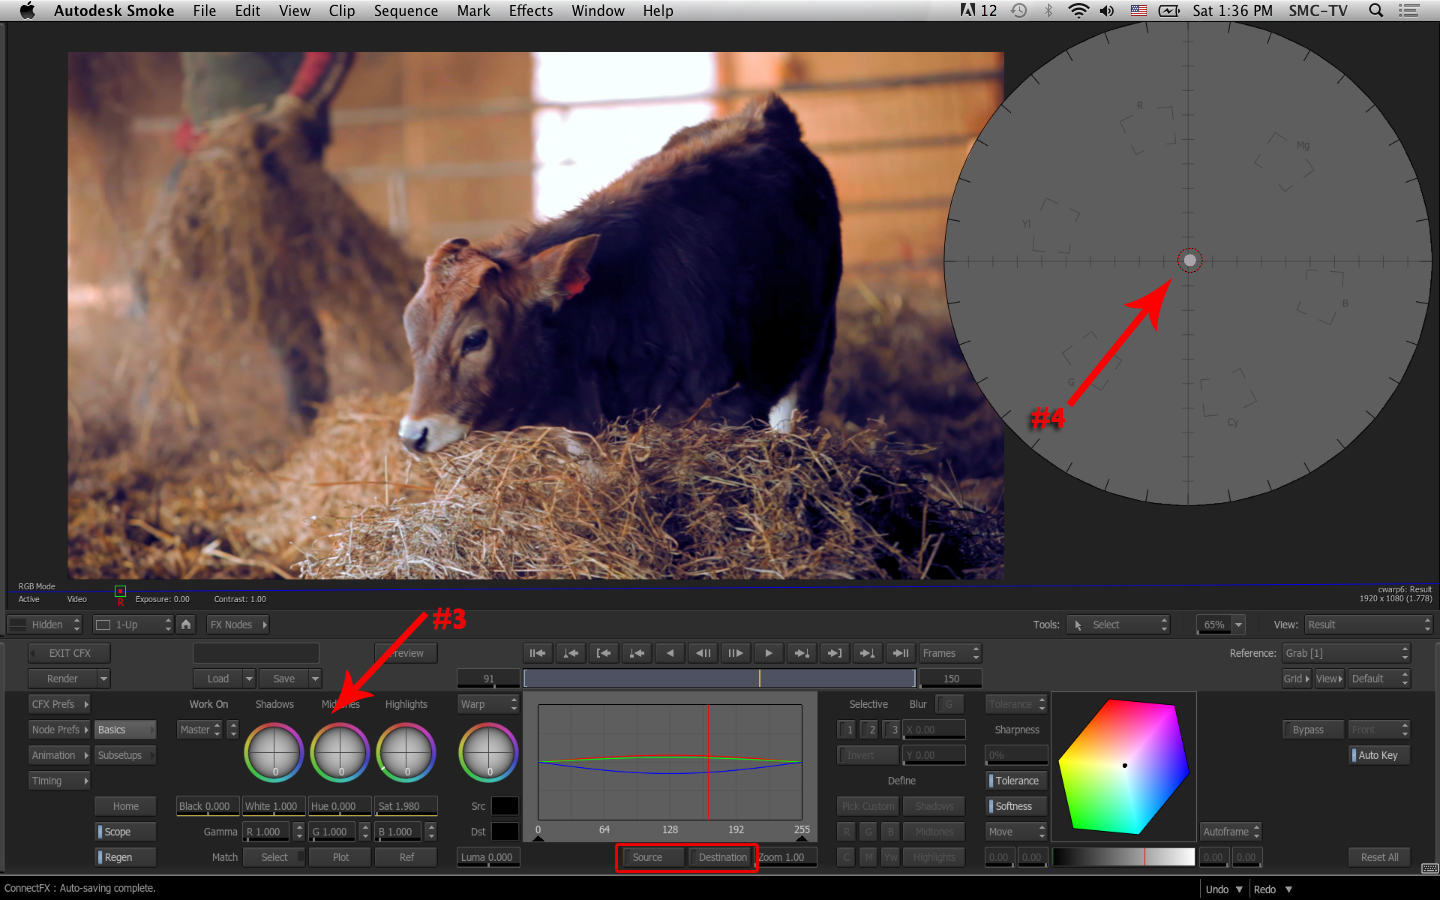
NOTE: You can turn off both the Source and Destination buttons in the histogram and it will isolate just the plot color in the vectorscope so that you can see the position more clearly.
As with many things in Smoke there are multiple ways to get the result you want. You can also use the SUPPRESS option in Smoke to also normalize a shot.
1. Select Suppress from the menu pop-up.

2. Click in the SRC selector and choose a part of the image that you would expect to neutral.
3. You will see the selected color highlighted in the vectorscope.
[Click for larger image]
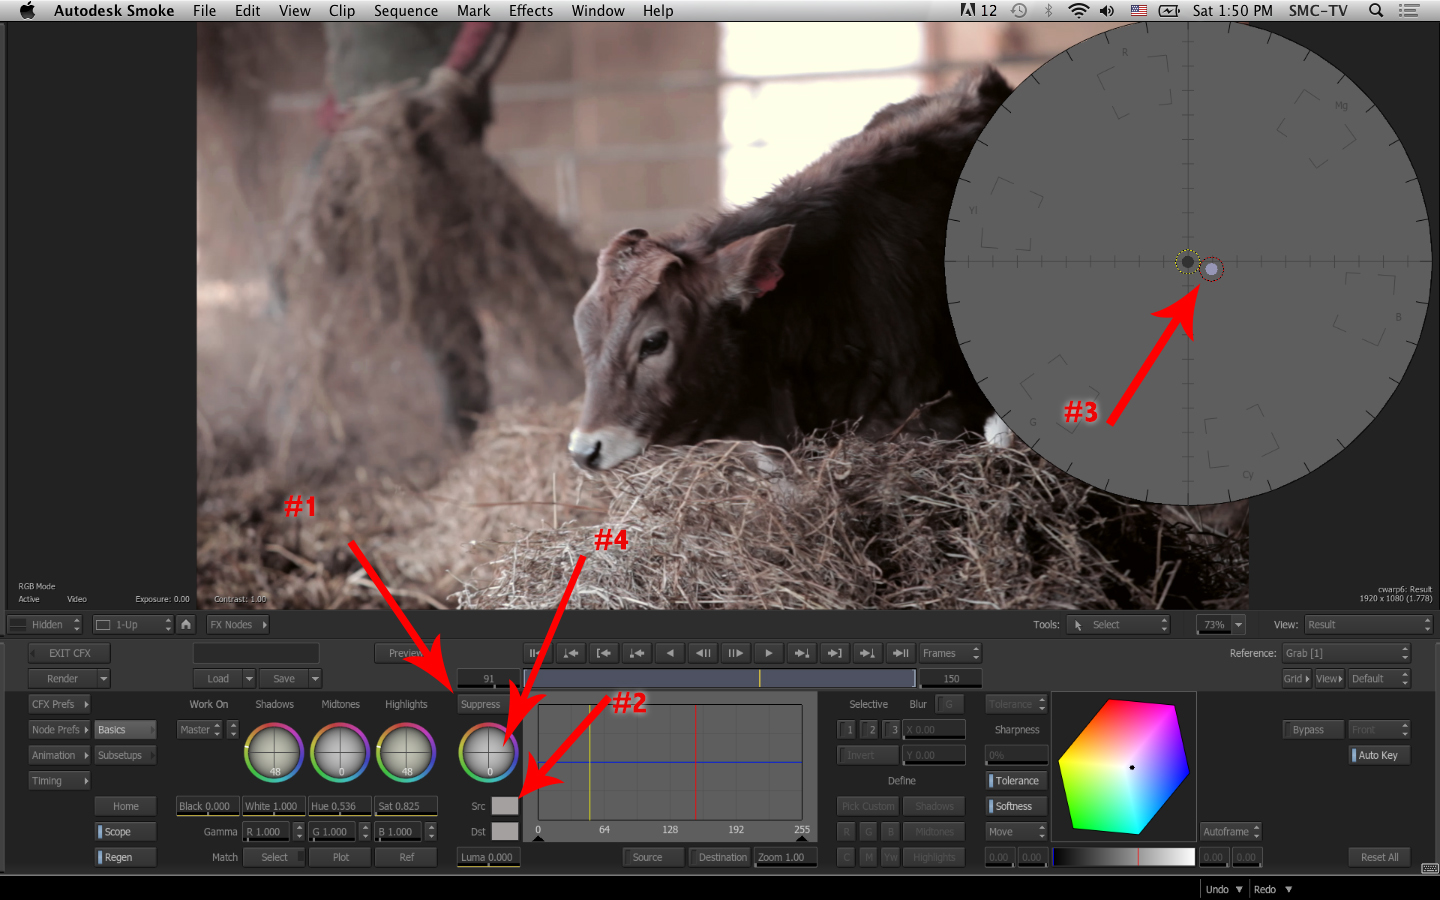
4. Adjust the Suppress trackball away from the color, which will move the selection color towards the center of the vectorscope.
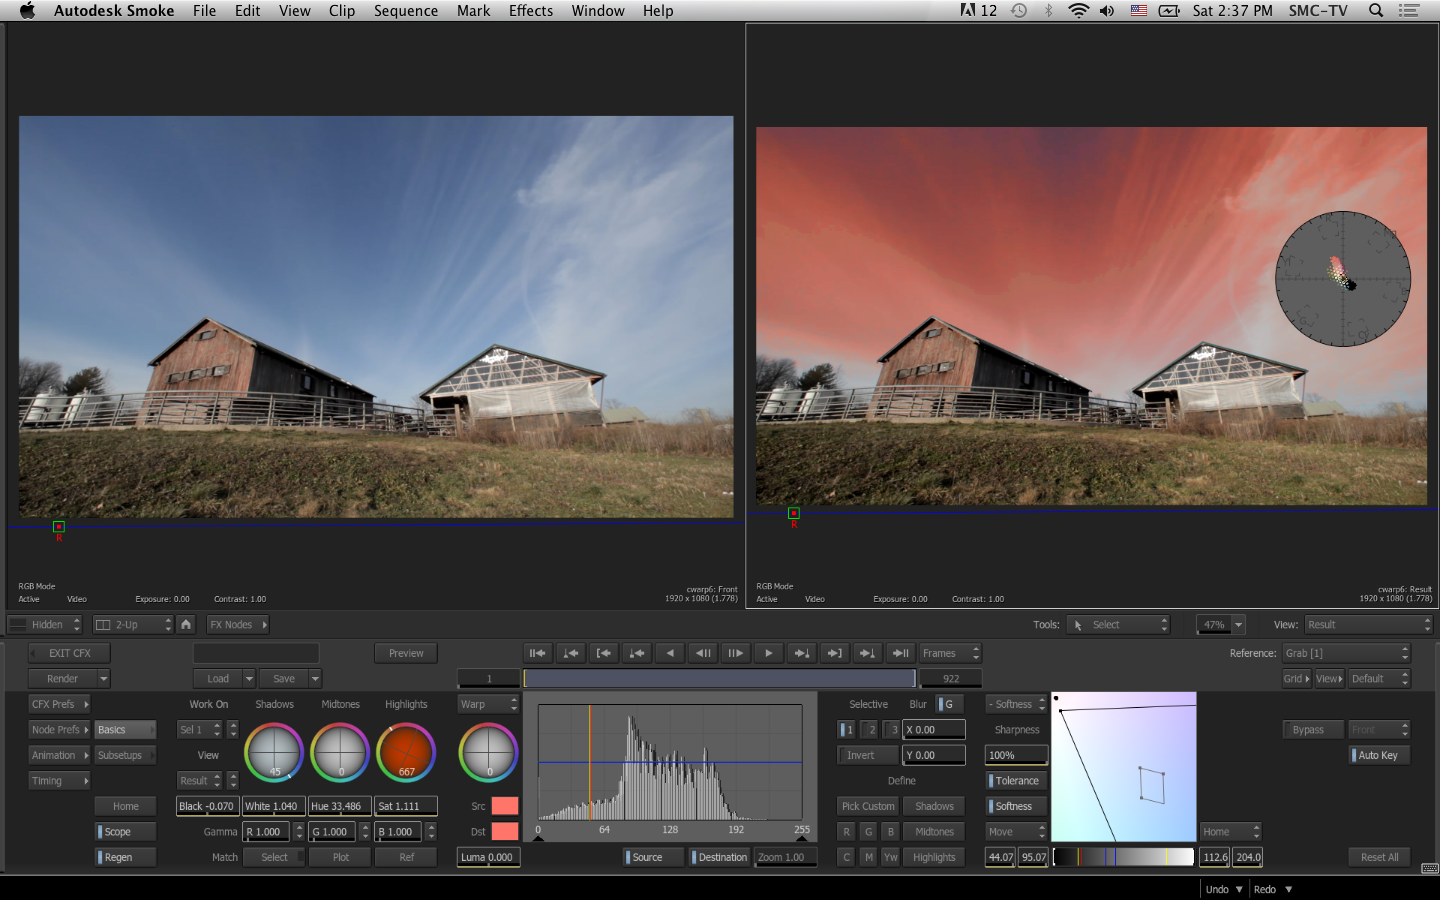
How to Manually Match colors from Back Clip to Front/Result Clip:
1. Press F1 to view the Front Clip (or use the 2-up view with Back & Front as illustrated)
[Click for larger image]
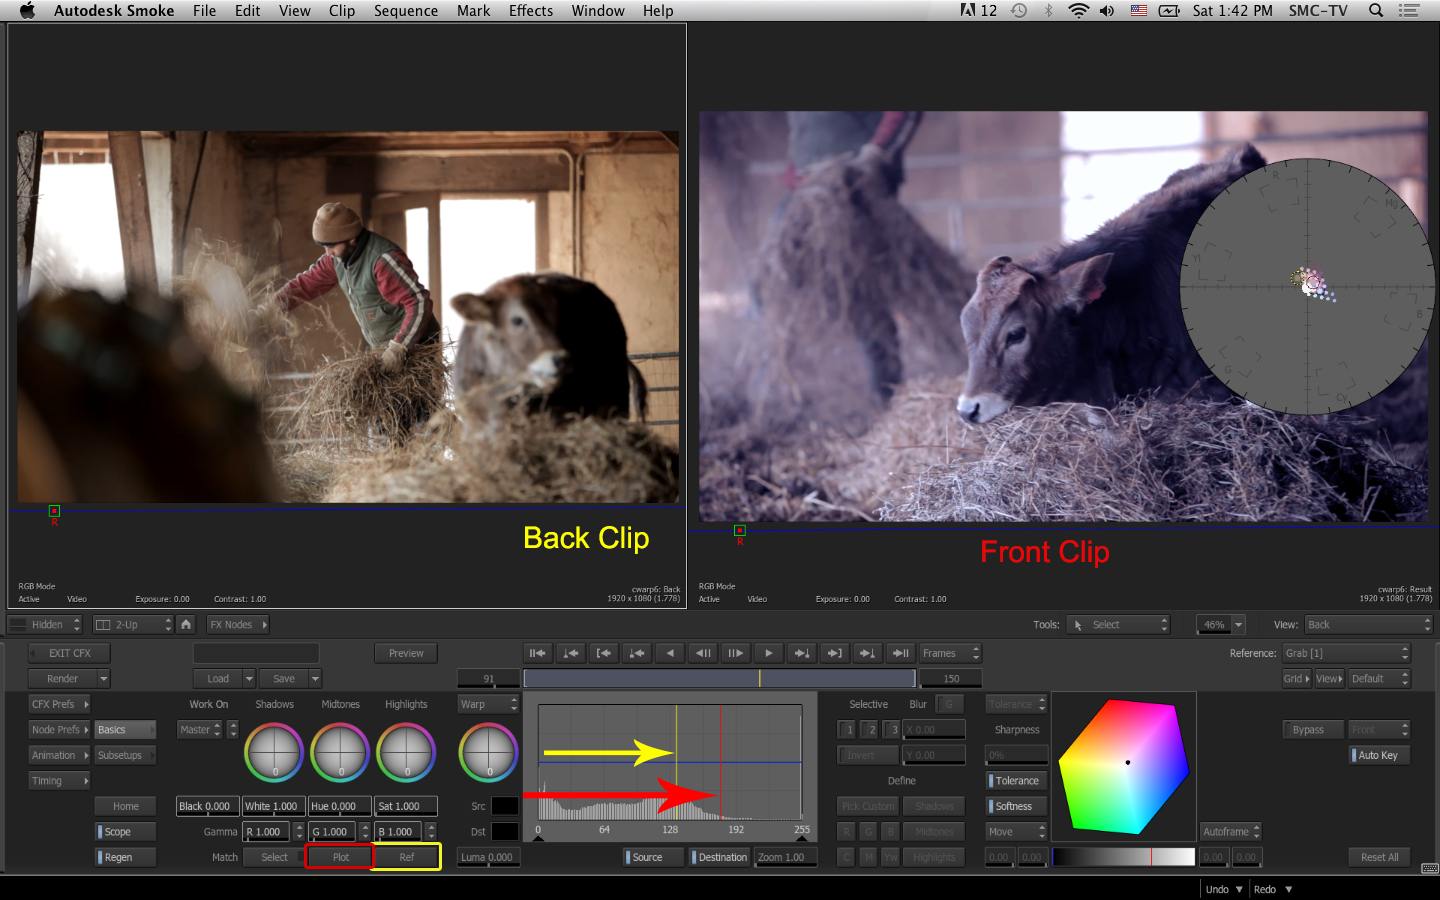
2. Click Plot and select a color that you want to change on your Front clip.
3. You will see the selected color in the histogram and vectorscope in RED.
4. Press F3 to view the Back Clip
5. Click REF and select a color that you want to be the match reference.
6. You will see the selected color in the histogram and vectorscope in YELLOW.

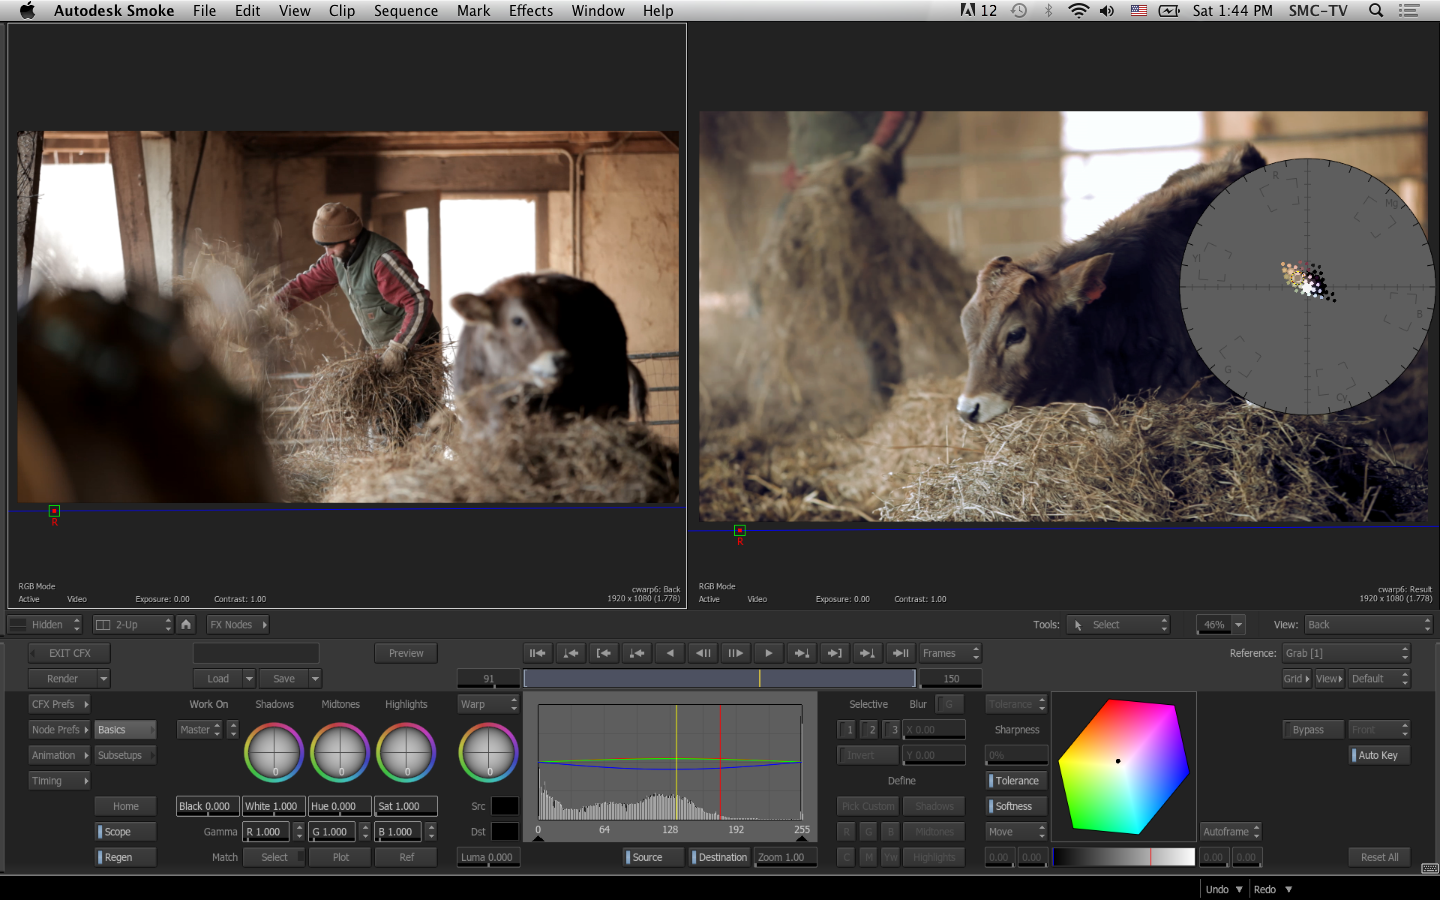
7. Press F4 to view the result (feel free to switch back to 1-Up view).
8. Adjust the midtone trackball to move the plot color (RED) towards the reference color (Yellow).
9. When the dots are lined up in the vectorscope the colors are matched between the 2 shots.
[Click for larger image]
Working with Secondaries and Selective Selections
Smoke’s Color Warper provides a powerful set of secondary color correction tools:
1. Under the Work On menu, choose one of the 3 Selectives – SEL1, SEL2, SEL3
[Click for larger image]
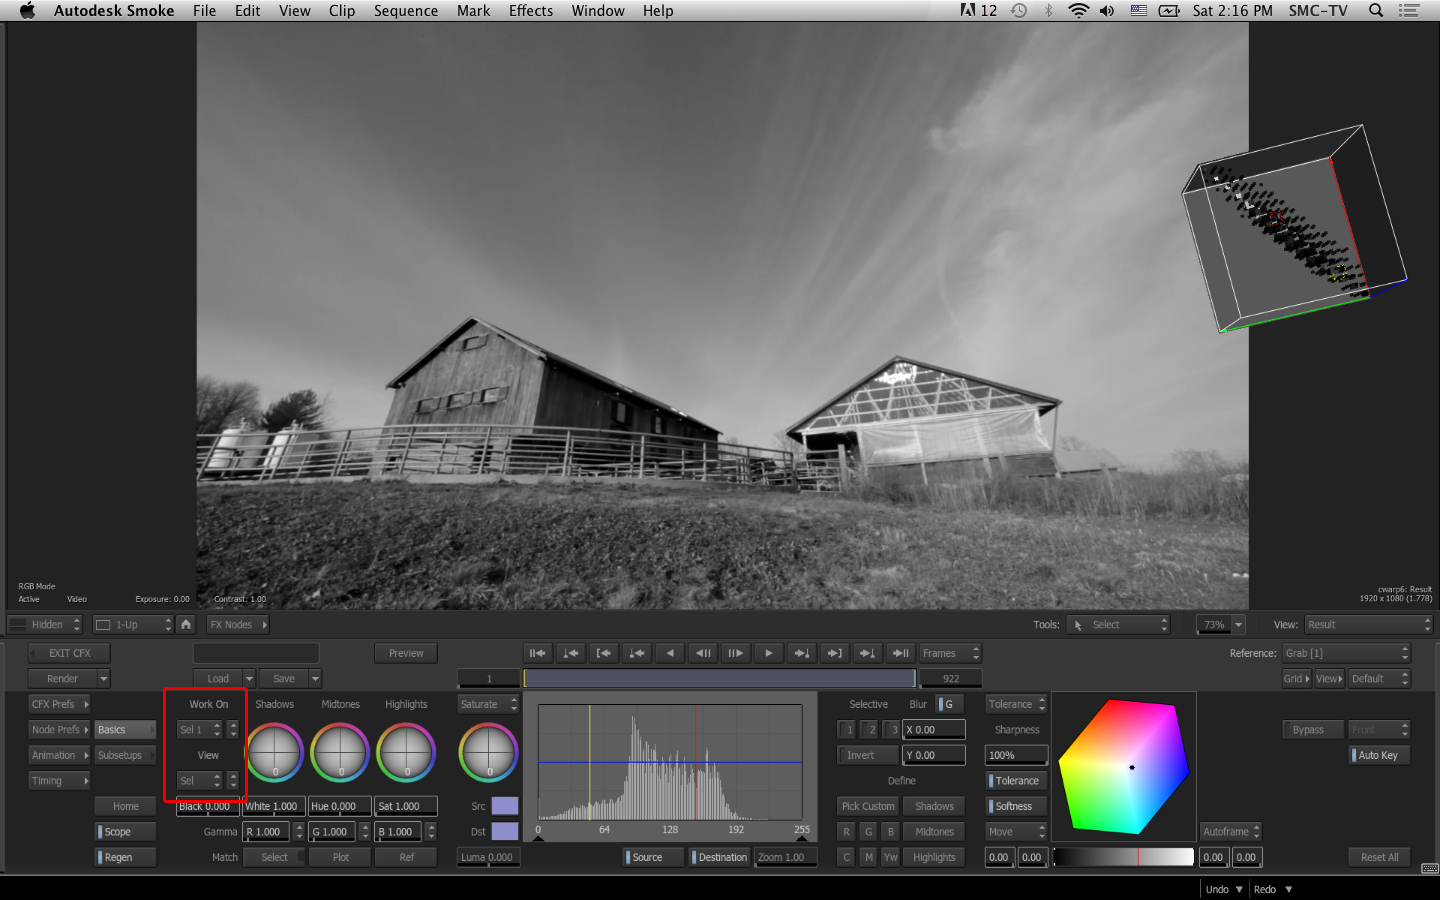
2. You will see that your image changes to monochrome B&W.
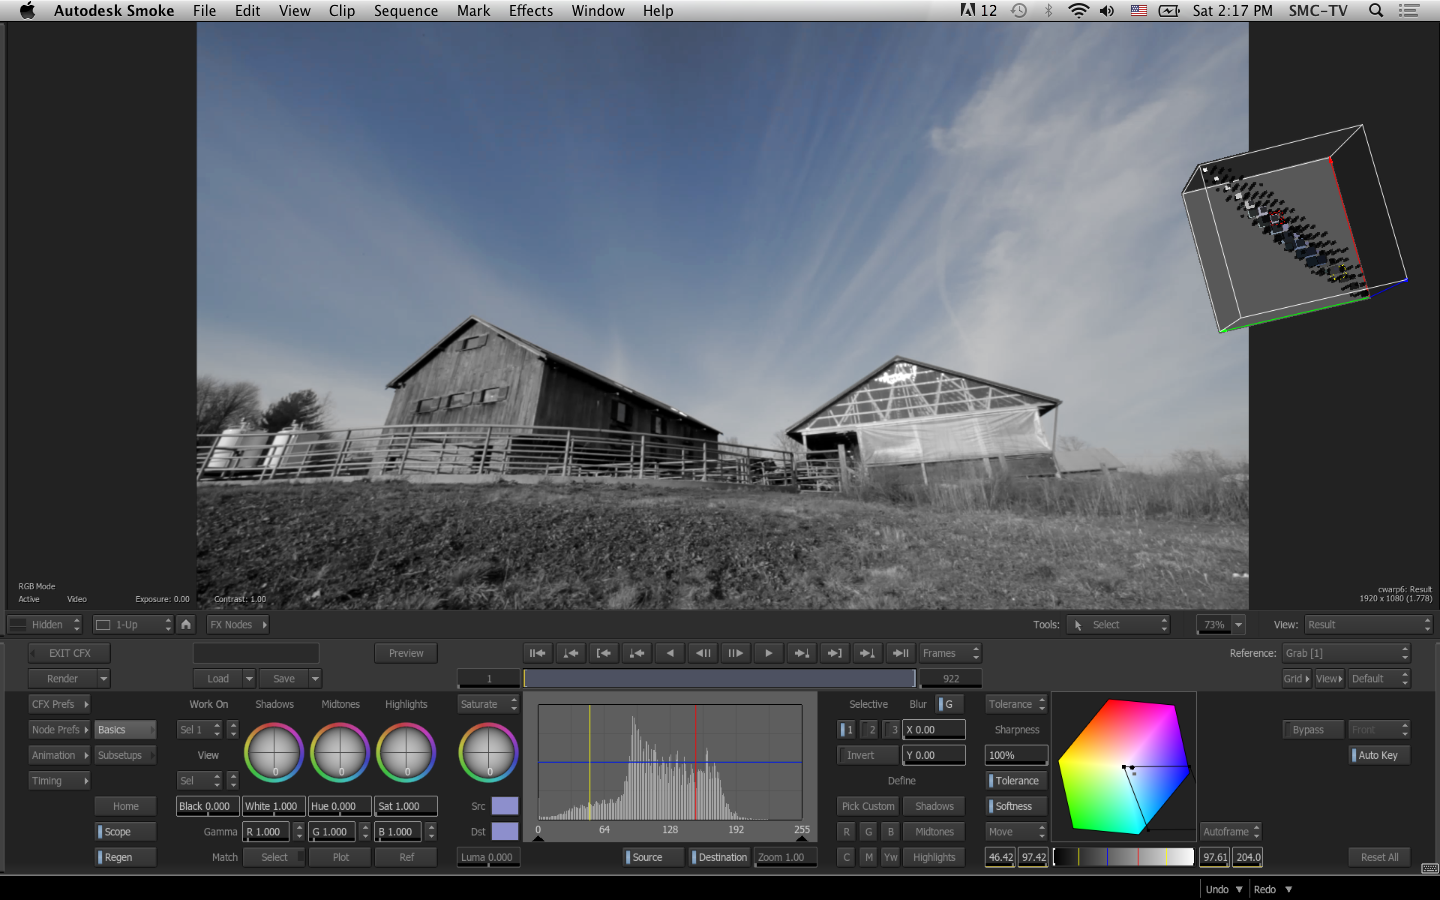
3. Move to the Secondaries menu and activate the selective 1, 2, or 3. The blue LED will light.
4. Click Pick Custom or choose a color range or RGBCMYw channel.
5. If you choose Pick Custom, sample the colors you would like to isolate and work on in your image.
6. You will see the color revel in the black & white image.
[Click for larger image]
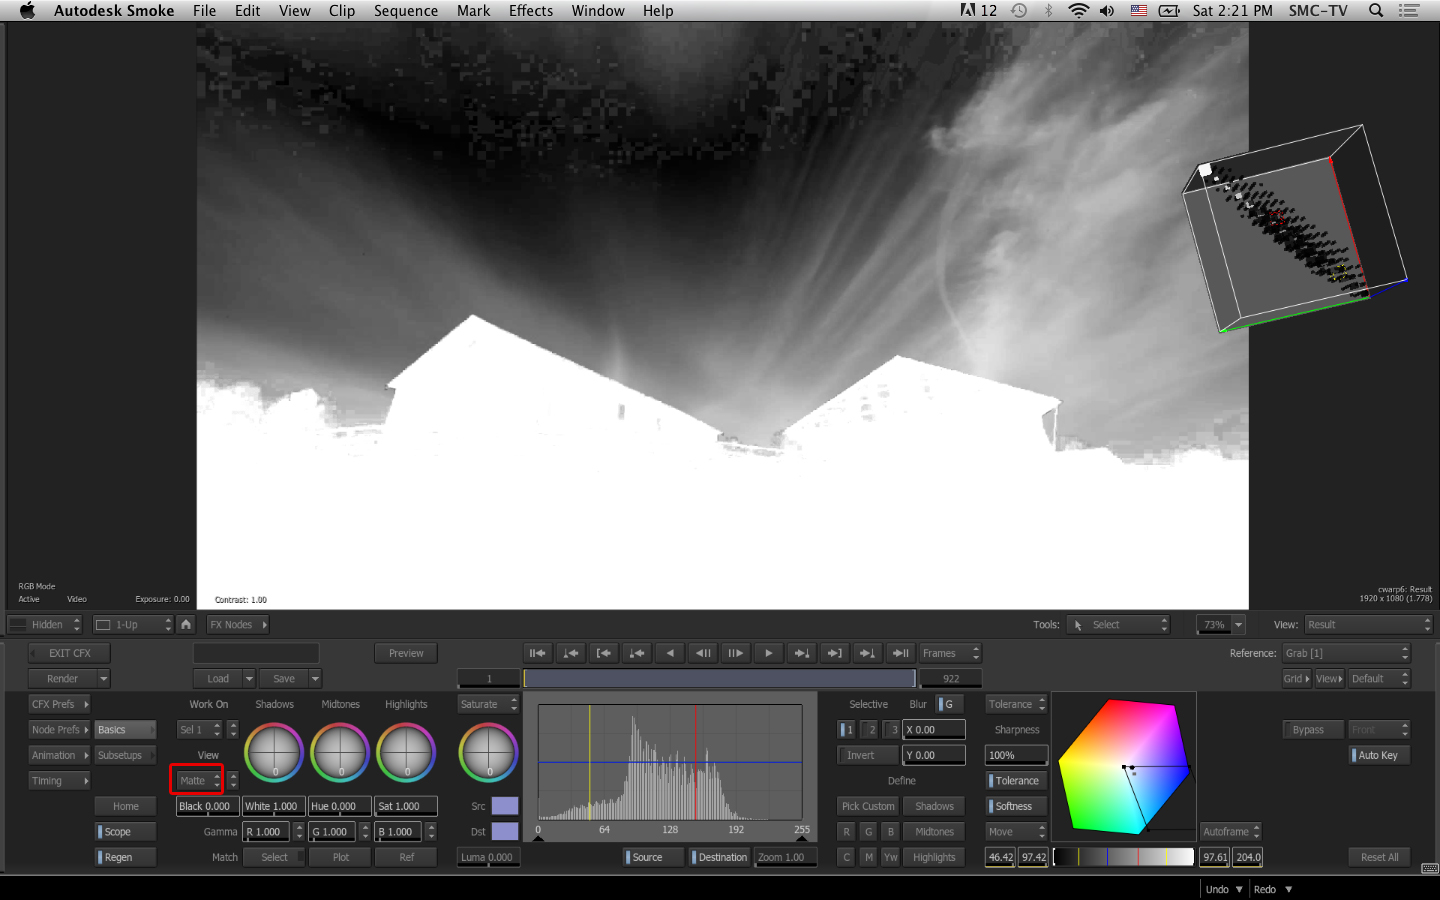
7. Return to the Work On menu and under the VIEW choose MATTE from the pop-up button. Your matte will be revealed which will match your selection. With the Color Warper, white in your matte is protected and the black areas are parts that become affected.
[Click for larger image]
8. You can continue to click and sample in the view to clean up and refine the matte. But with color correction and grading, the mattes don’t have to be perfect.
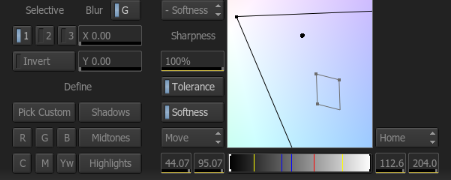
9. You will see a representation of the key in the Diamond Keyer. You can zoom in to the selection and manually move the points of the softness diamond which will also adjust and refine the key selection.
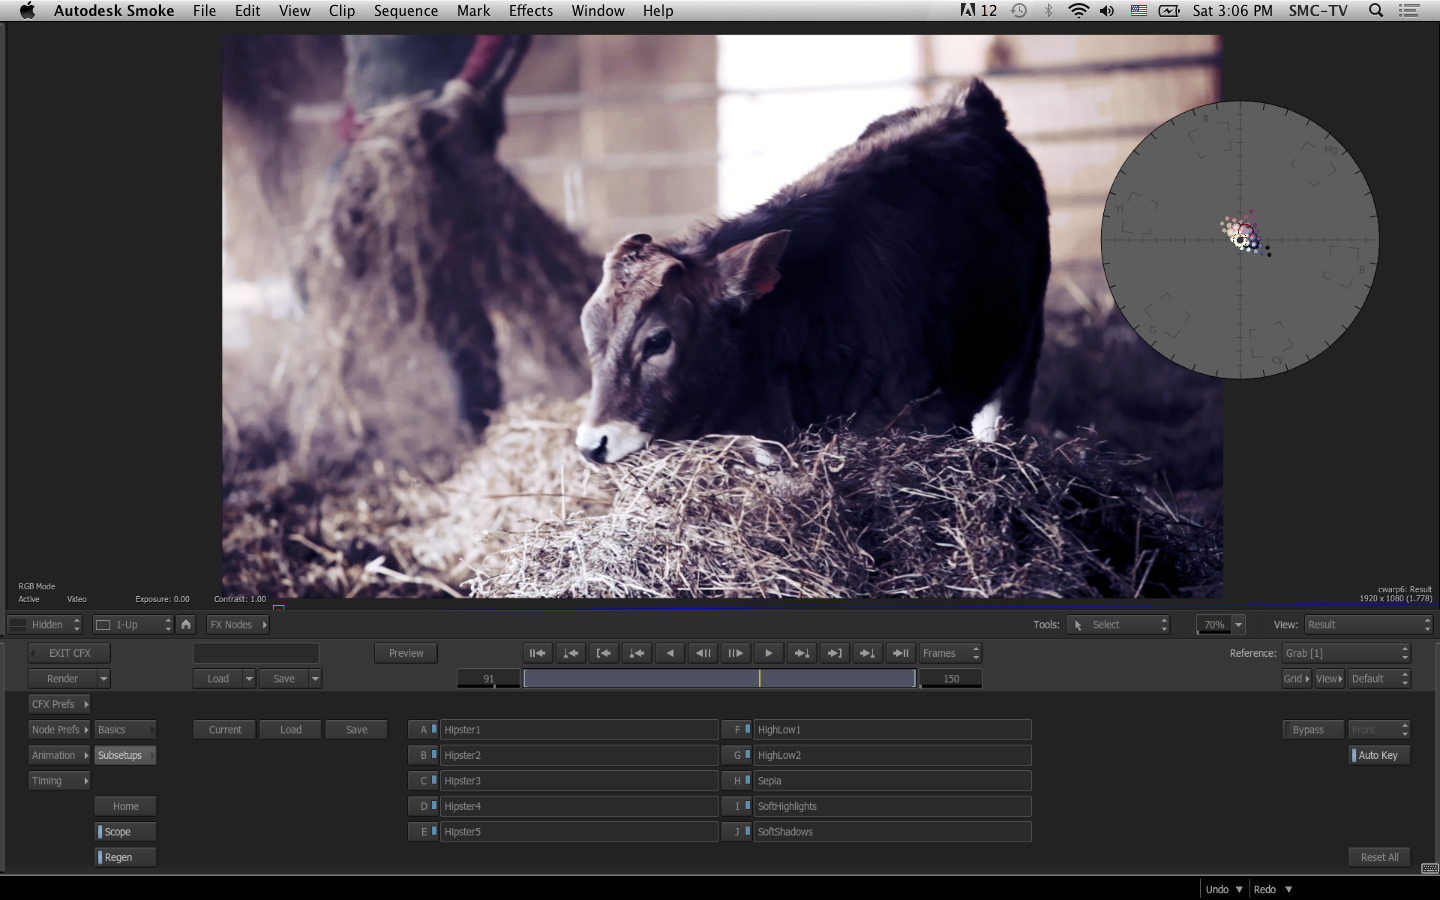
10. Once you are happy with your key, return to the Work On Menu and under View, choose Result. Your image should return to full color and look unchanged.
11. Now adjust any of the color parameters to achieve the look and grade you want.

12. When you are done, you can then perform a 2nd and 3rd secondary selection within this same Color Warper node.
13. Under the Work On menu, switch between your various selections for adjustments and to the Master section for an overall color adjustment.
[Click for larger image]
One feature lacking in the Color Warper is the exclusion of tracking and masking for the secondary selections. It was explained in the Color Corrector how to work with masks, but the mask does only work on the image overall, not within the secondary selection. For instance, if you want to change a red element in the shot with a secondary, it will change everything in the image with that color red. You are somewhat limited when you need masking. Even though you can mask and track that mask to isolate part of the image (and then use a secondary to adjust the color) you need to use another Color Warper node on the output if you need to perform other secondaries, or more masking and tracking.
The Color Warper can perform some advanced corrections and grading on a shot by shot basis. But grading more than just a handful of shots, with masking and tracking, would become more than tedious.
Under the Subsetups menu you can store and retrieve 10 color looks. These looks are presets that you can create (a nice way to keep color grading consistency between shots and save time).
[Click for larger image]

There are some great looks you can download from the Autodesk Community Site, The-Area. These Color Subsetups are also explained in this episode of Smoke Signals (the Autodesk Smoke videocast).
Are you color grading with Smoke? Got color correction tips to share?
Leave us feedback in the comments!


