Using Speedgrade Look Files in Autodesk Smoke

Download 75 FREE .look files for Adobe Speedgrade. They can also be used for creative grading in Autodesk Smoke!

Autodesk Smoke uses the Autodesk Color Management which allows for consistent processing, interpretation, and communication of colors throughout a mixed pipeline. It is the same Color Management System found in Autodesk Flame and Lustre, the Autodesk dedicated color grading software. Autodesk Color Management is designed to support a variety of color management workflows, including ACES, ICC, OpenColorIO, and ASC CDL.
With Smoke you can easily mix footage from digital cinema cameras, film scans, and video using different color spaces that use ACES, the Academy Color Encoding System. ACES is a 16-bit file format for digital motion picture production, mastering, and archiving. Smoke uses the Academy/ASC color transform format and provides the color transforms needed to convert between the ACES reference color space and a wide variety of input and output devices. This enables better creative control by providing an accurate and consistent representation of floating-point linear color spaces across editing, 3D VFX, and grading.
Now, I am not a colorist, I am an editor. But I still have to color correct footage and work with color spaces… mainly Log footage. Thus, I have to work with Luts from time to time. But ACES gives you proper conversion between color spaces and keeps you colors accurate through the pipeline…even a ConnectFX pipeline, if you are mixing Log and regular REC701. Smoke has proper Log to Lin converters, as well as ACES to sRBG, and popular camera LUTs for when you shoot in Log or Slog2 withSony F65 and F35, Alexa, and even “flat profiles” like the Canon Technicolor Cinestyle conversion.

But none of these are creative look generating tools.
You have the Color Correct and the Color Warper Nodes to allow you to creatively stylize you clips, but sometimes, you just need a quick color look applied. It would be nice to simply load up a color look and apply it to a clip or as a CFX adjustment layer. Well, luckily the Autodesk Color Management System can help you with that. See how I brought this full circle?
The Autodesk Color Management System handles it’s own .ctf files found in the Lut Editor Imports. But it also handles industry standards.

I highlighted one format above. It’s the Iridas .look file. Adobe purchased Iridas and it’s product SpeedGrade, and made it a part of Adobe CC. With it, they continue to use the .look files which contain the setups used in the Lumetri color engine. These .look files are how creative color grading setups convert from SpeedGrade to Premiere. And since the Autodesk Color Management also imports this industry format… you can use Premiere and SpeedGrade .look files in Autodesk Smoke.
Now that we have the technical explanation out of the way, lets get to the fun stuff… being creative with color.
Download Creative LUTs
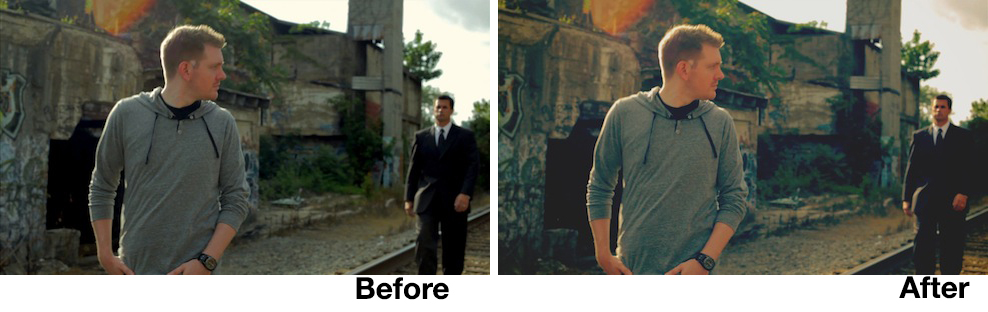
Premuimbeat’s Aaron Williams wrote a great blog on creating the classic Blue/Teal blockbuster movie look in SpeedGrade. He also provided a download link to his setups. Inside the .zip file you will see many compatible .luts for Smoke, including the .look file.
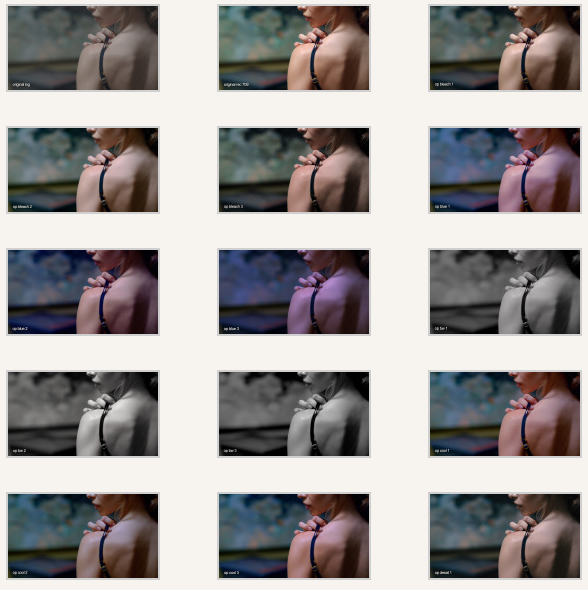
Also, Oliver Peter’s on his “digitalfilms” blog created 75 different creative color grading looks for your video using SpeedGrade. Download them and thank Oliver for creating them!
How to use SpeedGrade Looks in Smoke
Once you have the .look files downloaded, simply place them in a folder somewhere where you can access them. There are 2 ways to use these Luts on your clips in the Smoke timeline.
One is directly on a clip via the Format Options or the Pre-Processing Settings.

These sections affect the clip before any other Timeline Effects are applied. Simply enter the editor of the settings by double-clicking the button in the toolbar or by selecting the button pressing the “Editor” button. Once there the process is the same.
1. Select the RGB LUT button and then change the Import selection menu to Color Transform.

2. Press Import and you will see the standard Smoke file browser were you can navigate to your folder with the saved .look files.

3. Select the name of the Look you would like and it will immediately load and return you to the previous menu.
4. If you don’t see the Look applied, make sure you have the ACTIVE button enabled to see the effect.


If you want this effect copied to other clips, you can easily do that by copying the Format Options or Pre-Processing effects from the toolbar to any other clips or clips like you do any other timeline effect. You cannot modify this LUT effect at all in this menu, the LUT is either on or off. Any further adjustments will have to be done on top of this effect with a Color Correct or Color Warper node added to the clip in the timeline. Because of this you may want to add these .look files to the clip via ConnectFX which will give you more flexibility with color adjustments prior to the LUT. This is the second method:
1. Add a ConnectFX to the clip and enter the editor.

2. Add a LUT Editor node after your clip.

3. The process is the same as above, select Color Transform and press Import
4. Select the Look you want and the grade will be applied.
If the color isn’t right with your footage, you can add a Color Correct or Color Warper Node before the Lut Node and make adjustments. Set your Lut Node as a context point so you can see the result with the Look applied as you work in one of the other color nodes.

By working in CFX this way you can also combine these Looks by using more than one Lut Node with additional Color Corrections as needed.

However, if you need to do other CFX effects on your clips then working this way might be awkward since you may need to perform some green screen keying or other effects prior to the LUT. If this is the case, then you can simply add the CFX as an adjustment layer on a new track above your clip with it’s additional CFX applied.
Of course you can also double-click the clip in CFX and access the Pre-processing menus here as well and add your LUT. This would be just as if you added it on the timeline.
The Oliver Peter’s Look files were designed with Log footage. So if you are using standard video or Rec 709 clips, the CFX workflow will be your best bet, as you can “flatten” the existing color of your clip to simulate the Log look before the LUT is applied. In doing this you might be able to simply use the Pre-Processing settings on the clip in the Basic menu, and adding a Lin-to-Log adjustment to create a flattened look and a psudo-log clip.

The most important thing is that the Autodesk Color Management in Smoke is really quite powerful. Not only is it extremely capable at proper color conversions and workflows, but since it can import many other formats, you can use some of these great free tools available on the internet which makes Smoke even more user friendly.
Feel free to post a comment or a question below, and stay tuned for more tips and tricks for Autodesk Smoke.