

Smoke ConnectFX: Depth of Field Node

Everyone loves depth of field in their shots. Autodesk Smoke has it’s own Depth of Field Node that can create Depth Blurs on your shots and in your composites.

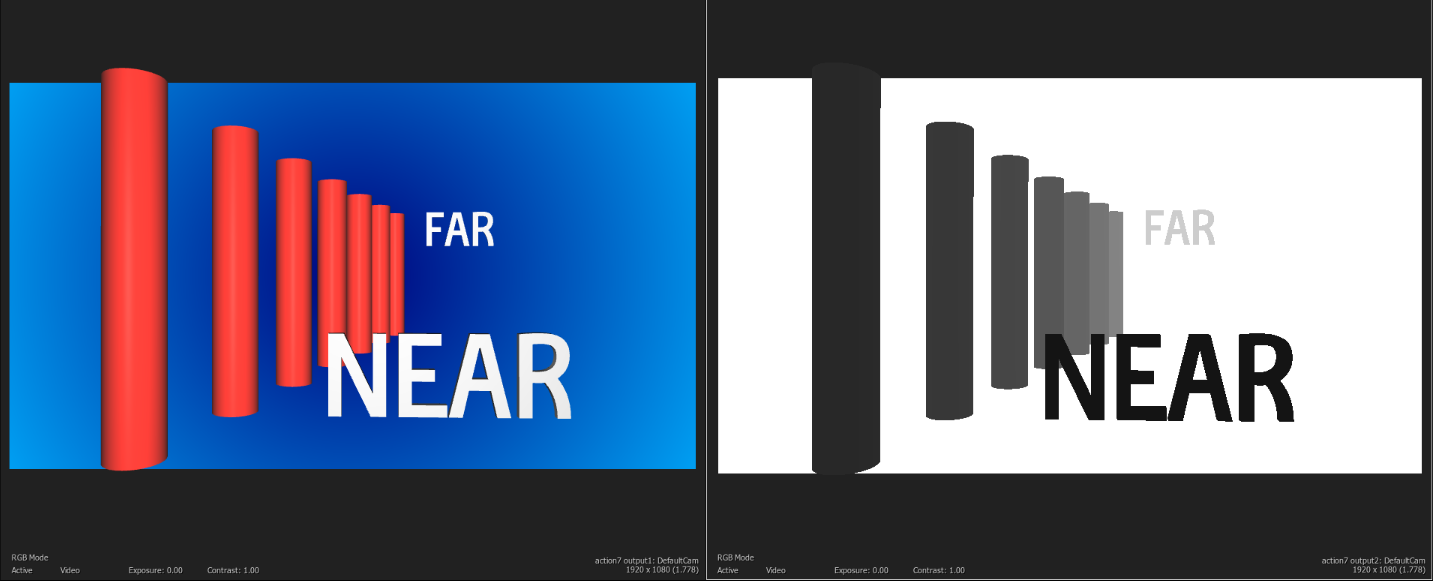
The Action Node is Smoke’s true 3D compositing environment. When Action is used with the Depth of Field (DOF) Node in ConnectFX you can create adjustable blurs to your 3D composites by taking a Z-depth pass from Action and processing it though the DOF node. Z-Depth passes can also be created as a layer pass from 3D applications like Maya, 3D Studio Max, and Cinema 4D. Depth passes are grayscale images where white is used for objects furthest away from the camera and black would be objects closest to the camera (this would be the normal representation, but they can be reversed.) Objects in between would be seen as various shades of gray. Each shade of gray would place the object at a different depth from the camera.
[Click for Larger Image]

Smoke’s Depth-of-Field Node:
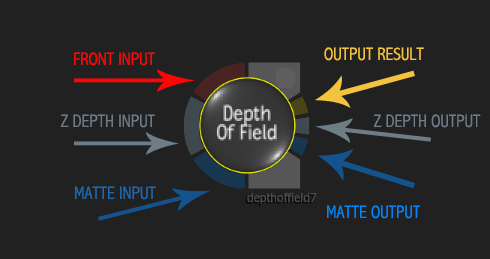

The main element that you’ll need to use the Depth of Field (DOF) Node is a Z-Depth pass. This can be provided from your 3D application or you can create one in Action by adding an Output pass for Z-Depth. Inside of Action you can use F4 to toggle between your Action outputs. When you have objects or images that have different Z values on the Axis, you will see the shades of gray in the Z-Depth Output.
[Click for Larger Image]

Since ConnectFX is now processing everything at 16bit fp, it really helps with getting a good Z-Depth output. If you are working in 8 bit, make sure you switch the Action rendering in Node Prefs to 16 bit. The Z-Depth Output menu in Action has a few other settings to help create the best Z-Depth Matte. Turn Off Anti-aliasing and the Tolerance setting – which will adjust the value at which the alpha is included in the depth of the output.
[Click for Larger Image]

This setting will help with transparent objects in your scene. Once you have your settings, you can feed the Action Outputs into the Depth-of-Field Node.
The general UI for the DOF node can be overwhelming, but like most of the node interfaces in Smoke, they generally work left to right.
[Click for Larger Image]

The Blur & Blooming settings will adjust the blur values and the amount of Bokeh effect. You have 2 options for blooming, Basic and Additive. The basic blooming mode adjusts the gain applied to highlights in non-HDR images. Basic blooming allows the creation of bokeh patterns without affecting colour integrity. The additive blooming mode allows you to create higher intensity bokeh patterns from any source image, using minimum and maximum thresholds for highlight separation.

The Bokeh settings give you the ability to customize the look of the bokeh pattern. You can adjust the number of sides, curvature, and rotation.
If you jump over to the Bokeh Profile Tab, you can further tweak the look for the bokeh shape. The S-Curve represents the shape of the pattern, from its centre to the outside. The default S-curve defines the softness of the blur. You can change the curve by manipulating the two points of the curve, or you can add points to the curve. This type of profile curve is also seen in the profile menus of Action Lights.


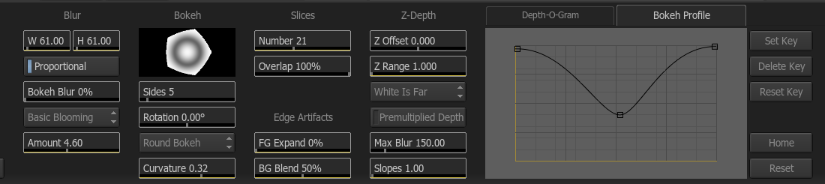
Back at the main UI, you start to get in to the settings that affect the quality of the DOF that will be created. Adjusting the Slices number will change the interpolation of the change in values in the Z-Depth Matte. You can see the relationship in the Depth-O-Gram as the dark and light gray vertical bars. The Overlap values will control the about of overlap between the slices. The Edge Artifacts controls the amount of mixing between the object edges with the foreground and the background elements. You would adjust these values to clear up an artifacts in the blur along the edges.
[Click for Larger Image]


Under the Z-Depth area, you can set the clipping plane for the MAX white and MIN black values. Think of it as a histogram for the z-depth. There is also a toggle to set white or black as the far color. Regardless of your blur, slices, and gamma settings thus far, you can clamp the effect of the blur by setting the Max Blur Value. This can help with rendering as too high of settings for blur, combined with slices and depth of your matte can produce some extreme render times.
The Depth-O-Gram, with a bit of a silly name, is where the main focus (pun intended) of the DOF node lies. The Depth-O-Gram will display the Z-Depth Matte in histogram fashion. You can use the Z Plot button and select a point on your image. This will show up as a line in the Depth-O-Gram. The Yellow line is the Focus Plane. you can move the yellow line to your plot point to make that point the point that is in focus. The Blue and Red lines are the Focus Range. Objects within this range will also be in focus, depending on other settings. But it gives you an area to work in. This Focus Range can be adjusted to create a very narrow focus range or to widen it out. This begins to give you a great deal of flexibility in giving your scene the look you want. The Focus Plane and Ranges are keyframeable. So it’s possible to shift or roll the focus as your camera and objects move. As you move the yellow focus plane through the Depth-O-Gram you will see your objects highlight in your scene with Yellow, Blue and Red as the focus planes cross through them.
[Click for Larger Image]


You may wonder why Action doesn’t incorporate Z-Depth within itself instead of running everything through a 2nd node? The DOF Node gives you greater flexibility to control the depth of field in your scene. Also, ConnectFX can be used to add DOF to 3D generated scenes from a 3D software with a Z-Depth Pass. Processing a DOF blur in the compositing phase is much more efficient than rendering in the 3D App. It will take less time and you can control the amount of blur.
Pro ConnectFX Tip:
The Z-Depth Output from Action is controlled by the clipping planes of the Action Camera. Object at different Z Depths will create a different looking Z Depth Output when the Action Cameras far plane is 10,000 pixels vs 2,000 pixels. What does this mean? If you have a very large 3D scene with objects at great Z-depths, and you have had to lengthen the cameras far plane to see your objects you will create a very subtle depth matte. The differences between values will be very slight and you won’t be able to get a shallow depth of field look if you wanted it.
[Click for Larger Image]


One tip to control the look of your Z-Depth Matte is to copy your Action Node, output the Z-Depth Output from the duplicate node, and adjust the far plane to get a depth matte that works for you.


You can then link via a copy/link expression the camera position from your main Action Camera to the duplicate Action Node’s Camera. So it will mimic any changes. The Depth of Field Node will create a very nice look and add depth to your composite, but it can be very render intensive. It’s better to keep your blur values lower and use the camera’s clipping plane or the DOF min/max adjustments to control your depth matte.
I hope Premiumbeat’s breakdown of the ConnectFX Nodes in Smoke are providing good information and understanding of how to use these tools. If you have any questions, please fell free to leave a comment below.


