

ConnectFX Nodes in Smoke: Blend & Comp and Blur

Our series on breaking down the effects nodes in Autodesk Smoke continues with Blend & Comp and Blur in ConnectFX.

There are over 50 nodes in the Smoke ConnectFX arsenal. As we begin the B’s, our first 2 nodes are very useful in setting up some quick composites of a few sources, and in creating some very organic stylizing of your clips.
Smoke’s Blend & Comp Node
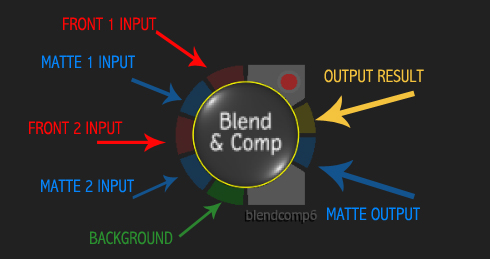
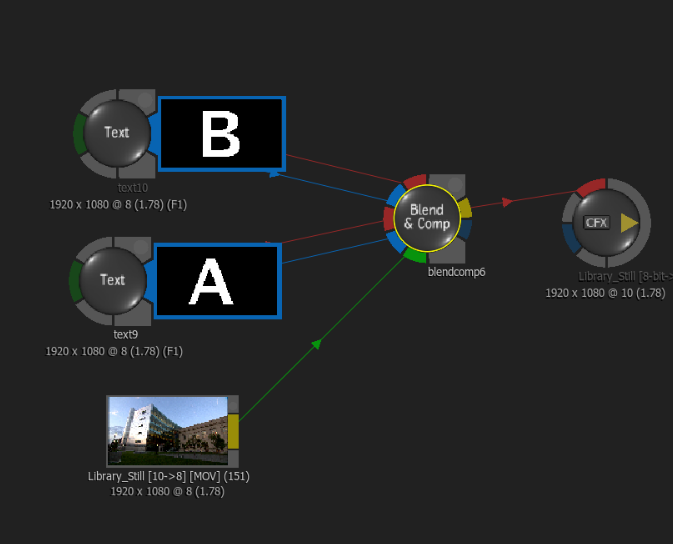
Smoke’s Blend & Comp is a simple yet very versatile node. You can use Blend & Comp to combine up to 2 sources with their mattes over a background. Now, that doesn’t sound like much, but there is more to this node once you start to breakdown the controls. By default Input 1 is composited over input 2, and the result of those 2 is composited over the Background input. This is very useful when you have elements, like graphics, that are already in position and all you need to do is just key them over a back clip. This node would be well suited if you have CG elements rendered out with alpha channels. Blend & Comp is a much lighter node than Action, and faster to use if all you need to do is comp.
[Click for larger view]

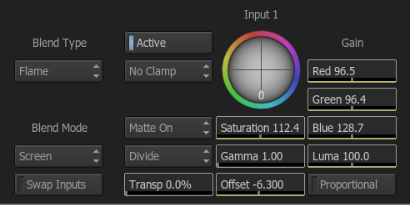
Blend and Comp has both the Photoshop blend modes and the classic Autodesk Flame blend modes. There are even GIMP blend modes, although I have never had the pleasure of using GIMP. Several of these blend modes are similar or identical, like Add, Screen, and Multiply. There are a also few blend modes that are exclusive to the selections. Flame modes have Spotlight and Simple Add, where Photoshop has Hard, Soft, and Vivid Light. Needless to say, you have lots of options to blend Input 1 over Input 2. You can also Swap Sources with a toggle button so you don’t have to rewire the inputs in the ConnectFX schematic.
[Click for larger view]
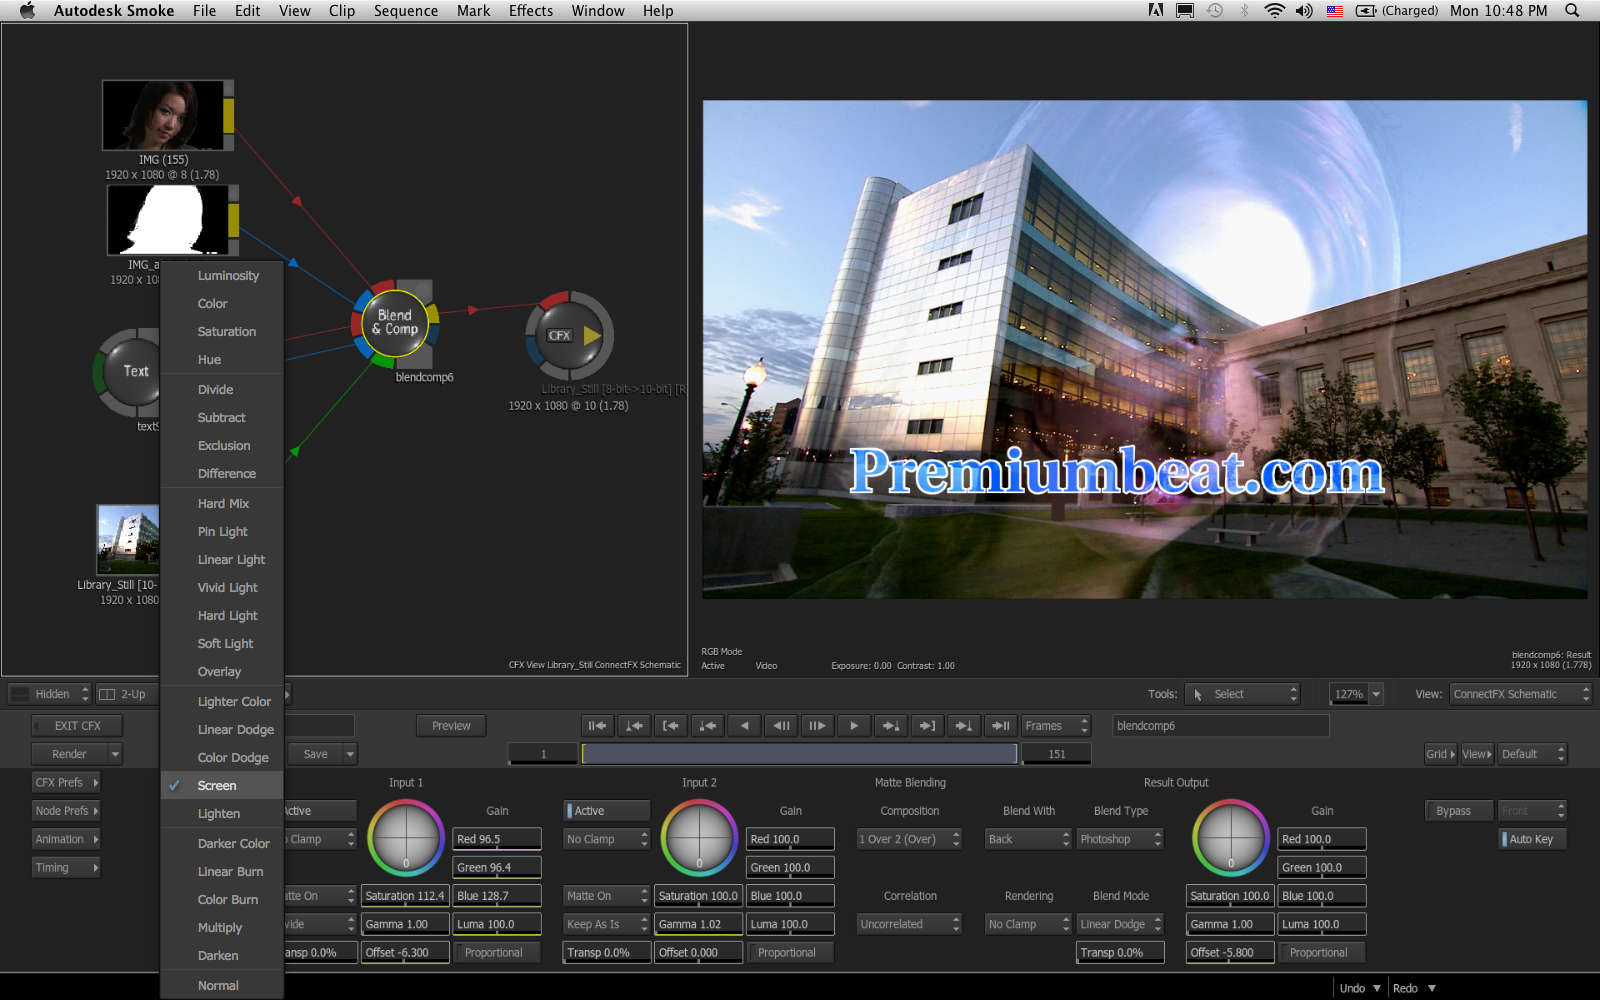
You can Activate or Deactivate either of the inputs, as well as, turn the matte on or off. There is also an option to set the clip as premultiplied or divided from it’s alpha(matte). Transparency can also be modified. One of the great features that Autodesk puts into many of their nodes is the ability to make color and level adjustments on the input source. You have the ability to make simple color tweaks with a color trackball, and individual gain controls for the RGB channels. These color adjustments only affect the Front of the input and not it’s matte input. All of these controls are also available on the 2nd Input for the node.
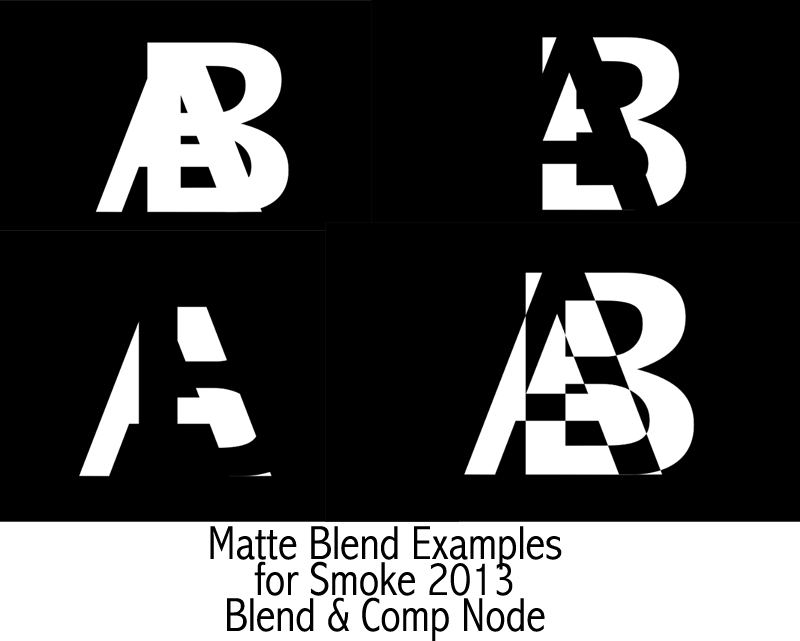
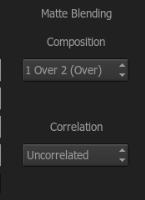
When it comes to the Matte or Alpha channels for the clips you have multiple choices in how those mattes interact with each other. This can be used to create some very interesting matte intersections which can be used for many effects further down in your ConnectFX schematic like making custom transitions.
[Click for larger view]
You can blend the mattes as 1 over 2, 2 intersect 1, 1 inside 2, 2 inside 1, Excluded, 1 minus 2, and 2 minus 1
[Click for larger view]
You would set the mattes correlation setting to Correlated if you had separate mattes but we all part of the same object. This will keep the intersection clean.
Now that you have these 2 inputs blended together, that result gets blended over the background. You can choose to blend the composite over the background, input 2, or a color. Again, you have the blend mode option of Photoshop or Flame, and all of the same blend modes as before.

This flexibility, can create some very interesting looks and effects to the final result. If you are familiar with how blend modes work with layer in Photoshop or After Effects all of those same looks can be achieved inside Blend & Comp. You then have additional color and level controls that affect the final composite, not just the background clip. The result of the 2 inputs and background can seen on the output of the node as well as the result of the matte blend if needed.
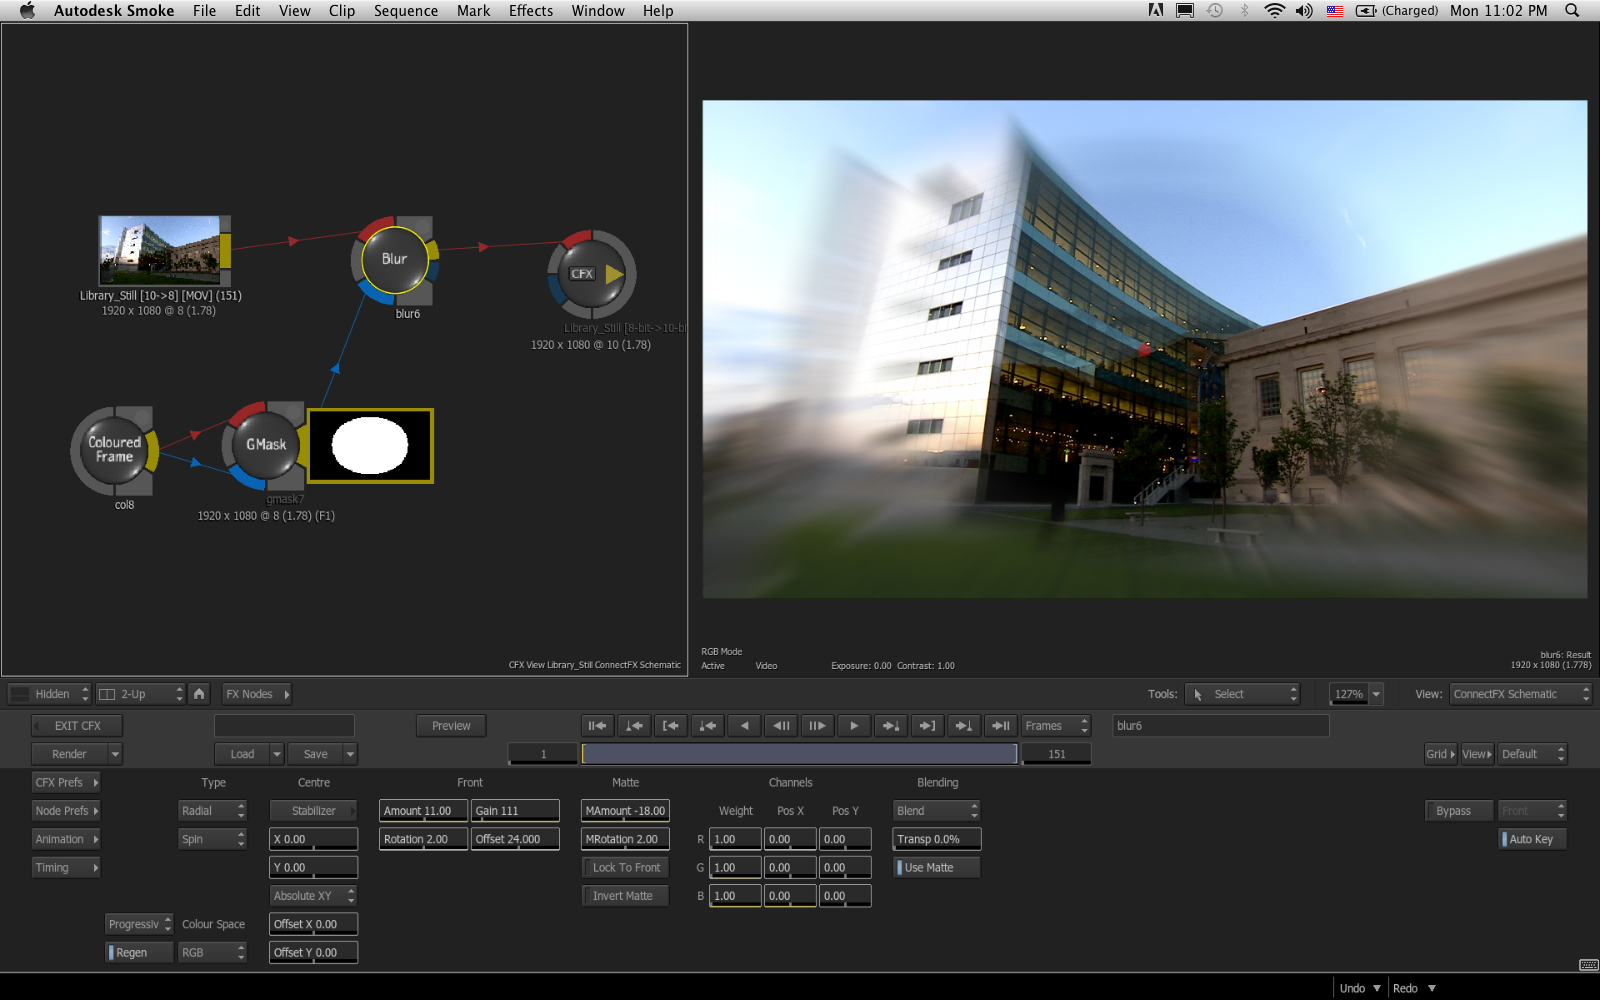
Smoke’s Blur Node
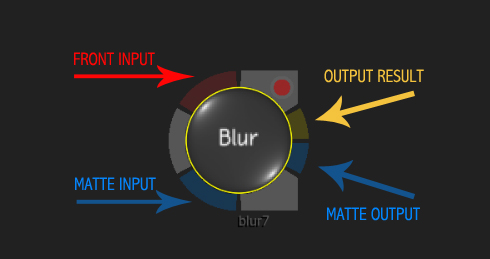
The Blur node is pretty self-explanatory, but as with most of the tools inside Smoke it has lots of options and customizations. The Blur node accepts both a Front and Matte input and will output the same. However, you have the option of having different blur values for the front and matte on output. If you are working in 16bit float, you have a clamping option for the input color and luminance levels.
[Click for larger view]
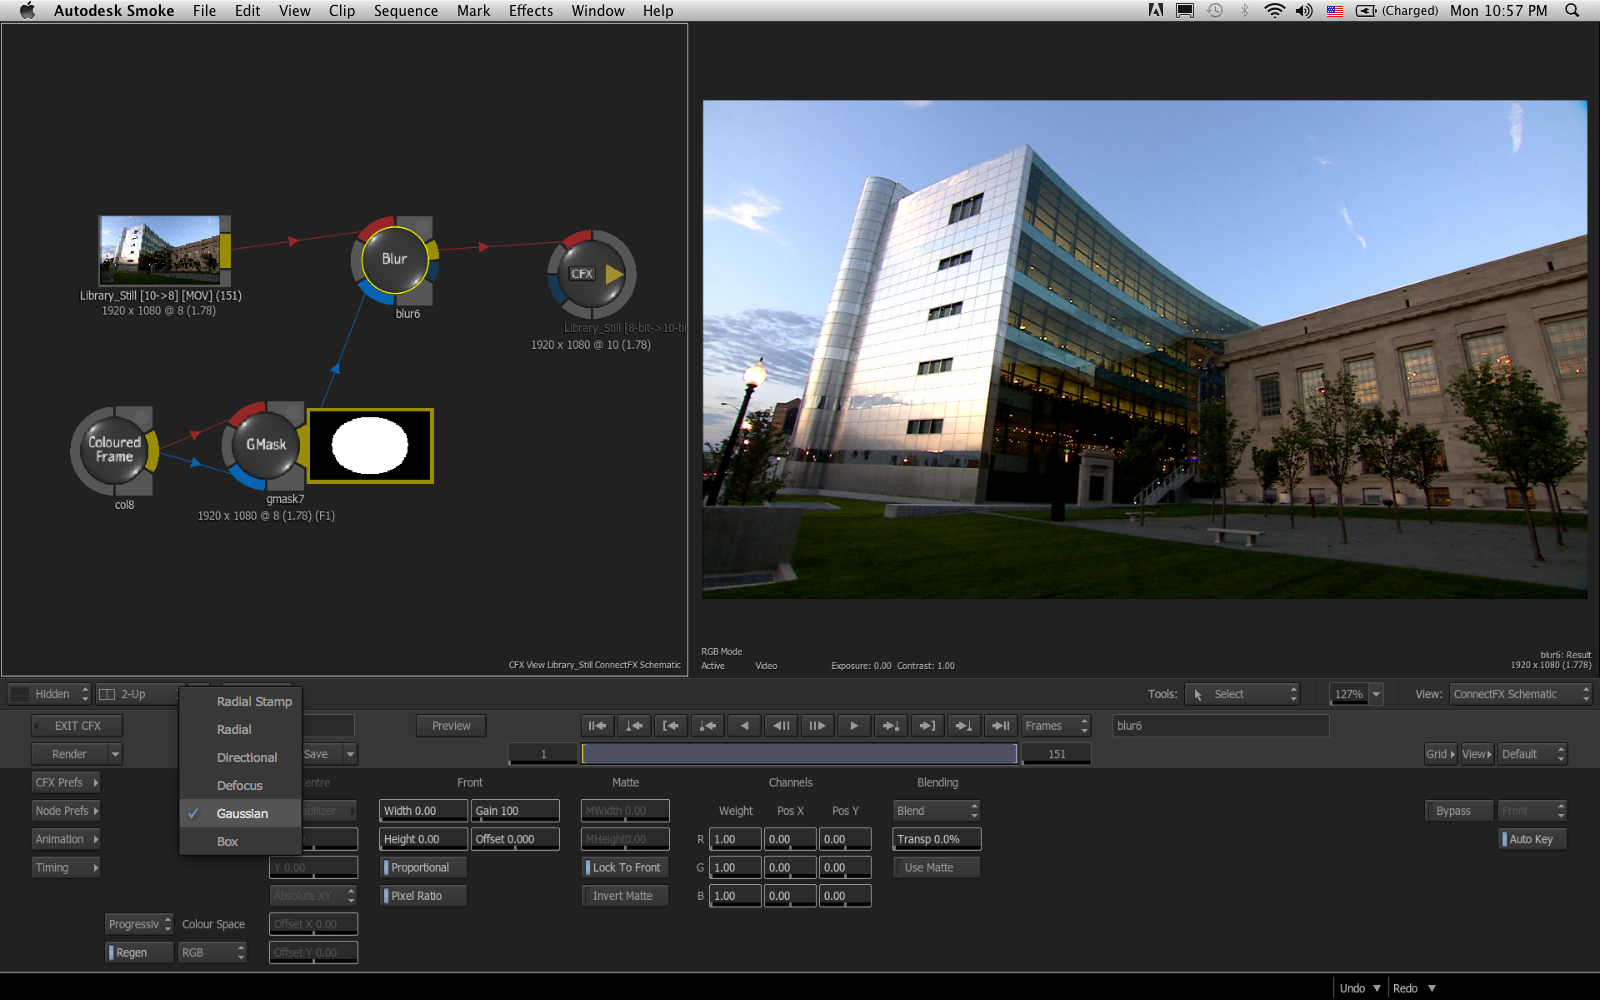
The Blur options of the node are Box, Gaussian, Directional, Radial, Defocus, and Radial Stamp. Depending on which blur look you choose, specific sub-options will become available. For the Radial option you have Twist and Spin adjustments. With the Defocus setting you have additional controls for the Bokeh look. Choosing Directional will allow you to set the bias, and Radial Stamp will give you samples setting. The Radial Stamp blur creates a very fast rendering blur depending on the amount of samples. With Radial Blur, you also have the option to set the center point of the blur as well as the ability to track the center to a point in your clip with the stabilizer.
[Click for larger view]
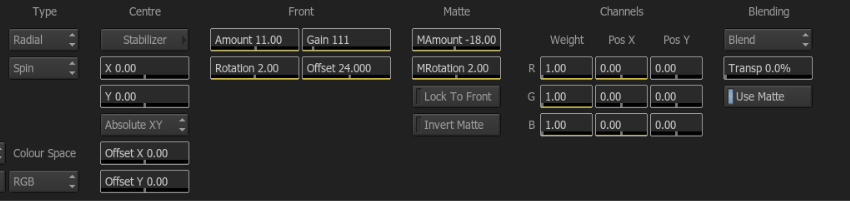
Once the type of blur is chosen, it’s time to set the amount of blur. By adjusting the front settings, you can have the matte locked to these settings or have its own values. Again depending on the type of blur chosen the front settings will give more options. Ex: Length & Angle values for Directional, and Amount & Rotation Values for Radial & Radial Stamp.
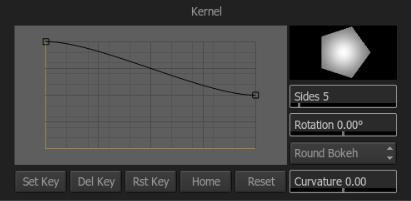
You would use Defocus as your blur type if you want to simulate a realistic camera lens defocus with added bokeh. Blooming settings can be seen in the front controls to adjust the amount of blooming that will occur on the highlights of the image as well as setting for the minimum and maximum threshold for the blooming effect.
A Kernel setting also appears when you can set the look of the bokeh effect. You can set the sides, rotation, curvature and roundness of the bokeh shape, and adjust a custom curve for the look that can shape the softness and blending of the shape.
When it comes to the matte settings, as I stated they can be locked to the values of the front image or you can have them independent. You can also invert the matte if needed. The reason for that is that you can use the matte to blend the blur over the original image. You can use this to create a vey stylized look to your image with the blur. The same blend modes that exist in Blend & Comp are also in the Blur node. You can add more transparency to the blur effect as well.
[Click for larger view]
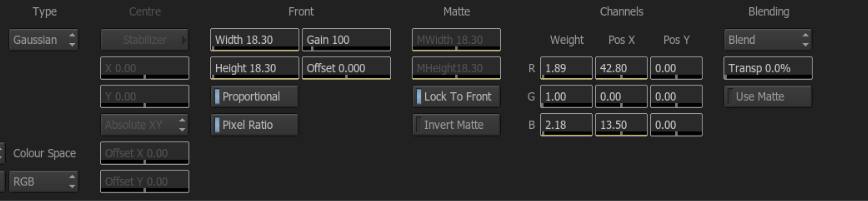
To further stylize the blur, you can offset the RGB or YUV channels of the blur. You can adjust the X and Y positon of the offset for each channel as well as alter the weight, which will give more emphasis to one channel over another. This is great for adding a little chromatic aberration to the blur. By animating these values you can create a very unique blurred distortion effect.
[Click for larger view]
As you can see the tools in Smoke are very deep and there are a lot of options and setting to create and customize the look you want. What sounds like a basic node, like Smoke’s Blur and Blend & Comp, is a very complex tool, but once you get comfortable with the nodes you can easily and quickly get the results you want.
With Autodesk Smoke, you have both depth and simplicity in how the tools are designed and how the interface is laid out. Take the time to experiment and remember that once you get look you like you can save that setup for use later on. Just hit the Node Prefs button and you will then have Save and Load options for that node available.
Check back as we continue our ongoing coverage of Autodesk Smoke. In the next post we will finish up the B’s in the ConnectFX Node Bin.


