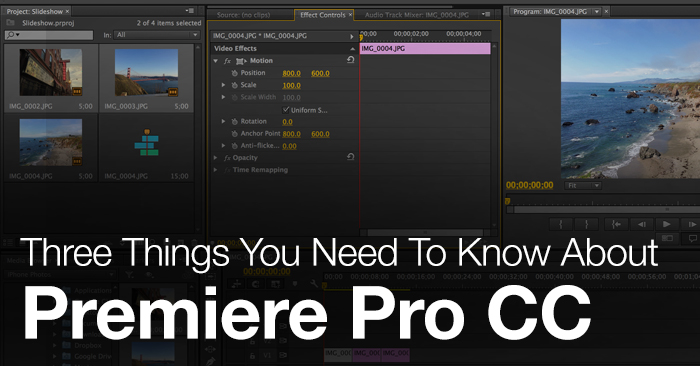
Three Things You Need To Know About Premiere Pro CC

New to Premiere Pro? Know these file management and workflow tips to improve your editing.

As an editor who is still learning the ins-and-outs of Premiere Pro CC after 10 years with FCP 7, I’m constantly coming to terms with why Premiere Pro does things the way it does.
I’m not saying either way is better (in comparison to any NLE) but what matters to me, is that I fully understand exactly what’s going on. To that end, here are three things I learned recently, that you might want to know too.
Premiere Pro CC Generates Useful Junk

One of the things that is especially helpful about Premiere Pro CC is the ability to throw just about anything on the timeline and it will just work. That ”just working” does require a decent amount of RAM to make it go, but it also requires a bit of work behind the scenes too.
When you import your camera native files (say some .MTS files) Premiere will start to ‘conform’ those files getting them ready to play back. If you’ve ever dropped some files on the timeline only to discover they seem to have no sound, this is often because it is still creating the preview files.

It only has to do this process once because it creates a cache of all those conformed previews in a folder on your boot drive. This is very helpful while you’re working on a project, but after you’re done those files just sit in that cache folder, slowly swallowing up a huge amount of disk space.
The best way to deal with this situation is two fold. First of all it probably makes sense to move the media cache folder from it’s current location on your boot drive, to your main media storage drive. That way you can keep a closer eye on it, and also not forget all about it and wonder where your drive space is going. By default the Adobe media cache folder is here on a Mac:
Users/(Your user name)/Library/Application Support/Adobe/Common/Media Cache Files
You can set the default location in the Adobe Premiere Pro CC Preferences under Media. In the second section ‘Media Cache Database’ – simply hit browse and point it to a new folder on your fastest media storage drive. It will ask you if you want to move the current cached files, or simply delete them and start over.
You can also set Premiere to save the Media Cache files ‘next to originals when possible’ – which means that your camera native folders will start to fill up with these files instead (or wherever you are importing your media from). This might be preferable if you are working on lots of little projects, spread across many drives, or taking the drive to lots of different machines. If not, you’re probably best simply moving the media cache folder off your boot disk.

Next, you’ll want to clean it out after you’ve finished a project to save space. If you need to come back to a project once you’ve deleted the media cache files, it will just re-create any missing files. To do so simply hit Clean. This will only delete any files not associated with any source media currently connected. If you want to delete everything you can just navigate to the default location and delete the contents to the trash.
How Premiere Pro CC Handles Audio Channels
One of the quirks of Adobe Premiere Pro is the way in which it handles audio channel mapping ( stereo, mono, dual-mono, 5.1 audio that you bring in). The main thing to understand is that once you drag an audio file to the timeline you cannot modify the settings of the track in the timeline. You have to set up your audio files to behave the way you want, before you edit them into the timeline. Otherwise you have to change them bit by bit, which is a huge hassle if you’ve already done any editing!

Rather than repeat the intricate details of how all of this works, I thought it best to point you to some excellent step by step instructions from Larry Jordan.
In this first article Larry describes the different audio track types and how they operate and in the second article he walks through how to modify the audio channels of a clip to get it to do what you want. For example if you want to get a dual-mono clip to operate as dual mono, rather than a stereo pair. You can also read the official information from Adobe here.
Move a Timeline From One Project To Another
If you are used to the way FCP7 used to operate, in that you could have multiple projects open at once, and simply drag and drop sequences, bins, clips etc. from one project to another, you might be wondering how you go about moving a timeline or a bin from one Premiere Pro CC project to another – given that you can only have one project open at a time. It is actually very simple and can be done a number of different ways.
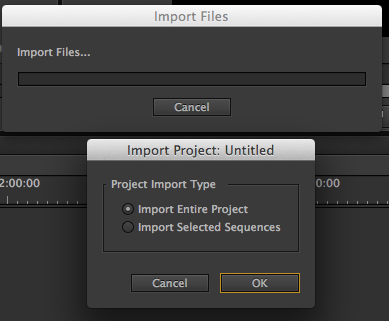
The first way is simply to click File > Import and navigate to the Adobe Premiere Pro CC project file itself and then choose from the options shown above. If you choose ‘Import Selected Sequences’ this will import a folder with all the media associated with the timeline you choose, and the timeline itself, into your open project. The two timelines will not be dynamically linked.

The second way is to use the Media Browser window within Premiere to do the same thing. This method provides you with a bit more visual feedback than the first, but operates in the same way. Just navigate to the project file you wish to work with and pull across whatever you want. The benefit of this method is that you can also select bins not just timelines.
Are there any other things about Premiere Pro that weren’t intuitive at first (especially for editors coming from other editing apps)? If so, share them in the comments below!