Witness Protection Effect in Adobe Premiere Pro

How do you hide things like faces, logos or license plates, as you so often see in news reports? All of this can be done with the Track Matte Key in Adobe Premiere Pro and (if needed) a little simple animation.

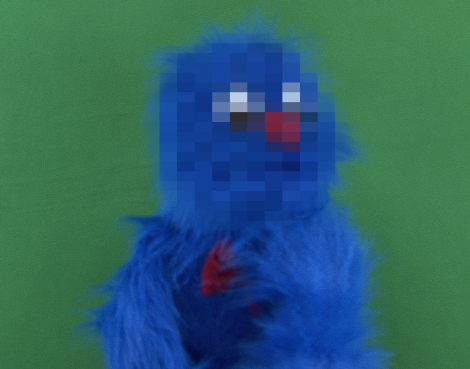
Our aim is to end up with the result below (for this example we’ll leave as is and pass on chroma keying). So how can you achieve this ‘witness protection’ style effect in your video editing app?
First, you need to think in terms of layers. To achieve the above result I setup my project with 3 layers…
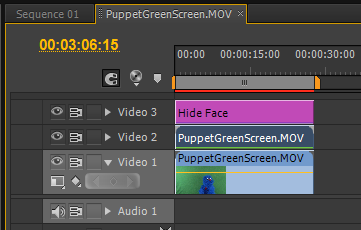
On the bottom layer (Video 1) I placed a copy of the video I want to use in its final form. Then, directly above the footage in video 1 I placed a copy of that video that I can apply some effects to.
Quick Tip: To get a copy of the video all I need to do is hold the Alt (on PC) or Option (on Mac) key and click and drag the video up into Video 2. This will create a copy of the video while leaving the original in video 1.
Now I am ready to apply my first effect. What we want to do here is add some kind of distorting effect that will make the face unrecognizable.
To do this I applied the ‘Mosaic’ effect (which is found under the Stylize category in Premiere Pro). I increased the horizontal and vertical blocks from the default 10 & 10 to 50 & 50. Obviously, different footage will need different numbers so adjust them to taste. Just sure that the end result can still be identified as the form of a face or license plate but can’t be ‘read’ or ‘recognized’.
Footage with the Mosaic Effect Applied with Settings of 50 & 50

At this point we are well on the way to achieving our goal. All we need to do now is create some kind of mask to go over the area that we want to hide/mask.
While this can be done in a number of ways including the Circle effect or Garbage Matte, probably the simplest way is to use a title.
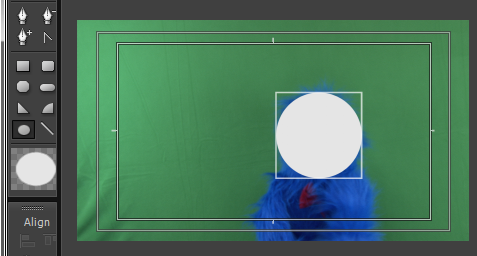
Go to a point in your footage where the face (or license plate or whatever you want to mask) is fully visible and then create a new default still title. Then, using the shape tools on the left, create an appropriate shape that will go over the part that you wish to hide. Although not essential, it is probably best to also make this item white.
Title Created Over Puppets Face
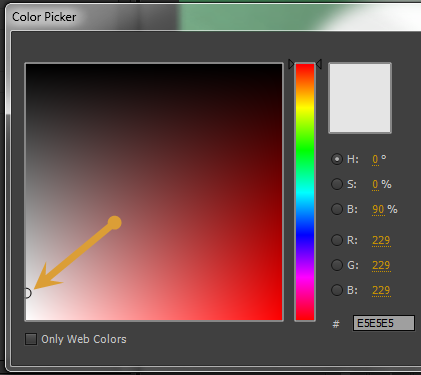
There is a ‘gotcha’ when you create a new white title – it seems that for whatever reason often the ‘white’ isn’t exactly pure white. So to make sure it is pure white go over to the ‘fill’ color section and ensure the little circle is fully in the bottom left hand corner of the color box.
Gotcha! White Isn’t Always Pure White with a New Title
Once you have created the title, apply it to the empty track ‘Video 3’ and then trim it out to match the length of the video in layers 1 and 2. Select the title and then open your ‘Effects Controls’ panel.
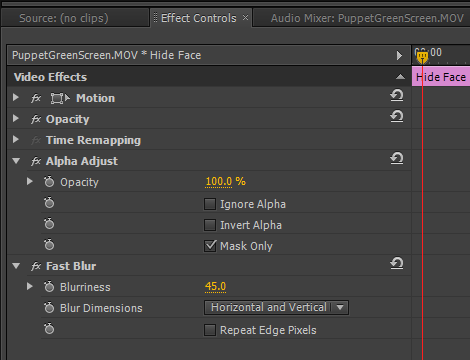
At this point I like to apply a couple of effects to get what I consider to be a slightly better end result. I apply the Alpha Adjust effect and tick the ‘Mask Only’ option which makes the title shape a more solid mask (although this shouldn’t really be necessary if you have ensured that the shape is pure white). Then, I apply a blur of some kind (Fast Blur in this case) and increase the blur amount until the edge of the title shape is nice and soft as seen below.
Effects Applied to the Title Shape
Title Before These Effects Have Been Applied

Title After These Effects Have Been Applied

Now, with the title still selected, open up the ‘Motion’ controls and click the ‘Position’ stopwatch and animate your title shape through your video to make sure it stays over the item that you wish to hide – as the effect we are going to apply will only work within the shape that you’ve created.
At this point we are ready to add the ‘Track Matte Key’ to the MIDDLE layer on Video 2. Where you place this effect is very important as you need to have the shape ABOVE the layer you apply the ‘Track Matte Key’ to.
Think of it like this:
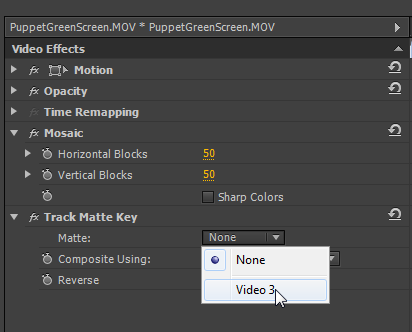
The middle layer looks up at the top layer and says ‘The only part of me that I want to show must be the same size, shape and position as whatever is in the layer above me’. So, when you apply the ‘Track Matte Key’ you click the ‘Matte’ option and choose whatever is in the layer directly above your distorted version of your footage.
Selecting the Title Layer Above
As for the other option ‘Composite Using’ this shouldn’t matter because you have a white shape. So if you choose ‘Matte Alpha’ it will look at the shapes ‘Alpha’ or ‘transparency’ channel and if you choose ‘Matte Luma’ it will look at the whiteness or luminance of the title shape – so both will work in this instance.
The end result is that all you can see of the distorted video in video layer 2 is just a shape the same size as the title you put above it. If it’s the opposite, you can always click the ‘Reverse’ check-box in the Track Matte Key effect to correct.
Video 2 with the Bottom Layer Video 1 Turned Off

To complete this effect, we have the original footage without any effects applied to it in the bottom layer Video 1. So, when we turn on the eyeball for Video 1, we see all the normal unaffected footage in our Program Monitor EXCEPT for the distorted area – and we end up with our final result.
Final Result
As you can see, the track matte effect is very easy to use once you’ve understood that it needs multiple layers to work. Although the tutorial uses Premiere Pro, these same principles can be applied in any video editing application to achieve a ‘witness protection’ style effect.
Have fun playing with it and see what you can produce!