8 Essential Tips and Tricks for Mastering Adobe Premiere Pro

Find some extra motivation on your next project with these 8 techniques for maximizing your non-linear editing skills in Premiere Pro.
Every editor has that moment when they first discover that truly awesome — often time-saving — breakthrough. It’s like a breath of fresh air, suddenly reinvigorating your work.
And while those self discoveries are always the best, they can be very few and far between. That is unless you read articles like these, which share some of the best tips, tricks, and hacks for your Adobe Premiere Pro video editing workflow.
1. Cherry Pick Your Timeline
When starting a new project, especially one with tons of footage (travel videos or documentary projects), your first step is to review all your footage. One quick tip, outlined in the video above, is to begin the process of cherry-picking your timeline as you review your footage — a technique that helps you pull out and (in a way) catalog your shots so you can begin doing your actual editing assembly after.
You can read more about the process here.
2. Creative Timeline Nesting
Another simple-yet-game-changing tip for starting off in Premiere Pro is to master the art of creative timeline nesting, as demonstrated by VideoRevealed. Nesting is a handy and powerful trick, allowing you to place your sequences into other sequences. This is handy for a number of reasons, as it not only helps with your program’s processing and rendering, but it also keeps your timeline clean and segmented, allotting for multiple uses in different areas.
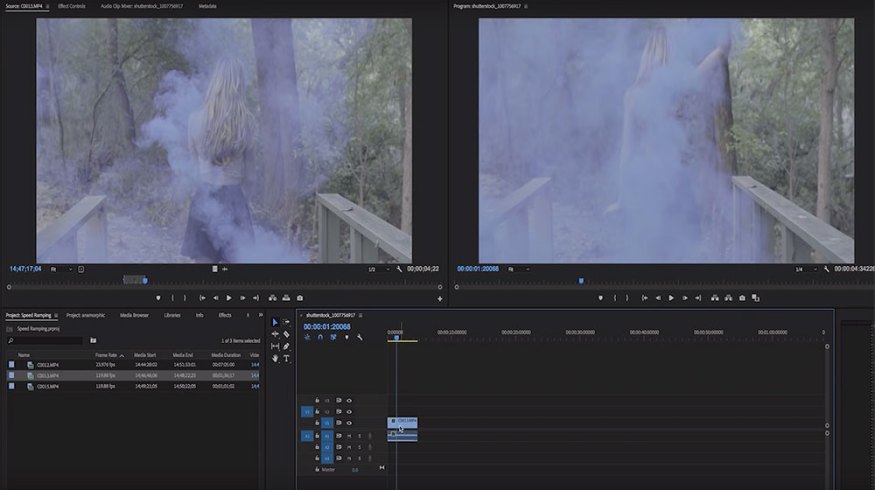
3. Time Remapping and Speed Ramping
Want to make some truly cool, clever videos for your clients, friends, and personal reels? Well, one sure-fire technique is to utilize the slick look of speed-ramped shots. Using a technique in Premiere Pro called Time Remapping, Robbie Janney walks you through the steps to create that stylized look.
- Record at a High Frame Rate
- Use the Speed/Duration Effect
- Change the Frame Information
- Keyframe and Speed Ramping
You can read a more detailed step-by-step here.
4. Quick Motion Tracking
For all those video editors intimidated by After Effects, here’s a cool tip that allows you to do some substantive motion tracking directly in Premiere Pro. In this tutorial by Daniel Marchione, we get a primer in working with keyframing and manually creating motion for your text or graphics, without any scary After Effects work.
5. Color Grading Using Lumetri Color Panels
For those editors who remember a time prior to Premiere Pro’s Lumetri Color Panels, you understand just how much of a game changer those color controls truly are. In this breakdown, we get some actionable advice, as well as some serious color theory to help you understand and master color alteration using Lumetri curves.
For a more in-depth breakdown, here’s the full article.
6. Smooth Slow Motion
As an antithesis to the slick, cool, and clever speed-ramping techniques above, we must now dive into the smooth and serene power of slow motion. Using many of the same effects and techniques, YouTuber Kyler Holland discusses how to work with high-frame-rate footage to create a consistent and smooth look for your slowed-down clips — and how to include them in your sequences and videos.
7. Animate in the Essential Graphics Panel
The next tip is a more advanced technique — animation. Using the Essential Graphics Panel, we learn how to create some basic graphic animations, which can look surprisingly complex and professional. In the tutorial, Jason Boone breaks down the following:
- Create Your Graphics
- Animate the Properties
- Fine Tune Your Results
Read the full step-by-step write-up here.
8. Resize Videos for Social Media
The final tip takes everything you’ve just learned and shows you how to do things faster. Aside from learning how to automate social media edits and more Essential Graphics panel tricks, you’ll also learn some tricks on making YouTube thumbnails.
- Automate Cuts on Previously Edited Videos
- Resize and Reframe Videos for Social Media
- Layer MOGRTs from the Essential Graphics Panel
- Use Photoshop-Style Rulers and Guides
- Export High-Rez Images for YouTube Thumbnails
For more video editing tutorials, tips, and tricks, check out some of these additional articles below.