Gear Hacks: DIY Camera Stabilizers and Rigs for Under $25

Camera mounts and stabilizers can be quite expensive when buying name-brand gear. Making your own DIY camera stabilizers and mounts is a much cheaper alternative.
Top image via Film Riot
The world of camera mounts, rigs, and stabilizers is quite diverse. Camera rigs come in all shapes and sizes for all types of jobs. Sometimes you need the most advanced camera rig for reliability and flexibility on an expensive shoot. Other times, you just need something cheap and quick to keep your footage stable.
If you find yourself with a free afternoon, why not take a trip to your local hardware store and put together a quick and cheap DIY camera stabilizer rig to add to your arsenal. Depending on your needs, one of the DIY options below just might be perfect.
The Silver Flyer
The “Silver Flyer” is a popular DIY camera stabilizer rig on the internet for which you can find several how-to videos on YouTube. For all its popularity, it really is a solid option that stabilizes almost as well as its high-end counterparts.
The curved design does a great job of distributing the weight out across its frame while still giving your focal point the balance and control it needs to move around. The metal frame makes it a little heavier than some of the other, lighter PVC options, but also increases its longevity and sturdiness (along with the weight being a good balance mechanism). Here’s what you’ll need to put it together.
- (2) 3/4″ 90-degree elbow metal tubing
- (3) 3/4″ metal tubing couplers
- (1) 1/4″ hex screw
- (1) 1/4″ nut
- (1) 5/16″ x 1″ fully threaded hex screw
- (1) 5/16″ nut
- (2) 1/4″ x 3″ hex screw
- (2) 1/4″ nut
- (~50) 1/4″ center x 1 1/4″ diameter fender washer
- (2) 1/4″ butterfly nuts
- (1-3) standard bearings (for how much it turns)
- (1) 1/2″ PVC pipe 5-8 inches long
- (1) 1/2″ PVC pipe male and female adapter (2 parts)
- (1) Traxxas 1651 set (3 pieces per set)
- (1) macro slider
- (1) quick release plate
Total Estimated Price: $15
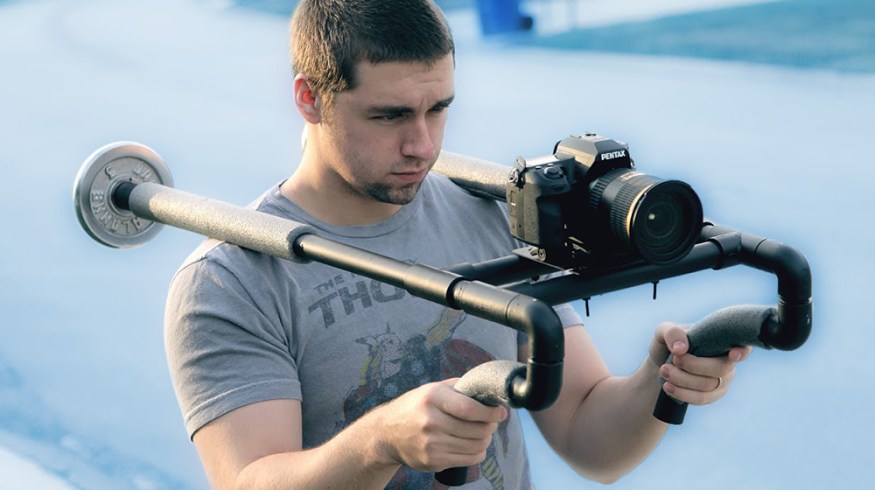
PVC Stabilizer
For our second recommendation, we share Collin McDowell’s “PVC Stabilizer” which he demonstrates on YouTube. Unlike the Silver Flyer (and as its name suggests), McDowell’s invention makes use of Polyvinyl Chloride piping — more commonly referred to as PVC pipe.
The PVC is much lighter than the metal contraptions and offers a little more give. The PVC stabilizer makes use of two side arms and counterweights at the bottom which can also be rotated to become a shoulder rig. Its simplistic design makes it possibly the cheapest and easiest option out there. Here’s what you need.
- (3) 3/4″ PVC pipe caps
- (3) 3/4″ PVC elbows
- (1) 3/4″ PVC cross
- (2) 3/4″ PVC pipes (2 ft each)
- (1) 1/2″ PVC pipes (2 ft)
- (1) 3/4″ metal nipple
- (1) standard tripod head mount
- (2) 2.5 lb dumbbell weights
Total Estimated Price: $13
Double Shoulder Rig
The good folks at Film Riot are no strangers to DIY gear hacks. They’ve actually done the DIY camera stabilizer before (which you can view here), but it’s a little more expensive and not quite as awesome as their double shoulder rig.
While this may look a little bit like an overkill, it actually provides the most reliability and sturdiness of any of the DIY options. The double bars give perfect balance and full control for most stationary and minor camera moves, however it does bounce a little more when moving quickly. If you’re ready to take on this mammoth, here’s how.
- (1) PVC cutter
- (4)- 3/4″ PVC elbow
- (2) 3/4″ PVC couplings
- (4) 3/4″ PVC tee joints
- (2) 3/4″ PVC 90-degree elbow bends
- (1) cover plate
- (2) weight plates
- (1) can of black spray paint
- (4) 3/4″ x 2 ft. PVC pipe
- (1) all-purpose cement
- (1) 3/4″ 6ft Armacell
- (8) #6 32 x 2″ machine screws
- (8) #6 32 machine nuts
- (1) drill bit
Total Estimated Price: $25
Metal Counterbalance Stabilizer
Meet Bob from I Like To Make Stuff. He likes to make stuff. And not just film stuff — he makes all types of stuff, which might explain why his solution to creating a DIY steadicam is so ingenious. Similar to the Silver Flyer in its weight and handheld design, it offers a little more control with its second-hand crossbar option. The overall design is very sturdy but allows for a great range of motion — although no shoulder mount modification. Here’s what you’ll need to build your own.
- (3) lengths 3/4″ steel pipe
- (1) 3/4″ steel pipe T-fitting
- (1) 1/4-20 x 1″ screw and (2) 1/4-20 nuts
- (2) 3/4″ steep pipe caps
- (1) 3/4″ steel pipe flange
- (1) 1″ PVC pipe (about 6″ in length)
- Duct tape
- Flat black spray paint
Total Estimated Price: $15
DIY Fig Rig
Unlike the other stabilizers and shoulder mounts, the fig rig is an innovative alternative to keep your camera steady while still providing the full range of motion. A fig rig works exactly like it looks like it would. You place your camera in the center and hold onto the outer ring as you would a steering wheel. This allows tons of different contortions and canted angles which you won’t get in a standard stabilizer. Here’s what you need to get started.
- (1) 3/4″ PVC (5 ft)
- (10) 45-degree elbow
- (1) cross connector
- (2) T-connector
- (2) end caps
- PVC cement
- PVC cleaner
- (1) 1/4″ bolt, 2″ long (maybe shorter)
- (1) 1/4″ washer
- (1) 1/4″ nut
- (1) 1/4″ wing nut
- (1) 3/4″ drill bit
- (1) lawn mower grip
- spray paint (high temp)
Total Estimated Price: $12
Other DIY Alternatives
If you’re in a desperate pinch and need some stabilization to hold you over until you build your own rig, there are some simple options you can try in the meantime. Watch the video above to try out any of these handheld quick-fixes.
- Pulling the camera strap against your neck
- Standing on a string attached to your camera
- Using household objects in your environment
- Using your tripod as a steadicam
- Attaching a rubber band to your waist
Total Estimated Price: Free
Have any other DIY gear hacks that you’d like to see? Let us know in the comments.