How to render an effects composite intelligently in Avid Media Composer

As a video editor, your time is valuable. Save precious time and hard drive space by learning how to render intelligently in Avid Media Composer!
Avid Media Composer’s ability to play back complex effects composites in real time is only limited to the sequence’s unrendered streams. That is, the more unrendered effect streams you have, the more likely that you’ll start dropping frames on playback. However, once you render the sequence, brand new media is created, and there’s no longer any limitation — everything should play back in real time with no problem.
Because rendering creates new media, however, you should usually only perform full-resolution renders after you are finished editing a particular effect-heavy section. (There are lots of other ways to allow real time playback without rendering, which we’ll discuss in detail in a future post.)
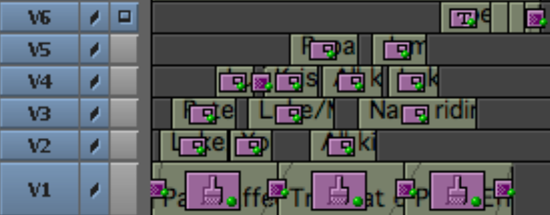
This composite is heavily populated with effects, thereby making it a supreme canidate for dropped frames on playback.
Ok, so this is all obvious, right? To play a composite back in real time, you render the sequence. It’s not rocket science…
Except that one of the biggest myths of Avid editing is that you should render every video track within an effects composite. Indeed, even seasoned editors are misinformed about this. Too many mislead editors simply mark an IN at the beginning of the sequence, mark an OUT at the end of the sequence, enable all tracks, select Render In to Out, and then go off to get lunch, leaving the sequence to render for the next 30-40 minutes. Doing this is a tremendous time-waster and unnecessary space-filler! Why? Because when you render a stream of video, it renders the effects on that video track, plus all lower video tracks. Therefore, if you render every video track, you are being unnecessarily redundant, wasting drive space, and taking way too much time.
Bottom line: you should always try to render intelligently. That is, you should keep in mind that rendering only one video track (the highest-most video track) is really all you need to do in order to render the entire composite.
To render an effects composite in Avid Media Composer:
- Play the sequence through, and note where it drops frames (indicated by red bars in the timecode track). Also note where it sends warnings that frames are about to be dropped (indicated by blue and/or yellow bars in the timecode track).

- Add a video track above the composite.
- Within this topmost track, insert add edits at the boundaries of where the sequence dropped frames (indicated by the red bars).
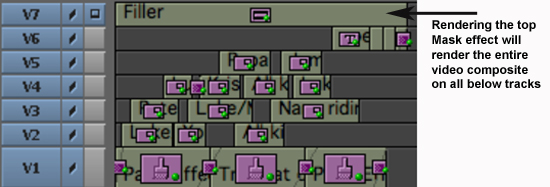
- Add a Mask effect to the section of Filler between the add edits that you created in Step 3.
- Render the Mask effect. (This is now called a “render effect.”) This render will create a brand new video file that contains the result of the entire composite — the top video track, as well as all video tracks below it. In the below picture, the “Filler” Mask effect acts as the render effect.
- Once you’ve rendered the render effect on the topmost track, the entire sequence will play in real time. Why? Because the render always contains the composite of the effect rendered and all lower tracks and effects. And that’s all there is to it! Happy rendering!