Setting up for Multi-camera Editing in Avid Media Composer: Part 1 of 2

Make sure you get yourself set up right for multi-camera editing in Avid Media Composer!
This is the first part in a 2-part series on multi-camera editing. Check out Part 2 here.
With the advent of multi-cam in the 1950s, both production and post-production changed completely. All principle shots (LS, MS, CU) could be captured in a single performance—in live or studio-recorded settings. Hours of production time were eliminated because the scene didn’t have to be re-lit and re-set for each take, and directors were able to call shot switches on the fly. Further, editors were able to edit a scene without the typical host of continuity issues that are common in single camera shoots.
Over the years, there have been numerous phases of popularity of multi-cam for television shows, but it has remained a staple for event videography and editing. Let’s take a look at how multi-cam is shot, and then we’ll take a look at how to set everything up in Avid Media Composer.
Here is a typical multi-cam setup:
- A wide master shot (B) captures the overall action and establishes the scene (LS)
- At least two crossover “ISO” cameras (A) and (C) capture closer actions (CU, MCU or MS)
- (Often) A roving (X) camera that is typically hand-held focuses on the main action

Each of the above shots must be synced in some way – usually by identical timecode or by a slate/clapsticks at the head of each shot. In this way, they are grouped to form one synced cluster of shots.
Grouping Clips
After a scene is shot in a multi-cam environment, the footage must be captured/imported into Avid Media Composer, and the shots must be grouped and synced.
To Create a Group Clip using IN points:
- Create a new bin for your Group Clips.
- Load the first clip into the Source Monitor and mark an IN point at the exact moment where the clapsticks come together. Continue to load each take into the Source Monitor and mark an IN at each point of sync.
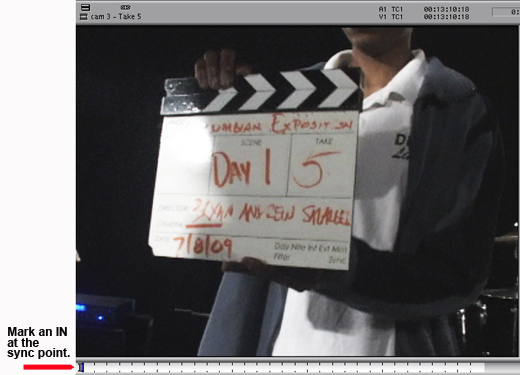
If you scrub through the shot frame-by-frame, this is the first frame where you hear an audible “click.” Make sure to press CAPS lock to be able to hear the audio as you scrub frame-by-frame. - Shift-click all the clips in the bin that you’ve synced with IN points.

- Choose Bin > Group Clips, or press Shift +Command+G (Mac) or Shift+Ctrl+G (Windows).
- Sync clips by IN point.
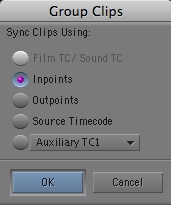
If the clips were synced with a tail slate, you should mark OUT points to sync the clips, and choose Outpoints (above). If the clips were shot with identical timecode, choose the Source Timecode option. - Click OK. A group clip is formed at the top of the active bin, with the name of the first clip in the group, followed by Grp.n.
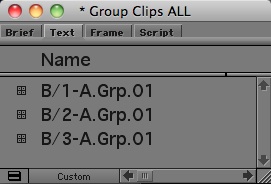
- Move this Group Clip into the Group Clips bin and label it appropriately.
- Continue to group each set of takes.


Setting up your Multi-cam Editing Environment
Once you’ve grouped each set of takes and organized them appropriately, it’s time to set yourself up for MultiCam editing.
To set up MultiCam editing:
- Create a new bin called “Group Clip Sequences.”
- Load your group clip into the Source Monitor. Mark an IN and an OUT to define the clip (or section of the clip that you want to edit).
- Splice the group clip into the timeline.
- Name the new sequence. Place it into the Group Clip Sequences bin.
- Activate MultiCamera mode by choosing Special > MultiCamera Mode or press Command+Shift+M (Mac) or Ctrl+Shift+M (Windows).
- By default, the monitor will display four monitors, called a Quad Split. (If you don’t have four shots, it will display as many as you have.)


- If you need to view more than four shots (Avid can display a maximum of nine at a time), you may change this via the Command Palette. You may map the Nine-Split button (Command Palette > MCam tab) to your keyboard.
- To switch to an additional bank of four or nine camera angles, map the Swap Cam Bank button (Command Palette > MCam tab) to your keyboard. (You can swap banks on-the-fly while playing in Quad Split mode, but not in Nine-Split mode.)


Audio and MultiCam
When you’re setting up your multi-cam environment, you need to decide how you want to cut in your audio. Sometimes, you want the audio of each clip to be edited with the video on every cut. Other times, you want one camera’s audio to act as the audio for all camera angles. Avid Media Composer lets you do either of these methods.
By default, when you cut between one camera angle and another, the audio does not switch. (You can switch it later, but it doesn’t change on the fly.)
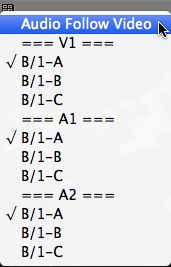
The Audio Follow Video option allows you to switch both the audio and video for each camera angle. This overrides the Timeline track selectors and switches audio in track A1 only.
To set up Audio Follow Video:
- Click on the Multi-cam icon above the Source Monitor to see the drop-down patch menu.
- Select Audio Follow Video, which is the first selection in the list. (You can also use this list to set up any combination of Audio/Video patches that you want.)

You’re ready to edit!
Ok, you’re all set up for multi-camera editing. Now comes the fun part! Check out Part 2 of this tutorial series to learn how to edit multi-cam.