Tips For Prepping for an After Effects Online Edit

After Effects is a powerful program that can be fantastic as an online and finishing tool with a only few changes in your preparation and workflow.

A few months ago, Oliver Peters did a fantastic post about the benefits of using After Effects as a finishing tool. He covered a lot of the benefits – significantly more powerful typography and design tools, larger library of effects, powerful nesting/precomping, and even glossed over others, like better keyframe control, 3D object abilities, easy motion blur, time remapping and frame interpolation – you get the idea.
 What he doesn’t cover is the specifics of an After Effects finishing workflow…but you’re in luck! I’ve been using this workflow for several years.
I initially started doing it because I was creating videos for a specific non-standard aspect ratio being projected by a set of image blended projectors. All of my videos had to be cropped to 2048×768, and at the time I was editing in FCP7, so all of my videos had to be formatted for this aspect ratio in After Effects. I loved the power and flexibility of the workflow so much that I kept on doing it after we moved back to a standard 1920×1080. It became even easier when I moved to Premiere Pro as my primary NLE.
There are a few things I’ve learned along the way with prepping a timeline in Premiere (or whatever NLE you use) for finishing in After Effects, and they might be good things to consider if you decide to try out this workflow. All of the following suggestions are built around using Premiere’s Dynamic Link to send to After Effects, but most of them still apply if you’re using an XML and After Effects’ built in “Pro Import” command.
1. Use Placeholders for Text
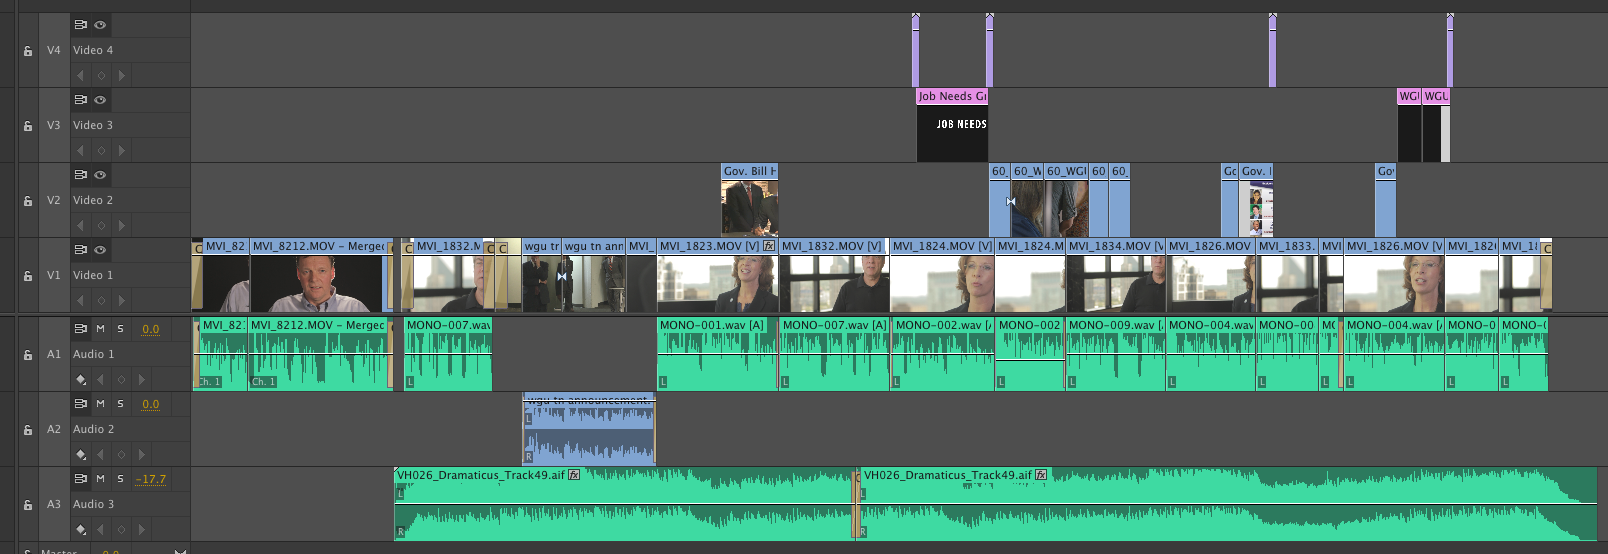
Believe it or not, After Effects can’t actually read the actual content of titles from Premiere. It doesn’t just ignore font and formatting like Automatic Duck used to when coming from FCP; After Effects completely replaces the text with a black solid. No actual title data is carried over. What are carried over are effects, keyframes, changes to the motion parameters, and timings (in and out points). After Effects also carries over the name of the text layer. This is the best workaround for text content: Name your title in Premiere with the full content of the text you want at that spot and After Effects will make that the name of the black solid. Then you can just copy and paste the name to a new text layer, and use the black solid for timing the in and out points. Here’s a timeline that had a ton of overlay and full screen graphics. Every pink layer is a separate graphic (click image for larger view).

In my workflow, I don’t even bother with the content of the title tool. With my first text layer, I make the title show the word “placeholder”, name the title layer what the content should be, and place it. This is what every layer in the above timeline said:

Then, all I have to do for the next title is duplicate the first one (for speed, I’ve mapped this to the shortcut CMD+D in Premiere to match After Effects). When you duplicate a layer in Premiere it automatically selects the layer and puts you into rename mode. Just paste or type whatever the content of the new layer should be, drag or insert/overwrite it into your timeline, adjust the timing and transition needed and there you go. No more messing with Premiere’s clunky title tool: Instead you can use After Effect’s significantly more powerful typography tools!
2. Keep Tracks to a Minimum and Stay Vertically Organized in Premiere
When you send from Premiere, After Effects lines up your clips by tracks. The tracks stay in the correct order (top to bottom, not numerically), and each track staggers/stair-steps down before starting the next track. This is important to take note of because editors tend to group things together vertically, like B-roll on upper tracks or titles above the shot it should go over. When you make the move to After Effects, even though the layer order is technically correct, since After Effects doesn’t have tracks they won’t be grouped so closely together. You may have to manually re-order the layers to suit the groupings you prefer (I always do this because it helps me keep my comp organized in the long run). Keeping tracks to a minimum (similar to collapsing or using a minimum number of tracks before sending to a color grading application) keeps these groupings easier to find and makes for a more organized comp.
Designating specific tracks for specific items helps with the move and organization in After Effects. I generally use V1 for my storyline (interviews, primary narrative, etc.), V2 for all of my b-roll, V3 for all of my titles/graphics (unless I need to stack them for one reason or another), and V4 for any overlays (film flashes and light leaks, film grain, alpha matte transitions, etc.). This is all subject to change depending on the needs of my edit, but it’s a good template to stick to for me. When I move to After Effects, all of these things stay grouped together vertically.
3. Use Dynamic Link, But Don’t Trust It
Dynamic Link is a fantastic way to get from Premiere to After Effects. Unfortunately, it can cause problems if used too frequently, if it’s been too long since the project was open, if some source files move, if you sneeze too hard – you get the idea. I’ve heard of and seen Premiere project files and sequences get corrupted or glitched. In small uses it works, but frequent large uses can be risky.
Another issue specific to the After Effects offline workflow is changes. When you use Dynamic Link, your timeline in Premiere is replaced with a linked comp. What if you need to make some editing changes? You could do them in After Effects (maybe), but it would be a total pain.
My suggestion? Do one of two things:
- Duplicate your timeline before you send to After Effects so that you have an un-replaced version you can use for any necessary changes, which has the added bonus of leaving the linked comp in Premiere.
- You can send to After Effects and after it’s all done transferring you go back to Premiere and “undo” the send to AE. The linked comp is deleted, which prevents project corruption, but After Effects keeps the timeline you sent. All you do is output from AE instead of rendering in Premiere. This is my preferred option.
4. Export an Audio Mixdown
After Effects is obviously not focused on audio, so working with sound in AE can be frustrating.. So, instead of sending a bunch of audio layers to After Effects (and we all know the crazy amount of audio tracks you can end up with), do your audio mixing in Premiere or a dedicated audio program, then export a WAV file mixdown and bring that into After Effects. That way you’ve only got one audio track that’s already been mastered to deal with in After Effects. You’ll also have all of the pieces you need to do your final export from After Effects, which is the point of the workflow to begin with!
I hope these tips help save you some headache as you move to After Effects for all of your finishing needs!