Using the Automatic Color Correction Tools in Avid Media Composer

Using Avid Media Composer’s automatic color correction tools is a great way to quickly bring your luma and chroma levels into check. But you should be aware of exactly what is happening so that you can manually tweak your corrections further, if necessary.
When to use Automatic Color Correction
The automatic color correction tools are often an efficient way for you to quickly perform general color correction adjustments, like setting accurate white and black values and removing unwanted color casts. You should perform automatic color correction controls with the same intentions—and the same order—as that of manual corrections. Then, you can make additional adjustments manually if you need to fine-tune your correction (which, most of the time, you do).
This post won’t cover an entire detailed color correction workflow, but here is a brief rundown of how manual corrections are typically applied:
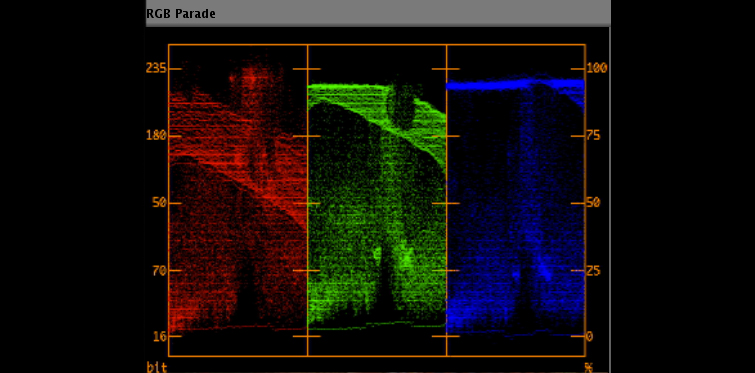
- Set the image’s black point using the Setup slider. (Monitor luma levels using the Y Waveform monitor, making sure the darkest part of the image is set at or near 16 bits.)
- Set the image’s white point using the Gain slider. (Monitor luma levels using the Y Waveform monitor, making sure the lightest part of the image is set at or near 235 bits.)
- Adjust the image’s mid-tones by using the Gamma slider. (Monitor luma levels using the Y Waveform monitor, making sure you have an appropriate range of values from black to white.)


- Balance the image by removing any color casts from the image’s highlights and shadows using the ChromaWheels. (Monitor chroma levels using the RGB Parade, making sure to bring the red, green and blue values of the highlights and shadows into alignment.)

- Adjust the hue and saturation of your image using the ChromaWheels, paying special attention to skin tones. (Adjust chroma levels using the Vectorscope, making sure to set skin tone values along the i-line.)
Getting Familiar with the Auto Contrast and Auto Balance Controls
Ok, now with that review, let’s get started on automatic color correction.
You can use the automatic color correction controls to quickly perform the above Steps #1, #2 (automatic contrast adjustments expand the tonal range of the image, which usually improves sharpness and detail) and Step #4 (an automatic balance adjustment evens out the influence of the different color channels in the image, which usually eliminates color cast).
These three steps usually make up the bulk of the color correction process, so just by clicking a few buttons, you can dramatically improve the image. However, because gamma correction (#3) and hue/saturation tweaking (#5) are not included in this automatic workflow, it’s always a good idea to set a baseline with automatic color correction, and then use manual controls to make further adjustments.
Automatic Color Correction Tools:
Let’s get to know these tools:
- Auto Black: Makes the darkest areas of the image as dark as possible (sets blacks at 16 bits by adjusting the Setup slider control).
- Auto White: Makes the brightest areas of the image as bright as possible (sets whites at 235 bits by adjusting the Gain slider control).
- Auto Contrast: Maximizes the tonal range in the image, making the brightest areas of the image as bright as possible and the darkest areas of the image as dark as possible. Essentially, it’s the same as performing the Auto Black and Auto White simultaneously by adjusting both the Gain and Setup slider controls.
- Auto Balance: Balances the colors in the image and eliminates any color cast. Adjusts all three ChromaWheel controls.
- Remove Color Cast Buttons: You can instead balance an image (remove its color cast) using the Remove Color Cast buttons. These can provide more precise control over color cast removal than Auto Balance buttons because you choose the area that should be color neutral (like areas of the image that are “supposed to be” pure white and pure black.

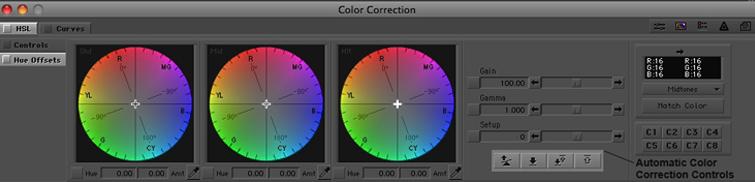
Performing Automatic Color Corrections
There are two groups within the Avid Media Composer color correction toolset: Hue Offsets and Curves. Each works within a different color space and has different results. Therefore, each has a slightly different way of performing the automatic color correction techniques.
To make an automatic color correction in the Hue Offsets tab:
- Enter Color Correction mode.
- In the Timeline or in the monitor window, navigate to the segment you want to correct, and make sure the Record Track button is selected for the track you want to correct.
- Do one of the following:
• Click the Auto Black, then Auto White buttons.
• Click the Auto Contrast button. - Click the Auto Balance button.
To make an automatic contrast or balance adjustment in the Curves tab:
- Enter Color Correction mode.
- In the Timeline or in the monitor window, navigate to the segment you want to correct, and make sure the Record Track button is selected for the track you want to correct.
- Click the Auto Balance button.
- Do one of the following:
• Click the Auto Black, then Auto White buttons.
• Click the Auto Contrast button.


To use a Remove Color Cast button in lieu of an Auto Balance button:
There are three ChromaWheels—one for Shadows, one for Midtones, and one for Highlights.
- Click the eyedropper to the lower right of the Shadows ChromaWheel and then click on something that should be black in your image. Avid Media Composer will adjust the image so that the area you click on becomes black, and everything else adjusts accordingly.
- Click the eyedropper to the lower right of the Highlights ChromaWheel and then click on something that should be white in your image. Avid Media Composer will adjust the image so that the area you click on becomes white, and everything else adjusts accordingly.
When you have performed the automatic color correction techniques, you can go back and manually adjust other characteristics of your image, like its Gamma and Saturation levels.
Note: For an in-depth video tutorial on how to perform these steps, check out my lynda.com video tutorial on using Automatic Color Correction.
Not all shots call for use of the automatic color correction tools. Here are some general rules you should follow when performing automatic color corrections:
1. Only use the Auto White, Auto Black, and Auto Contrast controls on images that should have areas of strong highlight (white or close to white) and areas of strong shadow (black or close to black). If you mistakenly perform a luma correction on an image that does not require a full tonal range (i.e., a mostly dark scene with no real white highlights, or mostly bright scene with no real dark shadows), then the auto correction will most likely not work well.
2. There is usually no benefit to making an automatic correction more than once on the same image (regardless of whether you switch from Hue Offsets to Curves, or vice versa). Once you make one automatic correction, use manual controls to tweak further.
3. Automatic corrections you make in the Hue Offsets subdividing tab of the HSL tab and those you make in the Curves tab do not produce identical results for most images, and sometimes produce very different results. This is because the methods for calculating the corrections are different and the controls in the two tabs operate differently. Automatic corrections in the Curves tab often work well for correcting basic problems caused by incorrect camera color balancing.