

A Practical Look at FilmConvert: Film Emulation for Video

Add the feel and grain of motion picture film to your projects with Film Convert.

What is FilmConvert?
 FIlmConvert is a Film Emulation plug-in and stand alone app. It is designed to emulate the color and grain of popular film stocks from Kodak and Fuji.
Film responds to colors differently than video, and FilmConvert lets you pick specific film stocks to emulate. It feels more like a system than an add-on plugin, in that it reacts to what you choose as your “source camera”. This means that you get a specific response to your source footage.
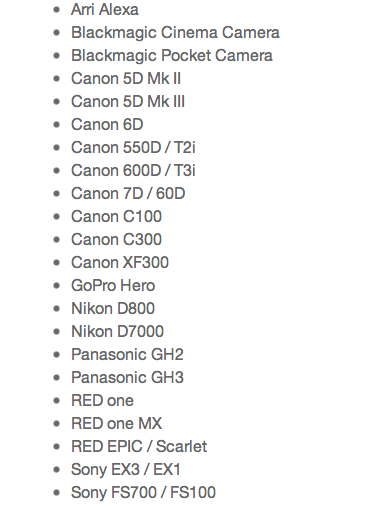
FilmConvert supports most digital camera formats (Arri, RED, Black Magic, DSLR’s, Go Pro) including the Blackmagic Pocket Camera Film setting.
If you are using DSLRs, there are several third parties that make Picture Styles so you can have more control over your image in Post and they work hand in hand with FilmConvert (VisionColor, Marvels and Technicolor for Canon, Flaat for Nikon).
FilmConvert works in Premiere Pro, FCP, Motion, Resolve, After Effects, Photoshop and Sony Vegas. That it works in so many apps makes it very useful for freelancers like myself. The job I’m on generally determines what software I use, so it is nice to have the flexibility to use FilmConvert in any of those for one price ($299). Additionally, it now works in DaVinci Resolve 10 Lite (which added OFX support that FilmConvert uses), which is very cool as it is a popular and free color grading app.
Whether or not the $299 price tag is worth it for you definetly depends on the type of work that you’re doing. Obviously not all projects require or benefit from a film look, but for indie filmmakers looking to give digital video that organic effect, FilmCovert is a worthwhile option.
For a taste of what FilmCovert can do check out this example by Brennan Robideaux:
FilmConvert Workflow
Let’s talk a little about workflow. I shoot with a Canon 5D Mark II and recently bought a Blackmagic Pocket Camera. A lot of folks shoot DSLRs with a flat picture style, to minimize “baking in” contrast” so they can better control that in post.
I started using use VisionColor for Canon EOS last year after being impressed by examples of the Picture Style on their website:
It comes with 2 picture styles, VisionColor and VisionTech. To quote VisionColor:
The VisionColor and VisionTech gamma curves are somewhat similar to Canon’s Neutral picture style with the Contrast at -4 (recommended value by Stu Maschwitz)
The VisionTech picture style (which comes for free with VisionColor) also lifts the black point to enable the camera to encode low light color information more accurately – not to increase DR”

The appeal of the Blackmagic Pocket Cinema Camera is the ability to shoot in CinemaDNG RAW (lossless compressed). This compressed DNG is different than the CinemaDNG the BMCC uses (that uncompressed DNG is supported in Premiere Pro and Speedgrade). Only DaVinci Resolve 10, After Effects, and Photoshop currently support it and I find it easier to work in Resolve and apply FilmConvert there.
If you are interested in a Resolve workflow, check out Denver Riddle’s tutorial on transcoding in Resolve and relinking via XML.
Using FilmConvert in Premiere Pro
So, now let’s explore how FilmConvert and VisionColor work together…
If you have noisy footage, FilmConvert suggests that you reduce noise first before applying the plugin. Scott Stacy has a video tutorial where he covers reducing noise, adds sharpening, and how he likes to use multiple instances of Film Convert.
In Premiere Pro, I created an adjustment layer and applied FilmConvert.
I find putting it on an adjustment layer gives you the most control. Depending on the look you are going for, you may want to apply multiple copies of the effect or LUTs on other adjustment layers.
James Miller shares his FilmConvert and LUT workflow here, and I previously looked at LUT’s in PP here.
The FilmConvert interface in Adobe Premiere Pro:

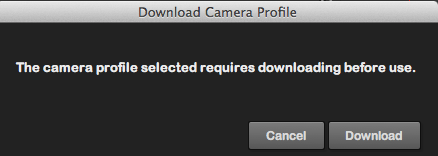
In my example I selected VisionTech for the Canon 5DM2, since that is what I used. If you don’t have the preset you select, the FilmConvert webpage will launch and you can download the preset.
Pick the Film Stock to want to emulate. If you want a sense of what the different stocks look like, check out Ruben Kremer’s comparison video.
You can tweak the plugin with a variety of settings (Exposure/Temperature, Film Settings, Color Correction, Levels).
I like to apply one pass of the filter with no grain. If I decide to add grain I prefer to create another adjustment layer and add the grain there so I have more control when a client changes their mind.

I suggest you experiment and find out what works for the needs of your project. If you just want to emulate how film reproduces color, then just pick your source, pick the stock, and drop the grain to o%.
Then you could add FilmConvert again and use it more as a look creator, tweaking the settings to taste.

Are you using FilmConvert?
Share your thoughts and workflow tips in the comments below!


