
Free Final Cut Pro X Plugins to Improve Your Video Edits

Expand your video editing toolkit with 13 FREE Final Cut Pro X plugins to boost your editing workflow and improve your final product.
If you’re a follower of the old adage “Work smarter, not harder,” then plugins might be your new best friend. They’re excellent at condensing complicated tasks into easy-to-use, drag-and-drop effects that speed up your edit and reduce stress. But, if you don’t have a nest egg to draw from for investments in your editing suite, plugins can be a hard sell. So, to combat that, we’ve rounded up some of the best plugins available to you for FREE, for Final Cut Pro X.
Let’s get to downloading!
What Are Plugins?
Plugins are third-party add-ons that enhance specific tools in Final Cut X — or even add features that weren’t initially included in the software. They’re usually created by people looking to improve their own workflows, then shared on the internet—often for a fee. The original software works just fine, but the additions make it a little bit better. Simply put, it enhances the software by providing immediate access to many tools and extra features.
Some companies—like Red Giant—also specialize in creating plugins for editing programs. But, those plugins usually come at a price. If you’re interested in a curated list of the best-paid plugins, check out this article. Like most paid vs. free products, you’ll find more features and possibilities with the paid plugins, but the free plugins I’m about to discuss will also help you out.
1. mLUT
Now, I hope I’m not ragging on Final Cut’s integrated color grading software too hard…but it could use a little work. That’s where the mLUT tool from MotionVFX comes in. It’s a free plugin that you can use to manage your look-up tables in one place. With intuitive settings and the ability to link to MotionVFX’s extensive library of LUTs, it’s an incredible color grading tool without the hassle of Final Cut’s original grading components.
To get the most out of your program’s color grading capabilities, the makers of mLUT, Motion VFX, recommend you shoot or ask your footage to be shot in log video file format. This will give you a greater palette to work with in FCPX.
Download mLUT here.
MotionVFX also offers another free LUT pack titled mLUT Movie. However, this pack is NOT Free. I just wanted to include it here so you can test out the first free pack before you decide to move to the paid version. These are just more looks for your choosing that lend a little more to the cinematic side of things. Be sure to check out the trailer below to make sure the looks are something you’re going for.
Like most LUT packs, one of the appeals is the “one-click” aspect of the plugin, which allows you to apply the grade in one click. However, you might find the image still needs a bit of tweaking after you’ve done this, so just be prepared to continue playing around with the image.
2. Color Finale 2.0
Another free color grading plugin, Color Finale 2.0, gives you a whole new range of color grading presets and tools to make your footage look more cinematic. You can add film emulation to recreate a retro look or use integrated masks to color grade certain parts of your footage without affecting the whole clip. This plugin is free for a trial, but if you like it enough, the final price is $99.
Download the Color Finale trial here.
If you’re interested in a tutorial on how to use the plugin, look no further than Dylan John’s wildly helpful breakdown below. I think these types of tutorials are great also so you can see someone else using the plugin so you can decide if it looks like anything you’d be interested in.
3. Movie Pop
If you’re looking for an extremely easy way to recreate title sequences from some of your favorite movies, Movie Pop, from Stupid Raisins, is a great plugin. It’s got a stock of free-to-use title sequences that recreate movie titles like Assassin’s Creed, Star Wars, and Harry Potter. This plugin doesn’t do much other than recreating titles, but since it’s just fun enough (and free), I included it on this list. Stupid Raisins has plenty of other free plugins to use, so be sure to go check out their site for even more free items.
Download Movie Pop here.
4. The Alex4D Suite
If you’re looking for a giant suite of free Final Cut plugins, look no further than Alex 4D and his giant library of free plugins. Big thanks to Alex Gollner, from Alex4D.com, for making his Final Cut Pro X plugins available to all video editors! Make sure to visit the site for more plugins.
The plugins offered in his free library include over 120 transitions for a logo, title, image, or even video clip. It should also be said that this plugin is relatively old, so just know that before you go to the site. However, I’ve found myself needing a quick transition for a title and absolutely do not feel like animating it myself. This pack always comes in clutch when I’m mentally exhausted at the end of an edit.
FYI, you’ll see us mention Alex4D a few more times; it’s a precious resource for FCPX editors.
5. Wide Angle Fix
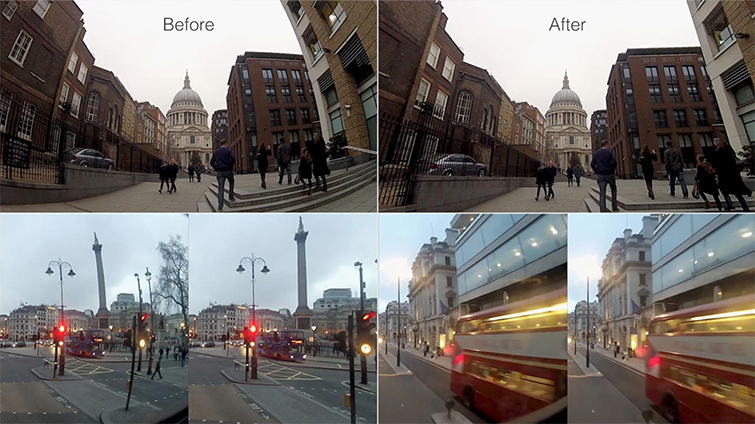
If you shot on a GoPro or used a fisheye lens to capture a shot, you might see some warping at the edge of your frame due to the lens’s wide field of view. While this is most likely your intention for the shot, there’s always the off chance that your client shoots back some notes like, “we actually don’t like the wide angle anymore, can you do anything with this?” The Wide Angle Fix plugin de-warps the footage to make it appear flatter.
This plugin also comes from Alex4D, so if you like the pack above, be sure to download this niche but super helpful plugin.
Download the Wide Angle Fix.
6. mLight Diffuse
MotionVFX coming at us strong with another outstanding FREE plugin pack that adds “anamorphic-like” flares and streaks to your image. It also creates a soft, warm halation effect over the brightest part of your image. Think of it as adding a Pro-Mist filter to your shot in post-production, and it’s free!
Once you’ve downloaded the plugin, using it is super simple. You drag and drop the effect on your clip, and then you can start tweaking the colors, intensity, and placement of these flares and blooms. You can also pick the color of these light blooms before you drag them onto your clip. With mLight Diffuse, you get six different options for the look you want. Check out the tutorial for using the free plugin below!
7. Distortion Effects

These are actually four unique effects to warp your video image. Modify the distortion by adjusting parameters in Final Cut Pro X.
- Black Hole: your video image gets dragged to a single point.
- Bulge: define a center point and add an inward or outward bulge to your image (see example above).
- Circular Zigzag: a ripple-style effect. Dial in the amount of refraction.
- Twirl: spins and twist your clip. Go from subtle to extreme.
Download the free Distortion effects plugin for FCPX.
8. Adjustment Layers

Anyone accustomed to using After Effects or Photoshop may be surprised there’s not an adjustment layer feature also built into FCPX. This plugin attempts to change that by using a title generator to mimic an adjustment layer. Apply the adjustment effect to the top layer in your timeline, and any changes you make to it will affect all of the layers below. Change the scale, position, add effects, fade in and out — there are tons of possibilities.
Download the free Adjustment Layer plugin for FCPX.
9. Mask+
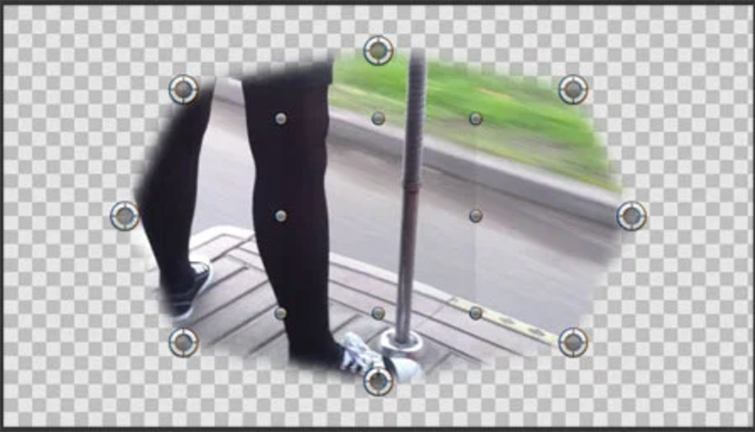
Want to keyframe your masks in FCPX? You won’t want to be without this extremely handy plugin. Add a four-, eight-, or sixteen-point mask to your footage and keyframe a mask to scale, reposition, or rotate over time. Stack duplicate clips on top of each another and use the mask to create color effects, blur a specific part of the video image, or add a vignette.
You can also start playing around with multiple people in one scene (that aren’t actually in the scene together). This plugin is a fun way to introduce yourself to the insane world of masks in NLEs and all the possibilities that come with them.
Download the free Mask+ plugin for FCPX.
10. Curves
Get more control over your Final Cut Pro X keyframing. The free FCPX Curves plugin allows you to change the values between two keyframes of any element in your timeline. Adjust the position, rotation, trim, and scale — and define the order of these adjustments. This handy plugin seems especially useful for creating custom transitions.
Download the free Curves plugin for FCPX.
11. Motion Blur
In this free plugin, you’ll be able to add that classic motion blur look to either your motion graphics or your subject in the film. In the tutorial above, Ryan Nangle uses the plugin on a timelapse clip, showing how FCPX takes the effect and applies it to the objects in the frame. You’ll notice that this effect might take some time to render out correctly, so be mindful of this as you download it into FCPX.
Download Ryan Nangle’s Motion Blur Here
12. Interface 2037
This may not be the most versatile plugin on the list, but it’s undoubtedly the most fun! Alex says he created this title effect based on the computers in Alien (1979). It’s an excellent text effect for giving your project a sci-fi or retro-futurism vibe. See it in action in the video above.
I’ve found this type of specific, niche effect is the most fun to play around with if you’re learning how to edit in Final Cut Pro X. You can get a feel for how plugins work and how effects like this work inside the program.
Download the Interface 2037 text effect for FCPX.
13. Shutterstock FCPX Plugin
Of course, you know we have to mention Shutterstock in this list, but for a good reason. This plugin is incredible for sourcing royalty-free footage and images for your project without even having to leave the application. Instead of going to the site to download a preview clip, you can drop the stock footage directly into your timeline and send it to your client for preview. When you’re ready to license your clip, buy the clip within the plugin, and your timeline footage will automatically appear without the watermark.
Download the Shutterstock FCPX plugin here.
Also, if you’re new to FCPX and want to learn some of the essential tools you can expect to use while editing, check out our tutorial below! The tutorial covers keyboard shortcuts and essential editing functions you’ll see when starting up in FCPX.
How to Install Final Cut Plugins
When you download a plugin, you need to do some creative filing to get it to appear in your application. Bring your file into the Final Cut Motion Templates file in the “Movies” base folder, then add “Localized” to the end of the motion templates folder name. Some plugins use different ways to install themselves into FCPX, so make sure to read the instructions on the site before installing or modifying anything.
This post was originally published on May 30, 2012. We’ve updated it to reflect changes in the industry.
Cover image via goffkein.pro.
Looking for more on Final Cut Pro X Plugins? Check out these articles.


