

Video Editing: Speech Analysis in Adobe Premiere Pro

Speed up your video editing workflow in Adobe Premiere Pro by using Speech Analysis to navigate to specific words and clips in your project.

Speech Analysis is becoming a popular option in video editing applications these days. It can save you time if you are dealing with large amounts of footage, by allowing you to quickly locate a line of dialogue or subject matter in your video clips.
Avid Media Composer offers speech analysis and recognition as an additional purchase. If you want quality speech analysis in Final Cut Pro X you’ll need to pony up for an additional plugin. The folks at Adobe have made speech analysis easily accessible by including it in Premiere Pro CS6.
Like all speech recognition programs, the quality can be a bit hit or miss depending on the speaker and the quality of the recording. However, after an initial analysis you can make changes manually or add the script to Adobe Story to improve the results. In this post we take a look at how to apply Speech Analysis in Premiere Pro, how to use it in conjunction with in and out markers and how to attach a script to your Premiere project.
Step 1: Analyze Content
When working with speech recognition in Premiere I recommend setting your workspace to Metalogging (Window > Workspace > Metalogging). Then, select the clip or multiple clips in your project, right click and select “Analyze Content”.
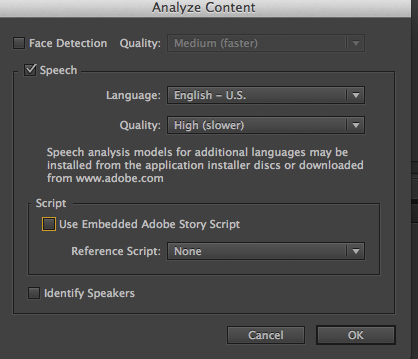
In the Analyze Content panel check Speech and set the quality to High, leaving the rest unchecked. Then, click OK. Note: If you want to attach a script from Adobe Story be sure to check the “Use Embedded Adobe Story Script” box.
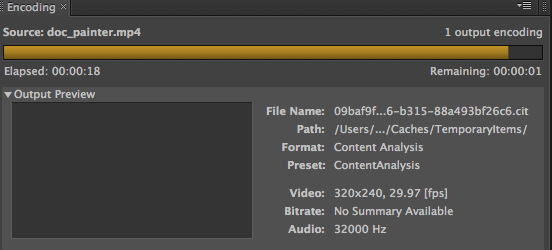
Adobe Media Encoder will launch and encode the Speech Analysis. As a timesaving benefit, you can continue to work in Premiere Pro while Media Encoder runs in the background.
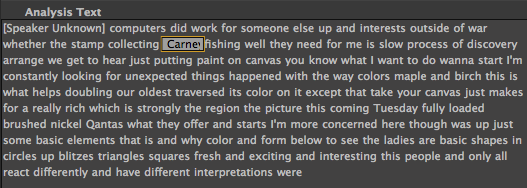
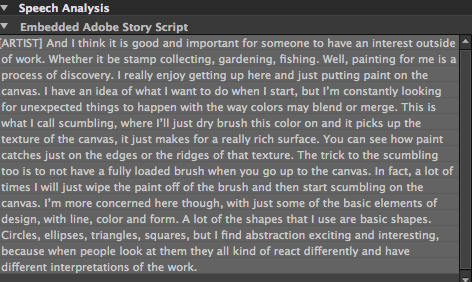
After the Speech Analysis is complete, you will see the results in the Speech Analysis panel. Click the Play button (shortcut: spacebar) and each word turns blue when it’s played.
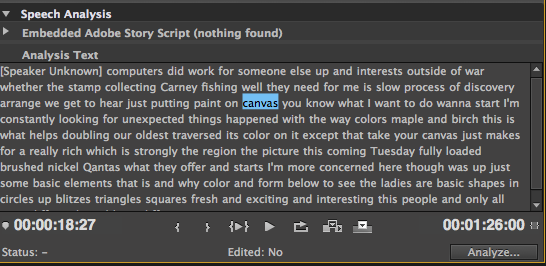
Again, it’s worth noting that the quality of your speech analysis in Premiere will largely depend on the clarity of the on-screen speaker, background noise in the footage and the quality of the recording (high quality vs low quality microphone). You can delete/merge/insert a word by right clicking on a clip.
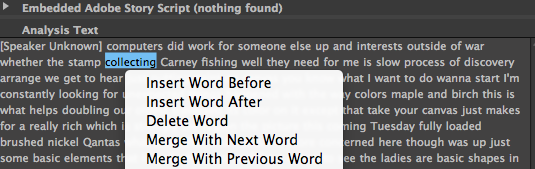
To change a word click on it twice and then type the new word.
Navigating Footage Using Speech Analysis
Now, when working with analyzed footage I usually change my workspace back to the default editing layout. I moved the Metadata panel to the side of the Source Monitor, so I can see both at once.
I save this as custom workspace called “Script Editing” – a timesaver when you’re doing this process often.
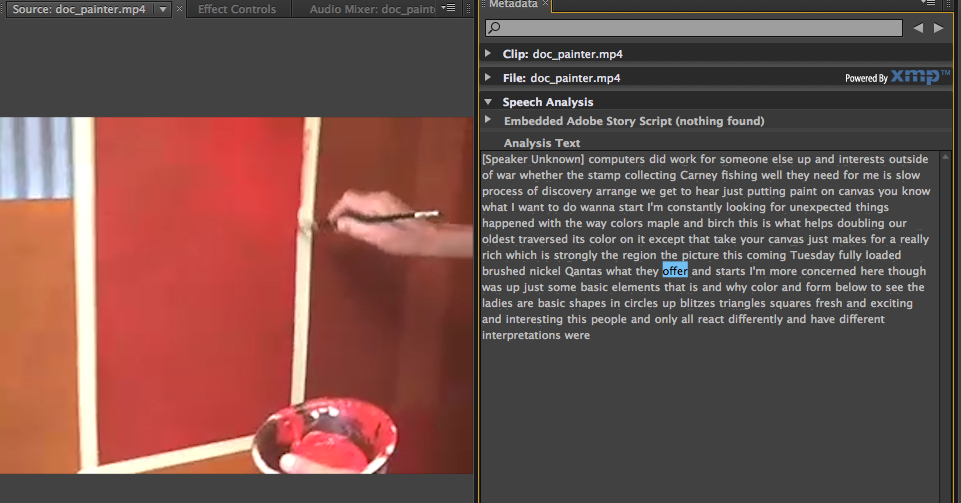
I can now use Speech Analysis to find specific parts of my interview, and this will save me time, especially with longer interviews. You can also edit the footage directly off the script. Select a word, press I to set an In, then find the word you want to end on and press O. The area you have selected turns yellow.
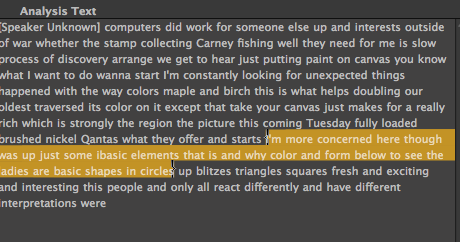
Then click the Insert or Overwrite icons in the Source Window or Analysis Speech panel to edit the clip into your sequence. This is a really quick way to assemble rough cut edits in Premiere Pro. You can always tweak the exact in and out in the video off your timeline later.
Insert/Overwrite Icons
![]()
If you’re more inclined to create subclips of your footage (great for organization) you can also do this with “In and Out” and then from the menu bar Clip > Make Subclip. When working with a large amount of interview footage I prefer to use the speech analysis information as a guide in creating my subclips.
I can also mark sections of the clip by adding markers to the script. Click on the word in the Speech Analysis panel where you want to set a marker, then click on the Source Monitor and press M to create the marker. Very useful for taking notes during an edit.
Improving Speech Analysis with Story
If you are doing doc work or scripted film/TV work you can use Adobe Story to increase the accuracy of Speech Analysis. Adobe Story is an online Service, but it can also be downloaded as an app to work offline. There is a free Version called Story Free, while the full Adobe Story is part of the Adobe Creative Cloud. Check out the Adobe Help for details on using Speech Analysis in Story.
Let’s take a quick look at the process of using story with your Scripts. First, in Adobe Story click the “+ New” icon to create a new script.
![]()
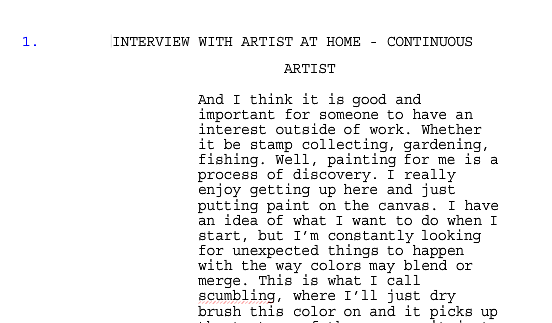
For narrative projects you can import scripts created in other apps. If I am doing a documentary , I can paste a transcription of the text into the script.
To get this to work in Premiere Pro you have to add scene numbers (scene numbers are marked in blue):
The easiest way to do this is to click on Production > Manage Scene Numbers in Adobe Story and add scenes automatically.
Click image for larger view:

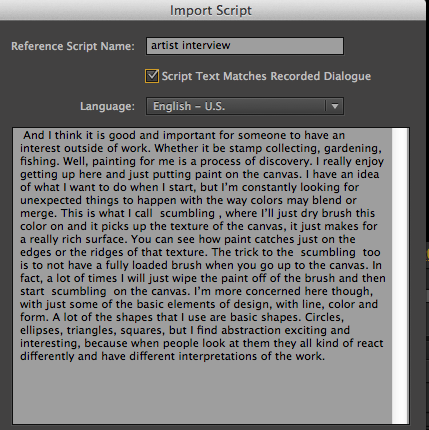
When you are done with your script, export it in the .astx format. Now, in Premiere Pro when you analyze the script click the “use embedded Adobe Story script.”
In my example the transcript matched what the speaker was saying so I checked “Script Text Matches Recorded Dialogue”.
Using Adobe Story with Premiere Pro makes the Speech Analysis very powerful and was a time saver for me on several doc projects where I was able to attach a professional transcript and quickly navigate to what the speaker said.
What we’re seeing is just the beginning of speech recognition in video editing apps. It will be exciting to see what advancements will be made in the near future. When used properly, Speech Analysis can be a great tool to cut down your time in post by organizing and streamlining the process of locating footage.
Are you using Premiere’s Speech Analysis?
Share your thoughts/experiences in the comments below!


