Setting Custom Composition Displays in After Effects
Create a more pleasant After Effects experience with custom composition displays.
Cover image via Shutterstock.
When I first started working in Adobe After Effects, the wide array of tools in the program intimidated me. Just take a look at the composition panel, and you’ll see a number of buttons, boxes, and drop-down menus. This is normal when you’re working in such a powerful motions graphics and visual effects program. However, often when working in After Effects, you only need access to a few tools.
![]()
Let’s say, for instance, I’m working on a project that involves simply applying keyframes to one layer. Let’s also say I’m working on a small laptop that doesn’t offer me much screen space. Both of these reasons incentivize me to customize the display options of my composition.
In this video tutorial, I’m going to show you how I can quickly configure the composition panel in Adobe After Effects to only display tools related to my needs. Specifically, I’m going to customize my comp panel for a keyframing workflow. This will help me cut through the clutter of tools and give me extra screen real estate for a smooth keyframing experience. Let’s get started.
Columns
As I stated before, if you’re new to After Effects, all the buttons and options in the composition panel can be quite confusing. The panel itself consists of a number of columns, all providing some nifty tool to assist you in your motion graphics workflow. Just the switches column alone has a lot going on, including controls for motion blur, adjustment layers, effects, and 3D controls. To customize these columns, I’ll open up the panel settings drop-down menu. Under the columns section, I can select or deselect thirteen different options, including the following:
- A/V Features
- Label
- #
- Layer/Source Name
- Comment
- Switches
- Modes
- Parent
- Keys
- In
- Duration
- Out
- Stretch
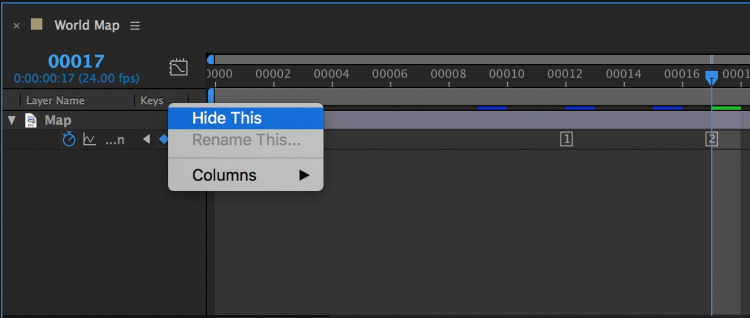
In addition to using the panel menu, I can also quickly deactivate columns by control-clicking directly over the column and selecting Hide This. For this particular workflow, I’m going to hide all of the columns except for Keys and Layer Name. Once you do this, you’ll notice I have plenty of space in the composition panel to keyframe.

Special Modifications
The panel settings menu has numerous other display options, which will help me customize a keyframing workflow. I want to select Show Cache Indicators since I will be previewing my animation. Also, I can switch from Keyframe Icons to Keyframe Indices, which will allow me to view my keyframes as numbers in order in the composition. Finally, if I command-click over the timecode indicator, I can change the display style of my timecode to frames.


