
5 After Effects Keyframe Tips

Check out these 5 tips to quickly and effectively create keyframes in After Effects.
I find that keyframes in After Effects often confuse editors coming from other video editing apps. In this post, get answers to 5 of the more common questions regarding keyframing in After Effects. Sharpen your AE keyframe skills to improve your projects and speed up your post workflow!
1. I Don’t See any Keyframe Settings!
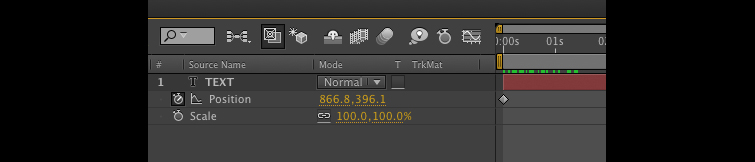
For new AE users, the location of keyframe settings in After Effects may not be obvious. Click the triangle for the entire layer to reveal the Transform properties. Then, click the Transform triangle to reveal the properties you can animate (anchor, position, scale, rotation, property).
The shortcut for each variable is the first letter of its name (for example, pressing P reveals its Position). This is true except for Opacity which is T – think “T” for Transparency. If I also wanted to modify another property like Scale, I would press Shift + S to see both properties.
AFTER EFFECTS POWER TIP: Alt/Option + the shortcut will also create a keyframe (ex. Alt/Opt + P creates a keyframe for Position).


2. What are the stopwatches for in AE?
In After Effects you click the stopwatch to set a keyframe. If you don’t want a property to change over time don’t click the stopwatch – instead just change the value (ex. changing Scale to 50 gives it a constant value of 50%). To animate a property or change it over time, first click the stopwatch. To create another keyframe move the playhead to another place and time and change the value. Don’t click on the stopwatch after you create keyframes, as it turns them off.
To navigate from between After Effects keyframes press J to go the previous keyframe & K to go next keyframe. You can also hold shift when you move the playhead, and this will snap you to a keyframe.
3. Why the different keyframe icons?
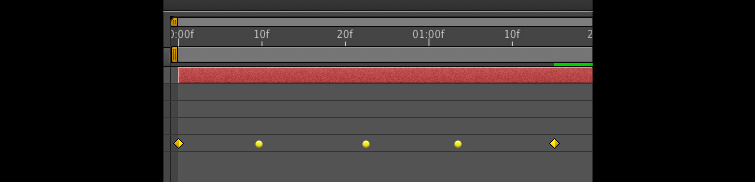
The type of keyframe you see is a visual shorthand telling you how the keyframe will behave. By default, keyframes in the timeline are linear and represented as a diamond. This means the speed is constant. Using only these will give your animation a robotic quality (when in real life most things build up or ease down in speed and don’t move at a constant value).
After Effects gives you the ability to ease a keyframe, so speed more organically builds up or slows down. Select a keyframe. right click, choose Keyframe Assistant> Easy Ease. This eases both sides of the keyframe (looks like an hour glass). This works well for beginning & end keyframes but generally not for middle keyframes. Command/Control click on the middle keyframe twice, to get the auto bezier keyframe (circle) for a smooth rate of change.


4. How do I shorten my animation in AE?
It’s quite common that you will need to change the length of an animation in After Effects, and you don’t want to manually do this by dragging individual keyframes.
Instead, click on the property name (In this case Position), to select all the keyframes. Option/Alt click on the last keyframe, drag and all the keyframes adjust and move together. This will keep their relative spacing.
5. How do I fix inconsistent speed changes?
You create an animation in After Effects with multiple keyframes so the speed is fast in some areas and slow in others.
Use the “Rove Keyframes” function to create smooth motion with multiple keyframes. Select all the Keyframes, right click and pick Rove across Time.
All the in-between keyframes turn into little circles, and the keyframes are automatically spaced to create a smooth velocity across keyframes. Note, rove keyframes look similar to auto bezier, but they are smaller circles.

Implement these After Effects keyframe tips to give your projects smooth motion and speed up your animation and graphics workflow.
Have After Effects keyframe tips to share?
Let us know in the comments!


