

How to Add Subtitles to YouTube Videos

Follow these steps to add subtitles and closed captions to your recently uploaded YouTube video. It’s a game-changer.
Having subtitles in your videos helps you more than you may think. Subtitles are traditionally used for viewers who are deaf, hard of hearing, or speak a different language. By having subtitles, the content can be accurately translated by Google and expand your reach even further than your native language audience.
So, let’s look at how you can add subtitles to your videos and how this can benefit your channel in the long run.
Metadata, Video Ranking, and Translations
With YouTube’s global reach, it’s easy to forget that people worldwide will be watching your videos. You can cater to your foreign audiences by adding subtitles and closed captions to your videos.
You don’t have to know multiple languages to reach your foreign viewers. YouTube will automatically send your caption file to Google Translate. Your foreign audience will be able to select the Translate Captions option and immediately enjoy your video.
Once verified, subtitles and closed captions will be indexed by YouTube to act as metadata. This means your video will be easier to find via searches. This has the potential to increase your viewership and benefit your overall rank.
If you find your videos doing well overseas, you can also translate your description and metadata for those languages. A translation tab on your YouTube Studio page allows you to target specific languages. Go ahead and use it to translate your titles and descriptions for that audience.
How to Add Subtitles or Closed Captions to YouTube Videos
YouTube Studio has made it incredibly easy to add captions to your videos. It automatically creates subtitles for your video using Google’s voice detection software and integrates them into your video.
But, here’s the kicker—it’s usually not exact and, most of the time, it doesn’t include proper punctuation. So, here’s an easy trick to get your subtitles in tip-top shape without typing it all out.
1. Go to your YouTube Studio page and select the video you’d like to add subtitles to.
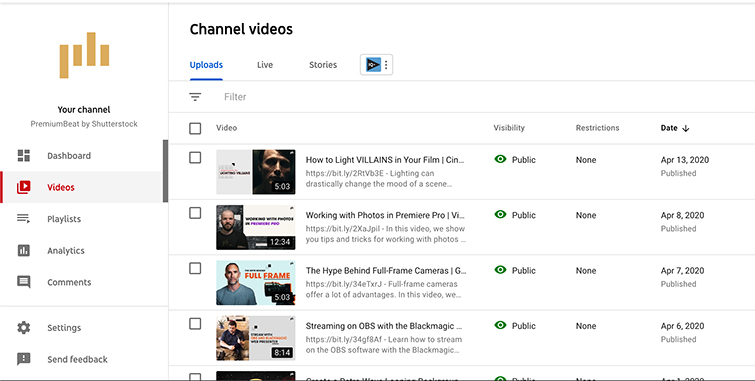
2. Look on the right-hand side of the screen to find “Subtitles.”
This will bring you to the YouTube Studio Subtitles Editor, making it incredibly easy to adjust your subtitles.
You’ll see all of your automatic subtitles generated by YouTube and their timestamps. In the top-right of the window, select Edit to get to work.
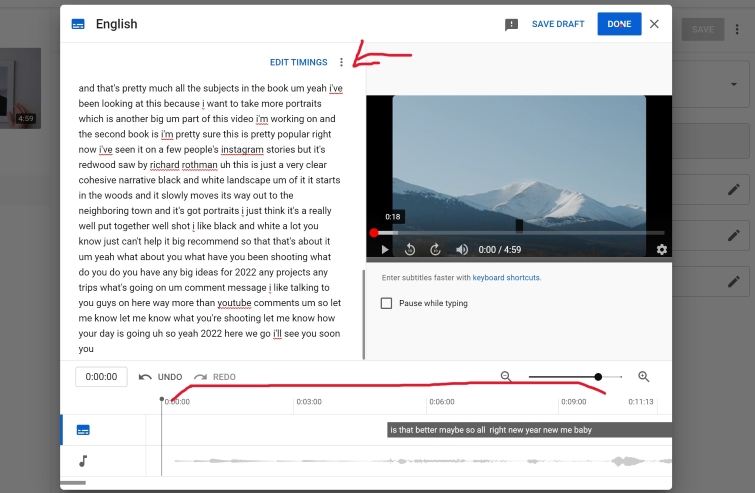
3. Select different sections of text automatically separated by YouTube, and play your video.

From here, you can fix spelling mistakes and add punctuation on the left side of the window.
If you want to fix the timing of your subtitles appearing on your video, the bars below the video can be adjusted with your mouse to either lengthen or shorten the blurbs to fix the timing.
It’s just a simple drag-and-drop feature.
4. Use Keyboard Shortcuts to scrub through your video. This is much easier to use than trying to scrub through manually with clicks.

5. When you’re finished, click Save Draft in the top-right corner.

Once you hit Save Draft, your video will automatically be updated with the changes you just made. I’ve seen the updates take a few hours to be applied to your video, so just be aware it might not be immediate.
Caption Certification
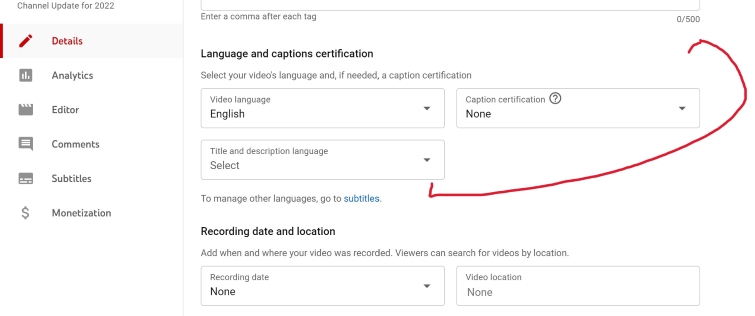
Next, once you save the updated subtitles, if you scroll down on the main Edit page for the video, you’ll see a section that features changes you can make to the captions. There’s the option to change the “Video language,” but be sure to stay true to what language is being spoken in the video.
Next to that, you’ll see “Caption certification.” Straight from the source, this is what YouTube claims this means:
If your content appeared on U.S. television on or after September 30, 2012, it might require closed captions. This is a requirement from the Federal Communications Commission.
– YouTube
So, if this applies to your video, be sure to add captions!
Underneath “Video language” is “Title and description language,” which gives you the ability to change the language in the title and description so people searching for your title in a specific language can find it—if the video is presented in that particular language.
Download Your Subtitles for Other Uses
If you want to download the subtitles from your video, YouTube studio makes this incredibly easy. Underneath, you’ll see “To manage other languages, go to subtitles,” and subtitles will be hyperlinked. Click on that.

You’ll see Edit and then the button to see more on the right-hand side. Hit the button. You’ll have the option to Unpublish, Download, Rename, or Delete. Hit Download, and you’ll have the option to save the subtitles as Original Format .srt .vtt or .sbv.
In regards to the .srt file, this will give your transcribed audio in a rich text file. If you’re uploading your video on different platforms—such as Facebook or Vimeo—you can use this .srt file to add your enriched subtitles.
Find more on creating videos for YouTube with these:
- The Ins and Outs of Streaming on YouTube Live
- Reviewing YouTube’s New Non-Linear Video Editor
- How to Upload to YouTube Directly from DaVinci Resolve 16
- Efficiently Lighting and Shooting Product Shots for YouTube
- Royalty-Free Music for YouTube: What You Need to Know
Cover image via Ellyy.


