
Ingest Options in Adobe Prelude

In this post, we look at the Ingest Options in Adobe Prelude. Learn when to stay native, when to transcode and when to use concatenate.
Adobe Prelude was added in Adobe Creative Suite 6 and took the place of OnLocation (an app designed for tapeless workflows and direct to disk recording). Think of Prelude as the front end application of the Adobe tapless post production workflow deisgned for today’s file-based cameras.
Premiere Pro can only import media already on your computer, but Prelude can ingest (copy) media cards as well as log footage and create a rough cut. How YOU use Prelude varies depending on your workflow. Let’s dive in to the app and explore some of the ingest options in Prelude.
Adobe Prelude: Native Ingest
Native ingesting is ingesting media using the same format that it is originally recorded to on the card or hard drive. If you are editing in Adobe Premiere Pro you may stay native as that app works well with a variety of formats. You have several options when ingesting media using Adobe Prelude.
Press Cmd+ I (on Mac) or Ctrl + I (on PC) to open the Ingest Dialog.
You can click “Check All” to quickly select all your video footage or select specific clips by clicking the check box below the clip.
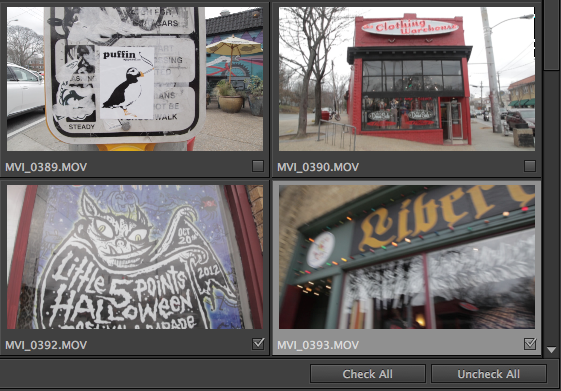
If you’d like to get a preview of the footage you can use standard video editing shortcuts to play the clips: Use the J, K and L keys to play, stop and pause. Hover scrubbing also works in Prelude, just as it does in Premiere Pro CS6.
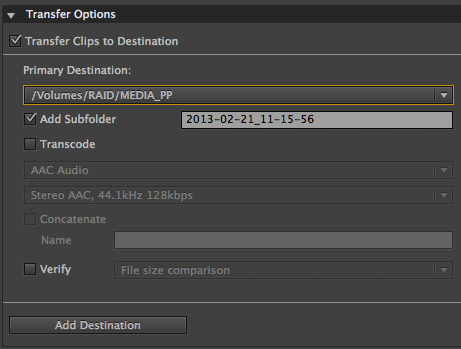
The next step is to select a destination for your media by checking the “Transfer Clips to Destination” box.
Check “Verify” to make sure the media was ingested properly. There is also a an “info icon” at the bottom right of the interface. Click this to bring up the Event panel and check that the Ingest was successful. Click image for larger view:

A good (and extra safe workflow) is to back up your video footage in multiple locations. Prelude let’s you backup your media to multiple locations at once by clicking “Add Destination”.

Adobe Prelude: Transcode
When you transcode you are putting the footage into another codec. This is useful when you only want to use a small part of a long clip or your workflow uses another codec, like ProRes (FCP) or Cineform (GoPro).
If you want to do a partial ingest in Prelude, select the clip in the Ingest dialog and press the I key to set the In and the O key to set the Out. Prelude hands the transcoding off to Adobe Media Encoder, so you can still work in Prelude. For more info check out my previous post on transcoding to ProRes.
TIP: Make sure that when set you’ve set in and out points that “Transcode” is checked. Otherwise the in and out points are ignored and the complete clip is ingested.
Adobe Prelude: Concatenate
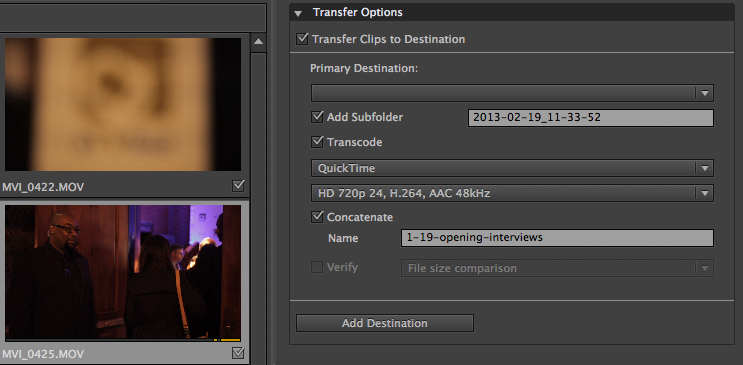
Concatenate transcodes multiple clips as one. This is handy for combining multiple interviews or similar B Roll clips into one clip. In some ways it may simply your project and workflow, but it also may make your clips long and unmanageable. Just make sure that you have good purpose when using this option.
Check multiple clips in the Ingest Workspace (set In/Out if needed), check “Transcode’ and “Concatenate”. Then pick the codec and destination and click “Ingest”.
Note that you can only use Concatenate for your Primary destination.
Now you know how to ingest footage in Adobe Prelude. For more info be sure to check out the Adobe help site and forum.
Got Adobe Prelude tips to share?
Let us know in the comments below!


