

Smoke ConnectFX: The Keyer Nodes

There are many keying tools inside of Autodesk Smoke 2013. So, how do you know which one to use and when? We’ll breakdown the keyers so you can better decide which is best for your next project.

Autodesk has always been known for their keying tools within their visual effects products. Simply put, they have some of the best keyers in the business. There are 7 keyer nodes inside of Smoke (Luma, Channel, HLS, RGB, YUV, RGBCMYL, Master Keyer). If you want to include the Modular Keyer, which is a separate node-based keying environment, and the Diamond Keyer inside of the Color Warper, then you have 9 color keying tools. Why so many? Well, Autodesk Flame is celebrating it’s 20th anniversary, and many of these keyers started then and there. Over time, other keyer algorithms have come along, each one a little different and a little better then the ones before. And since every keying situation can be different, sometimes one keyer can perform better and give you a better result then another.
[Click on Images for a Larger View]

The Smoke base keyers are the Luma, Channel, HLS, RGB, YUV, and RGMCMYL keyers. The Luma Keyer is a luminance based keyer, generating a matte from luminance levels. The others are all color based keyers where you would select a color in the image to key out. In other words, a chroma key. Each of these keyers only accept a front image and output a result image which is a hicon matte.
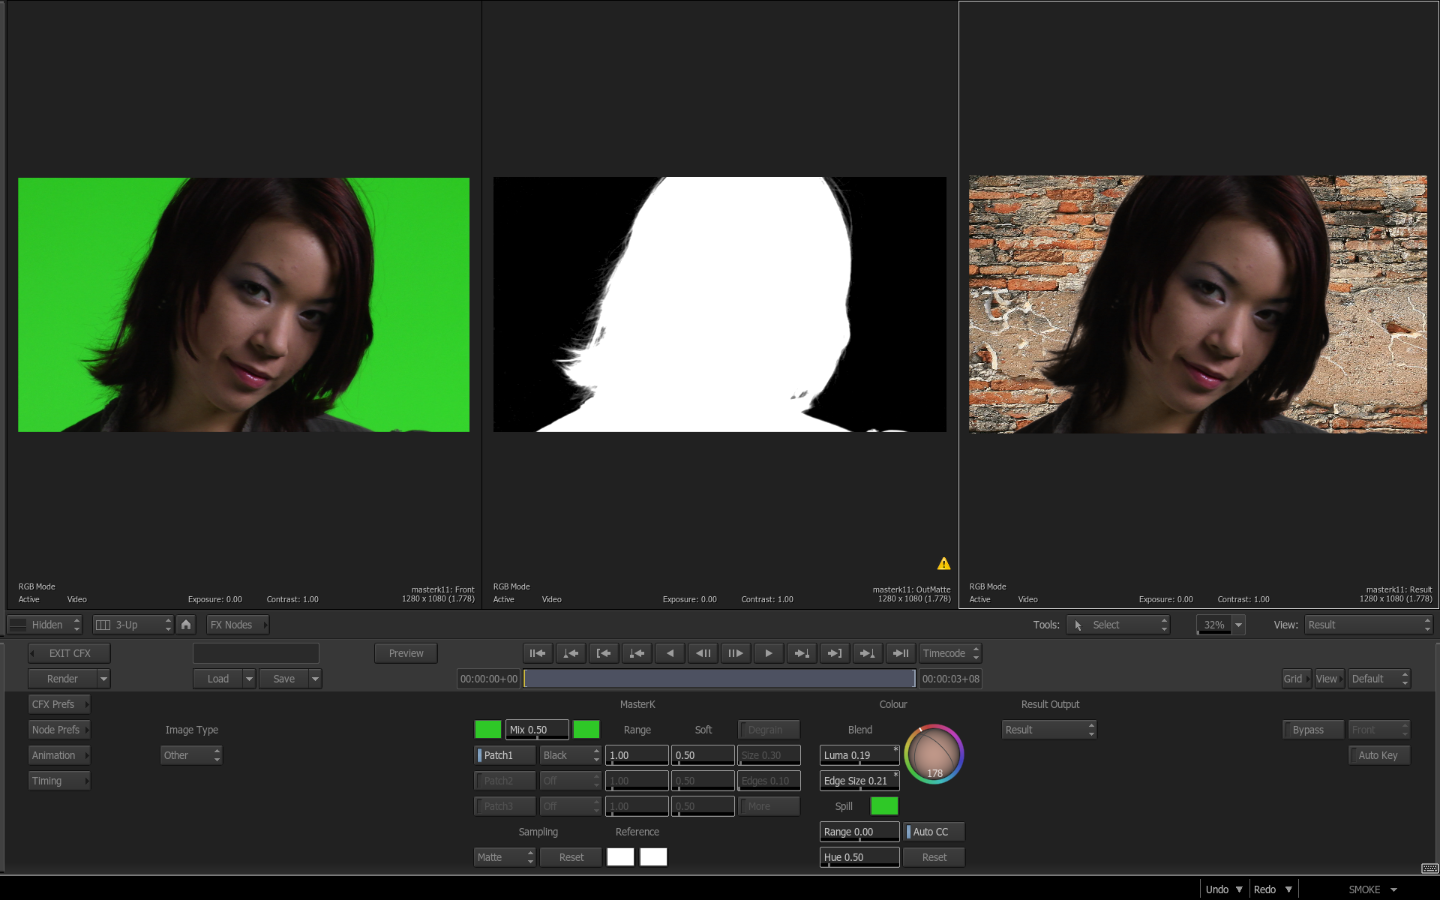
The best chroma keyer inside of Smoke, in terms of features and quality, is the Master Keyer. The Master Keyer also accepts a Front, Back and Matte input and outputs a front and matte result. But we will focus on that keyer in a bit.
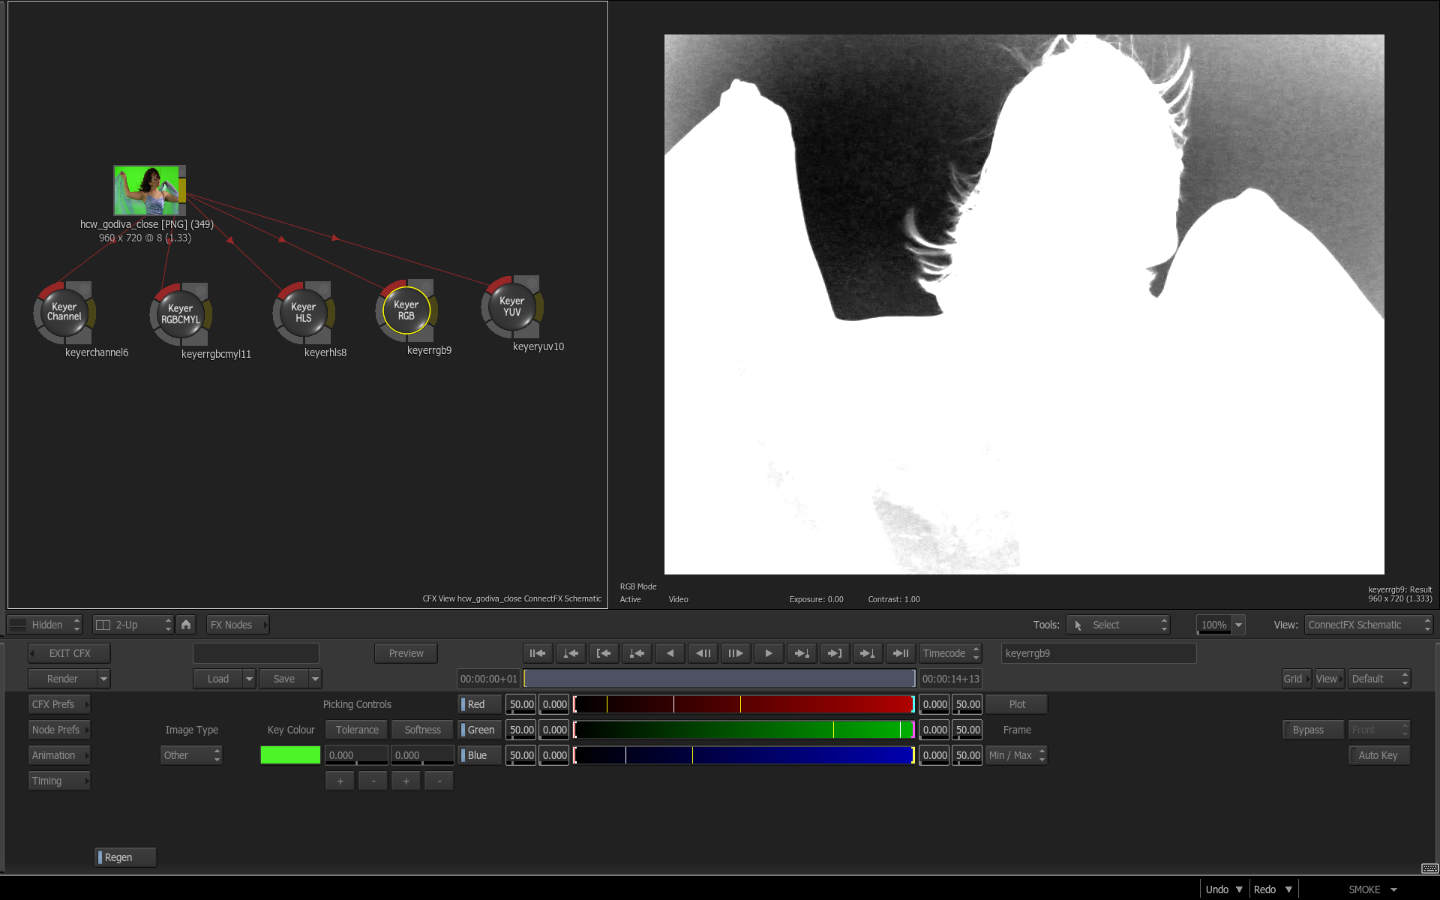
Here is an example of how each of the base keyers treat this image when we do a simple 1 click color selection. Images provided by and available via HollywoodCameraWork.us

Each of these chroma keyers (Channel, RGB, YUV, RGBCHML, HLS) has a color pot to select the color on the image you would like to key out. You then have Tolerance and Softness tools to add/subtract color information to finesse the key result. You can dial these values using the sliders or by selecting problem areas of the image. Depending on the quality of your image, the lighting of your blue/green screen, shadows, compression, etc, each of these keyers may give a slightly different result. So often it’s good to try them all to see which one works for your given situation.
The Channel Keyer works well when you have a very clean and uniform color channel to key. The other keyers work well when the image has impurities in the chroma key like shadows or creases in the background color.

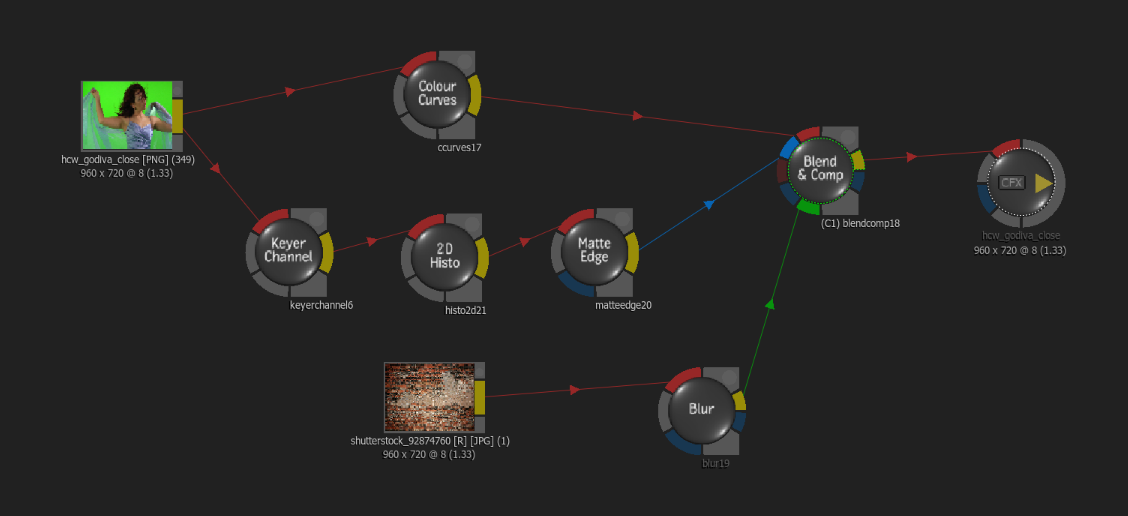
These nodes just give you the basic key, and result a matte. You would then need to add some other nodes like the Color Curves for color suppression on the edges or Edge Matte Nodes to add any shrink or erodes. Perhaps even a 2D Histogram to clamp the matte and clean up some rough areas, or even a Gmask Node to add a garbage mask to isolate a part of the image. And ultimately, comp the front and result key together in Action or in the Blend & Comp Node with a background.
The Modular Keyer inside of Action or in ConnectFX does all of this for you. There are presets for each of these keyers that have the nodes added and linked up. You can then add or delete nodes to get the best result for your individual keying situation.
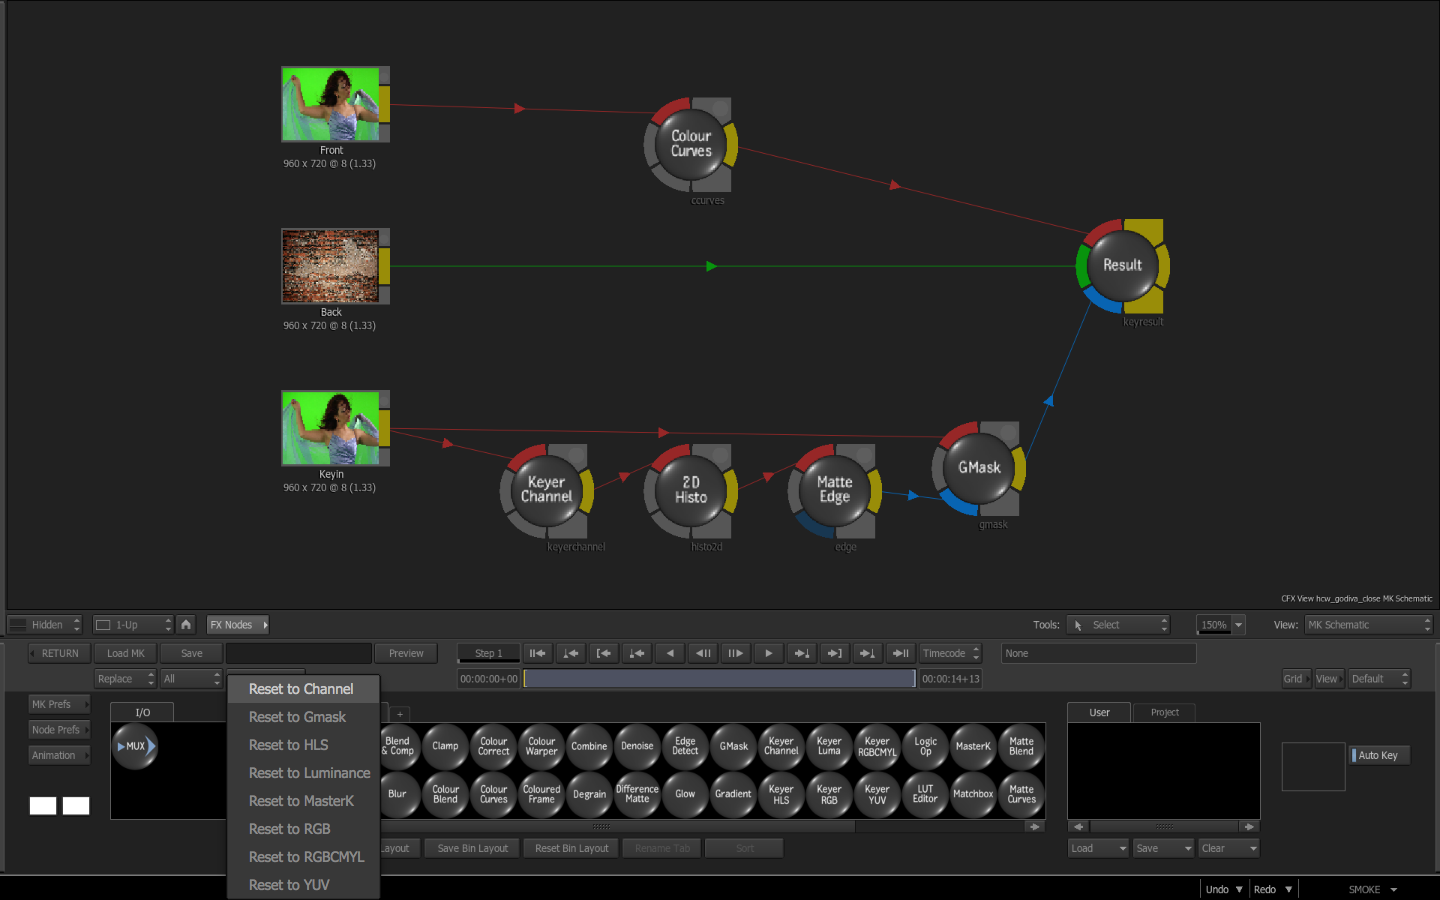
The Modular Keyer is the default keyer inside of Action. It’s complex enough that it deserves it’s own blog post, so I’ll do no more than introduce it here. Basically, it allows you to have a mini-schematic for keying inside of your larger ConnectFX setup.
Smoke’s Master Keyer Node:
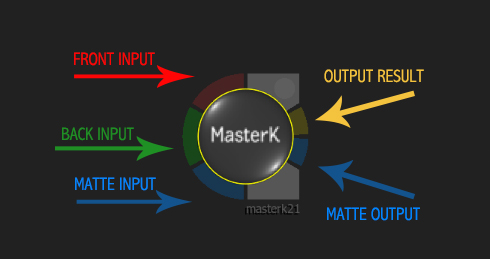
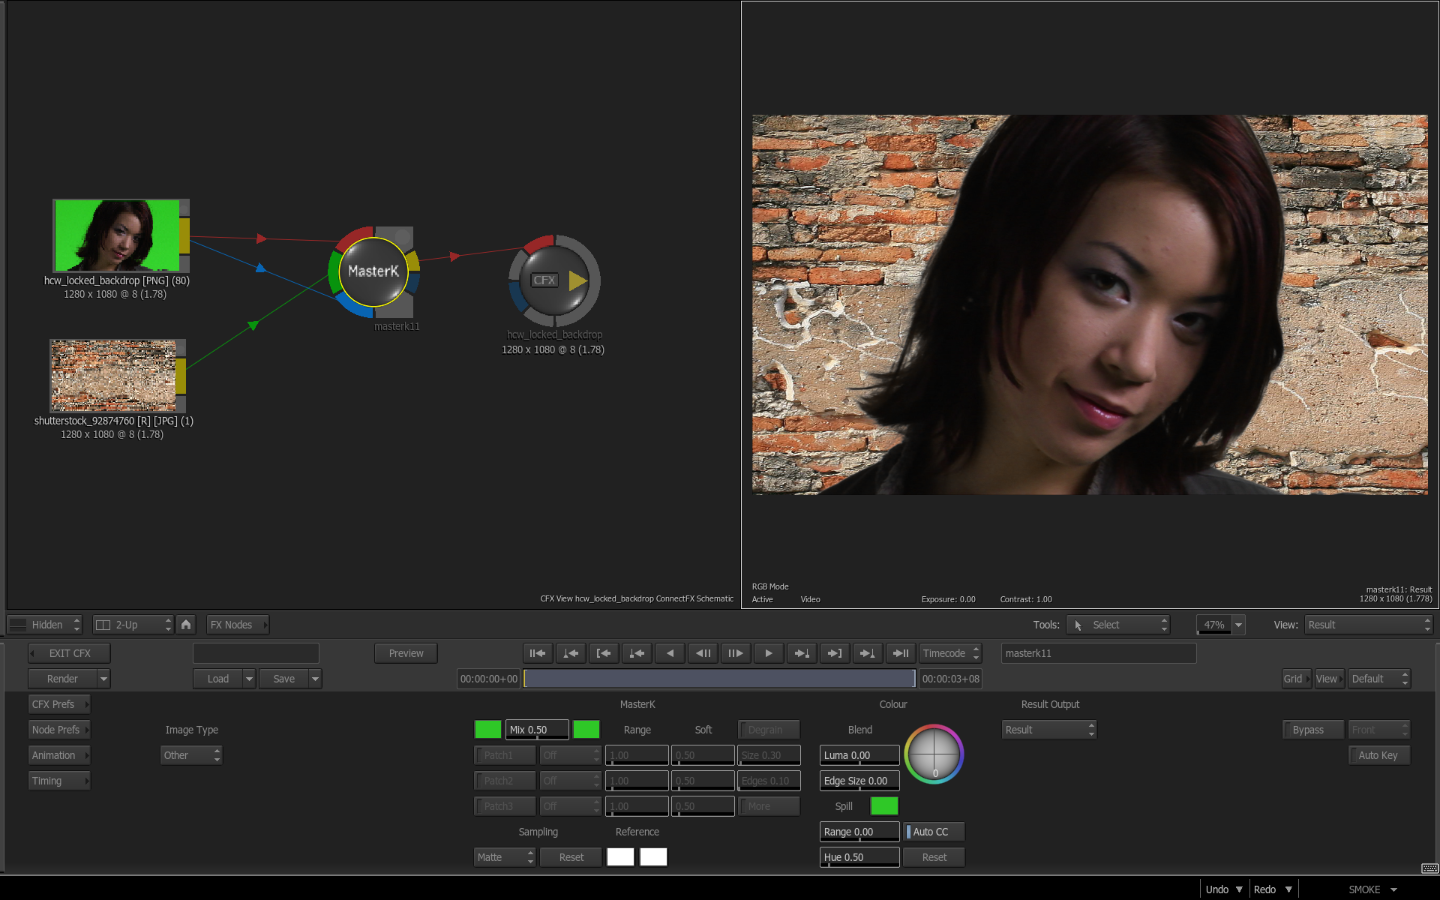
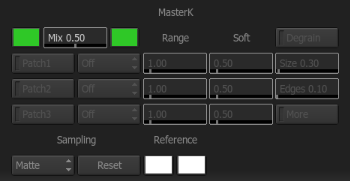
Your first stop when you have a chroma key to perform, is the Master Keyer. Its name is appropriate as it contains a very powerful and interactive keyer with more tools to generate a clean key than any of the other keyers. By keying with the Master Keyer, you have tools for color supression, correction, and degrain built inside the node. There are also Secondary Keyers, called Patches.
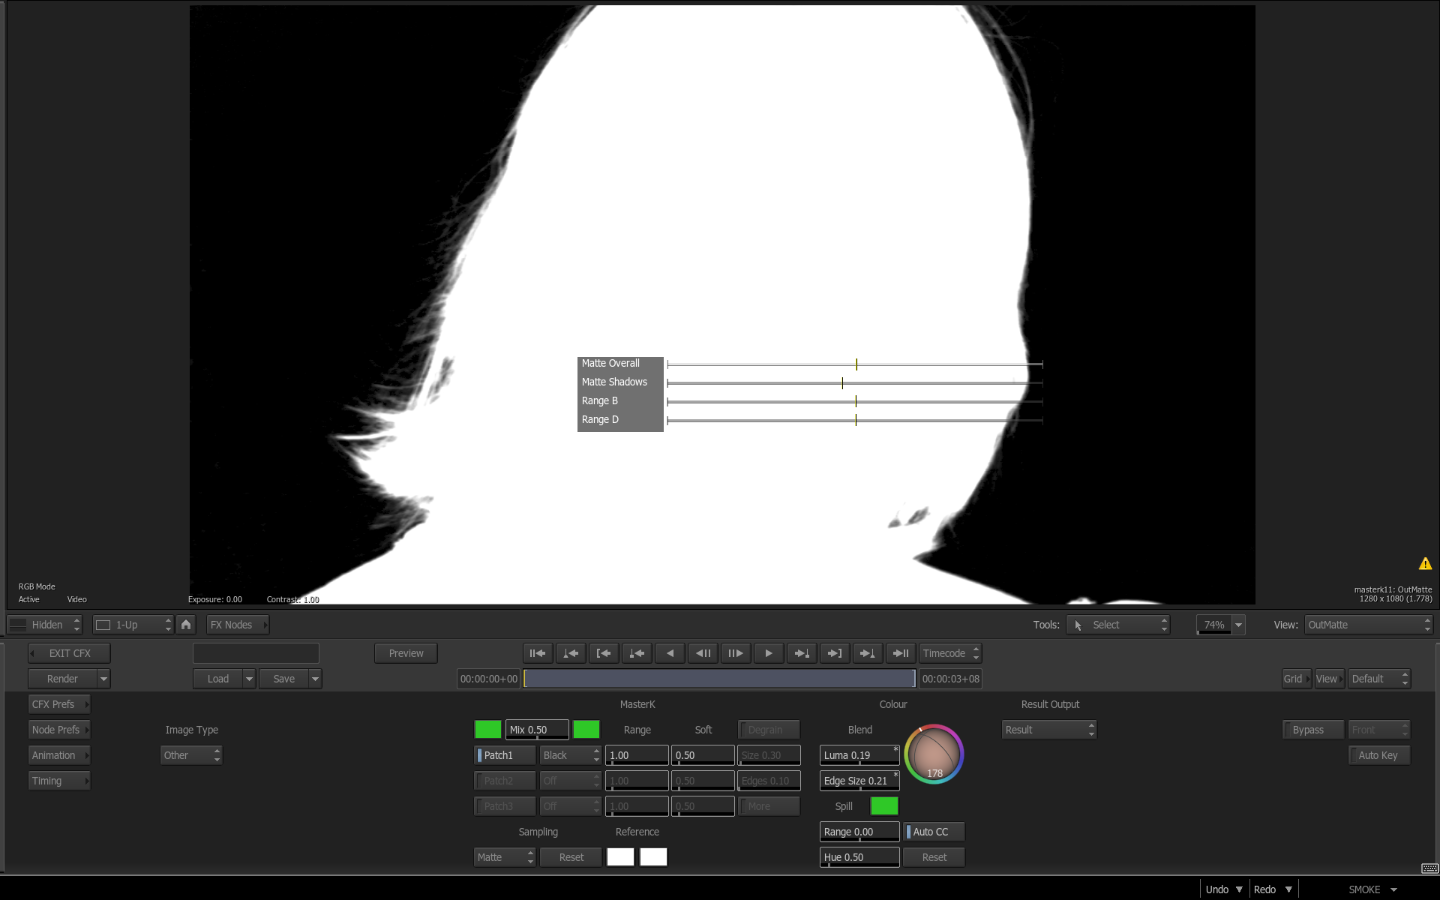
Once you have your Front/Back/Matte feeding the node, you have a standard color pot for choosing your chroma key color. The Master Keyer has 2 pots so that you can chose slightly different areas, brighter and darker, and then allow you to mix between the 2 to get a good balance for the key overall. Instantly you can see how well the key is working by looking at the matte output (Press F4 twice).
Your key probably isn’t perfect and there might still be some issues to work on. Here is where the Master Keyer excels. By holding ALT and clicking in the viewer, will see a Heads Up Display (HUD) that allow you to adjust the key. Depending on where you click in the viewer, you will get different option sliders (Matte Overall, Shadow Highlights, Ranges A,B,C,D,E), These are smart sliders, as the Master Keyer is looking at the pixels underneath and giving you options to fix just those range of pixels. It’s very specific. Adjusting the sliders in context allows you to have real control over the key result.
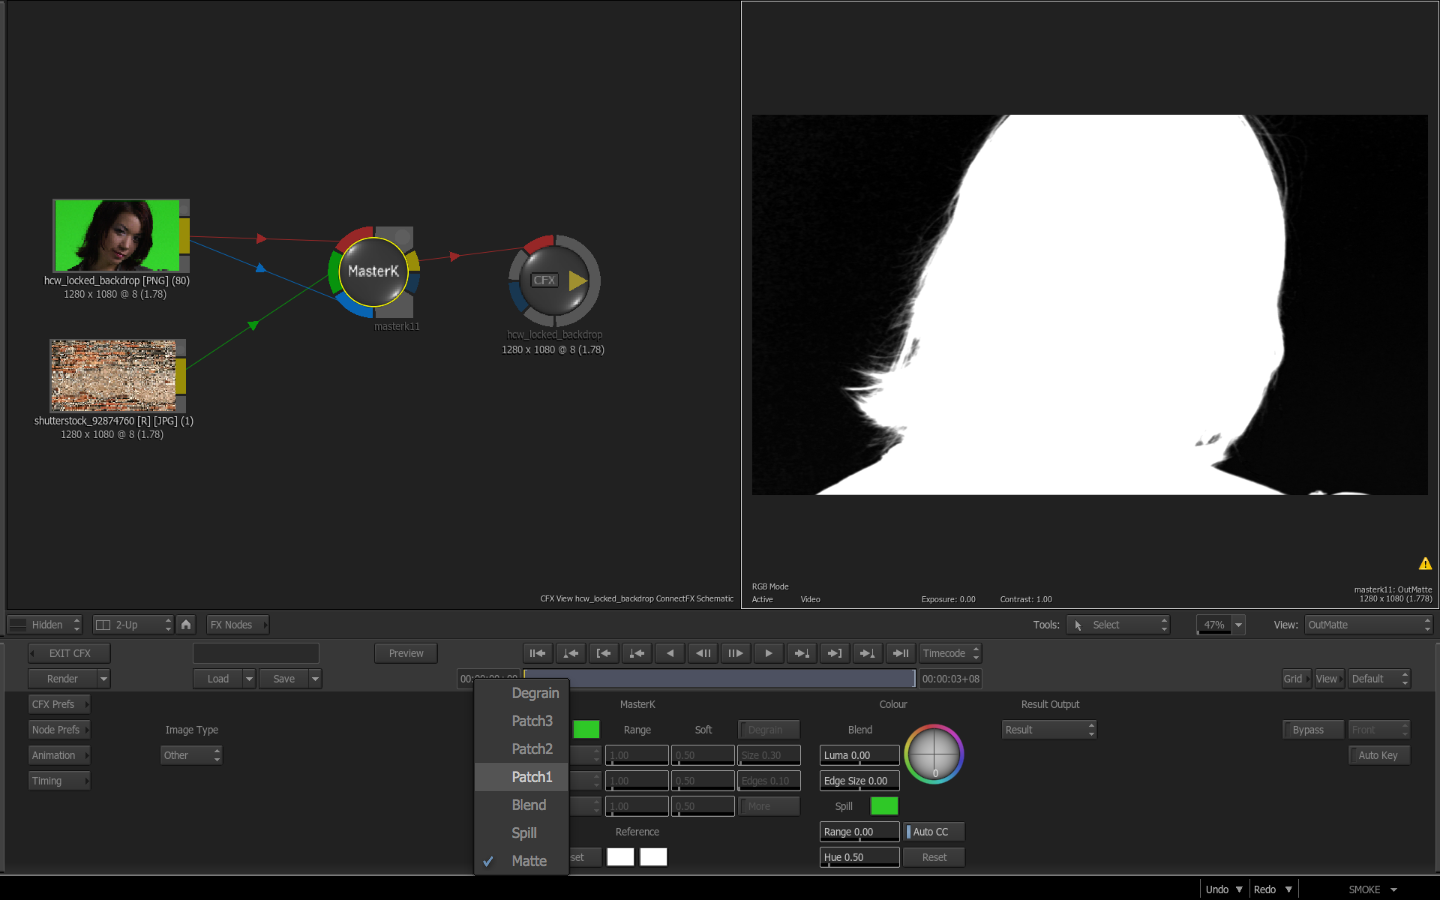
But sometimes you have a real problem key. This is where the Master Keyer’s Patches come into play. Think of them like secondary keyers, similar to secondary color correction in the Color Warper. Activate the patch by selecting it in the sampling menu. Then perform a Control+Box Selection in the viewer over a particular area you want to clean. The Patch will analyse the pixels and assign them as white or black. Obviously it knows from previous selections that if you click to clean up an area that is currently a matte, it will fill in the pixels as white and an area that you want removed, it will make them black.
You have 3 patches to work with, so you can easily clean up areas both inside and outside your matte. The range and softness values for the patches are keyframeable. So if you have an area of you key where the lighting changes, and more shadows are introduced, you can adjust the values to compensate as the scene changes.
Once you have the matte looking its best, you can now focus on the edges. Under the Color Menu, You can adjust the luminance and size of the edge. There is also a color wheel to skew the hue to better match into your background colors. For example, if you were keying your subject over red bricks, you would adjust the luma to match the brightness of the bricks and dial in a bit of red to match. This will help make your composite more realistic by blending the edges. You can also use the viewer interactive approach by selecting Blend from the Sampling Menu.

The Master Keyer will also do color suppression and remove spill on your image. The color is copied from the initial key selection, but further adjustments can be made in the hue and range. You can choose to turn off the Auto CC as well by deselecting the button. You would then need to add a Color Curves Node after the Master Keyer Node to suppress the color then. More than likely, you can just use the internal suppression in this node.
The output of the node is selectable. The result matte is always sent through the matte output, but the front can be selected to be the result with the background clip, the color corrected front without the back, or you can feed the matte output through the front. This flexibility gives you the options to add effects nodes downstream in your schematic and composite the key down the line.
Keying on the Timeline:
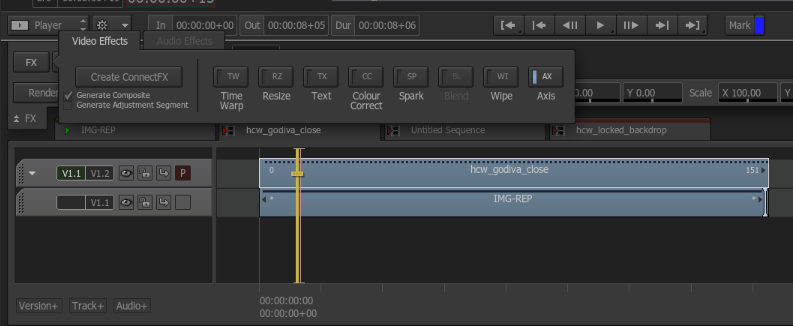
Sometimes while editing you need to get the cuts and timing down of your talent in Chroma Key as they pertain to the script or story. You can use the same keying tools from CFX on the timeline via the AXIS effect…with a few differences. If you place your chroma key talent on V2 with the background on V1 you can add an AXIS timeline effect to the chroma key.
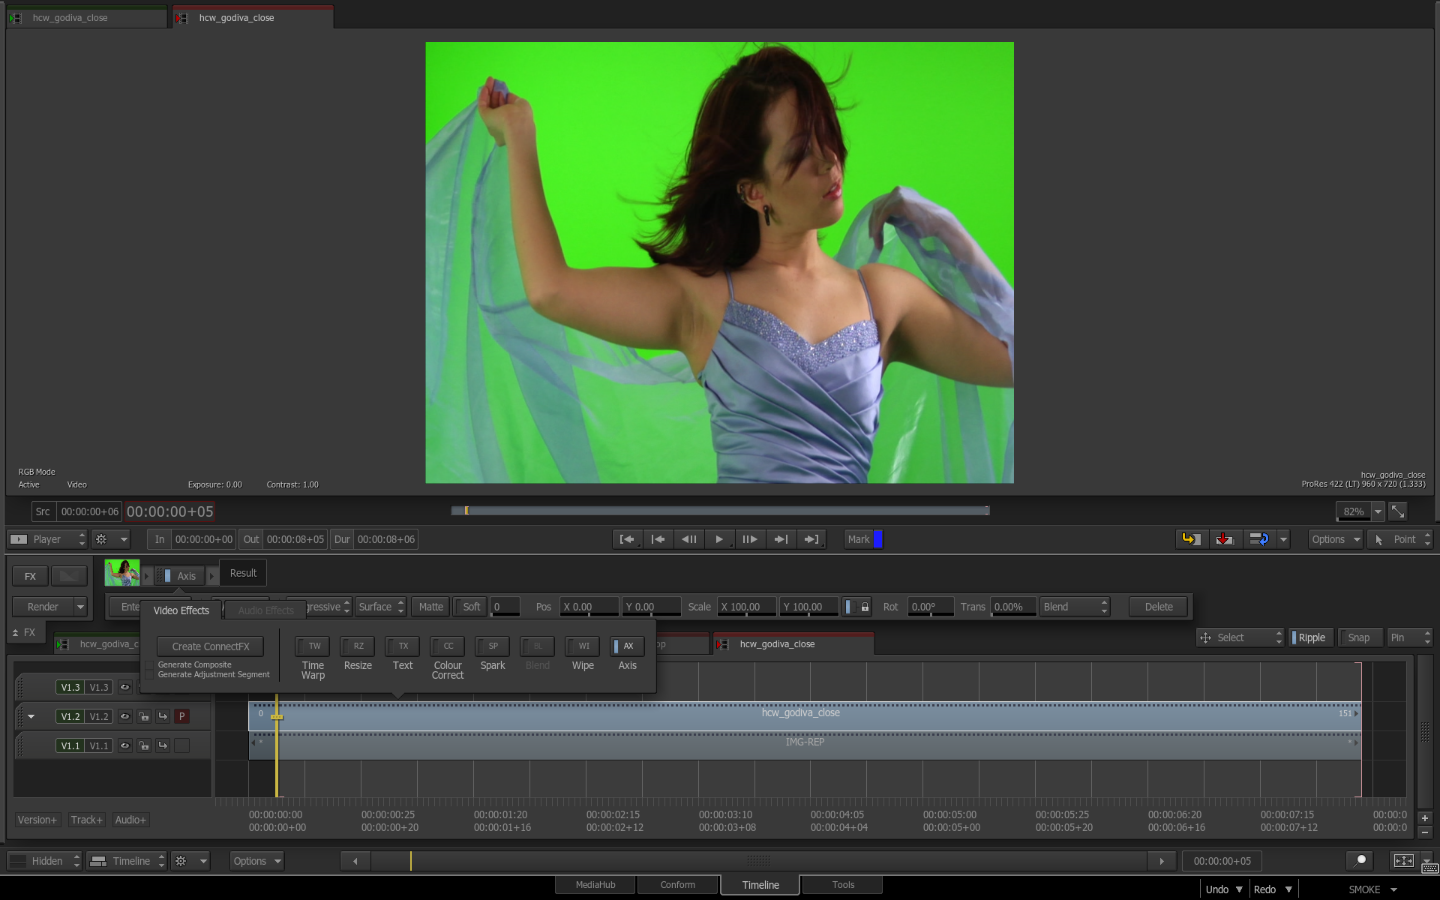
Inside of AXIS, activate the Keyer and you will see a new UI which combines all of the keyers we have talked about thus far, along with color and matte tools, histograms, and Gmasks. All in once neat and friendly package. Since all the the keyers are independent, you can test each one and see which one works best for you right in the timeline and you can toggle back and forth.
The color blend and spill suppression is available with each keyer as well as matte tools for shrink, erode, blur and invert. The histogram can be used to clamp the high and low values to clean up the key even more.

Also, having the Gmask (Garbage Mask) tools at your fingertips makes trimming off bad sections of the scene and highlighting just what you want, can save you time when generating a good key.
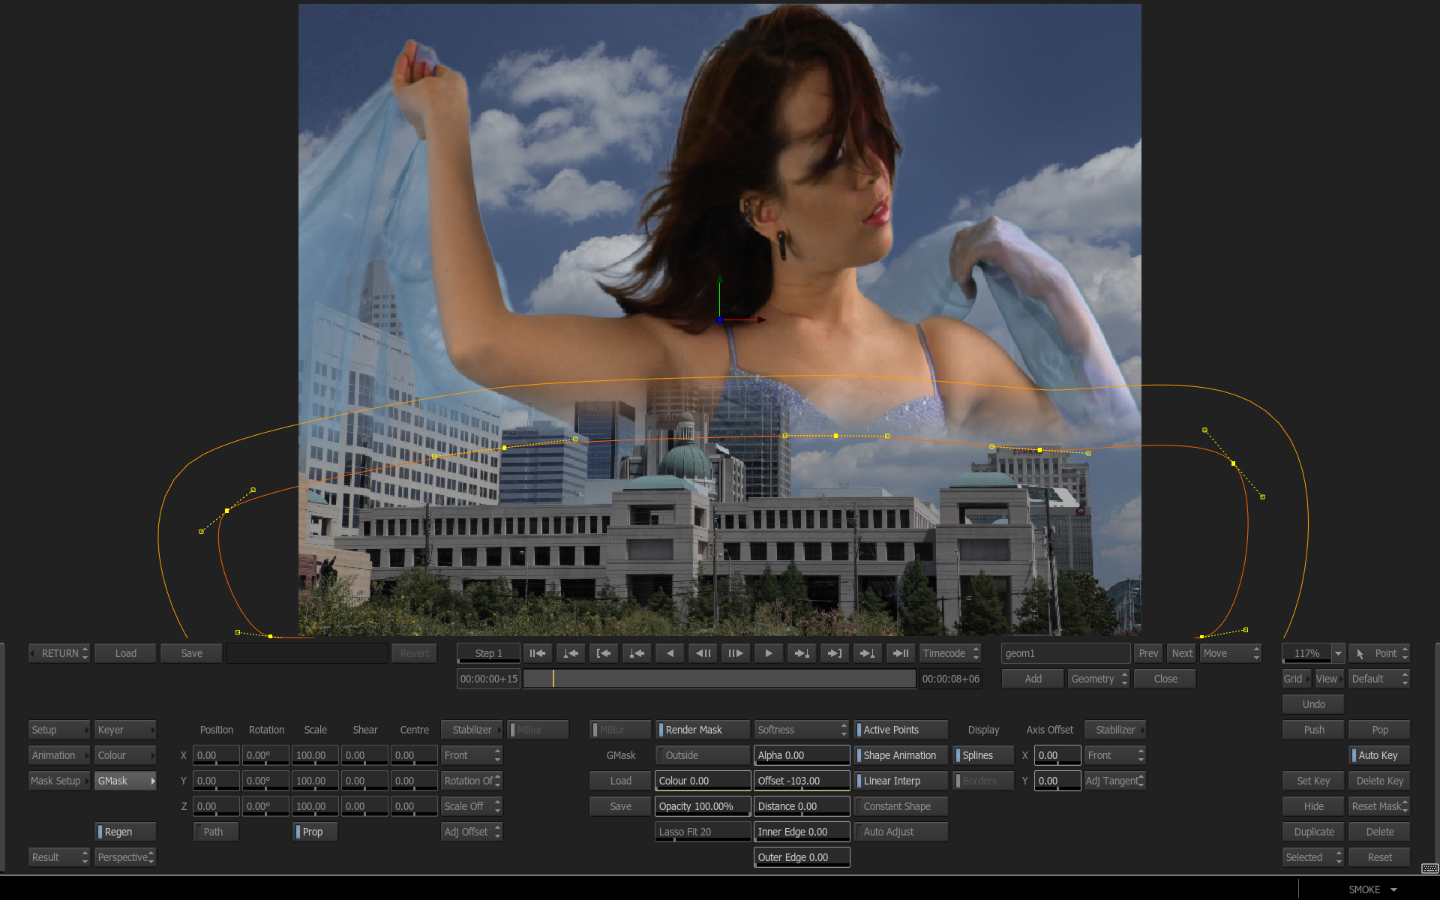
Once you have your key the way you like, exit AXIS and return to the timeline. Now, if your scenes are all the same, you can copy the AXIS effect to your other clips, adjusting Gmask as needed. If you want to take this into ConnextFX for some more advanced effects, you can do that as well. Select your layers (Chroma Key & Background) add a CFX and make sure ‘Generate Composite’ is selected. Smoke will then take the effects you have setup already on your timeline and promote them into nodes inside of ConnextFX…with a few issues.
The AXIS effect will become an Action node and the keyer inside will be the same keyer from AXIS. The keyer in Axis works great in the timeline with 8, 10 and 16 bit clips. But, if you are working with 10 or 16 bit clips then the keyer in Action will become inaccessible (black K).

The keyer in Action (promoted from AXIS) only works with 8 bit clips. The default Modular Keyer in Action, if you activated a new Keyer setup, is 16bit. If you have any clips that are 10>16 bit, you need to activate the RGB Lut and convert them to 8 bit. Then the keyer in Action will become active (white K). The keyer in AXIS used to be the same keyer in Action, but with the changes to the workflow in Smoke 2013, everything in CFX is processed at 16 bit fp. This is one reason the Modular Keyer is being used as it already worked in 16 bit. If you are working with all 8 bit clips on your timeline, then everything will be fine when you promote your timeline effect to CFX.

Keying is one of the strongest features inside of Smoke. I personally do a lot of green screen work in the promos and commercials I edit. So I have gotten pretty good and pulling a good key even from compressed formats like H.264, DVCPRO HD, and AVC-I. With better codecs and files like .r3D, and Prores4444 your ability to perform a good looking composite becomes very easy with the keyer tools in Smoke 2013.


