
Three and Four Point Editing in Adobe Premiere Pro

3 and 4 point edits are a way to get a higher degree of control and precision in your Premiere Pro video editing. Here’s how!
Premiere Pro has many great tools to help editors get the right clip in the right place at the right length – three point editing is one of them. That said, I don’t tend to use three point edits a great deal but when I do I find them to be very helpful especially when using the OUT point in the timeline.
What is a 3 point edit?
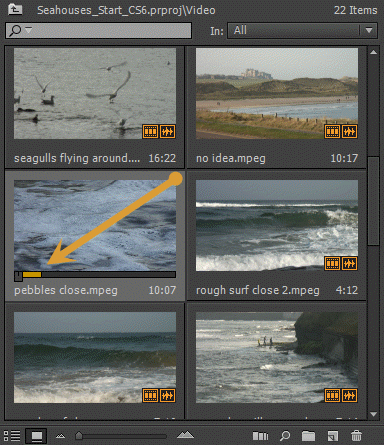
A three point edit requires you to specify 3 points in your project to make an edit. These points may well include the IN point and the OUT point of a clip in your project or source panel as 2 of the 3 points.
IN and OUT Points of a Clip in the Project Panel
But that still leaves 1 more point to be specified, and this is done in the TIMELINE.
The Timeline with an IN Point Specified
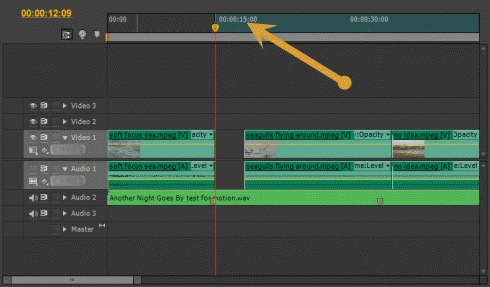
You can either create an IN point in your timeline by simply selecting your timeline and going to the place where you want the edit to start and hitting the ‘I’ key to get the results shown above. Or use the OUT point method…
The Timeline with and OUT Point Specified
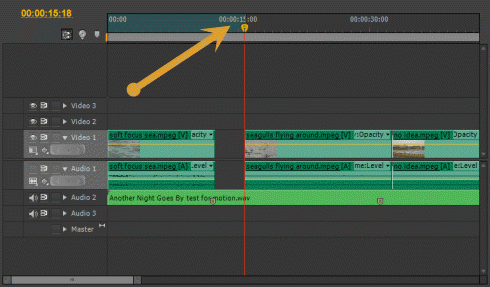
You can park your playhead in the Premiere Pro timeline at the point you want the clip to END and hit the ‘o’ key again as shown above.
If you get the IN point or the OUT point in the wrong place, don’t worry, just right-click where you see the blue area indicating an IN or OUT point has been created and you will get an option to clear IN, OUT or both.
So, you’ve set 3 points. The first 2 happen to be on the actual clip you want to insert and the third is on the Premiere Pro timeline. At this point you’re ready to insert your clip by selecting it and hitting the ‘point’ or ‘full-stop’ (.) key. This will create an overwrite or overlay edit with the the clip behaving as follows:
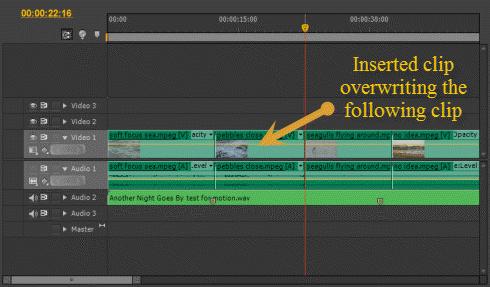
- If you have selected an IN point in your timeline then the IN point of the clip will match the IN point you have specified in the timeline. The clip will overwrite into the timeline and its length will be the same length as you specified for the clip, potentially overwriting clips AFTER the place of insertion.
- If you have selected an OUT point in your timeline then the OUT point of the clip will match the OUT point you have specified in the timeline and the clip will over-write into the timeline from its OUT point FORWARDS – potentially overwriting the clips BEFORE the place of insertion.
Inserted Clip Overwriting the Following Clip Because an IN Point Was Specified
For me, I tend to use this more for inserting clips which have to end at a specific point (in other words by specifying an OUT point in the timeline) than for clips that need to start at a specific point.
NOTE: You can also do three point editing in reverse of the above explanation. Set an IN point and an OUT point in the TIMELINE and just an IN point OR an OUT point on the clip. The clip would start at the IN point of the clip and end at the OUT point set in the Premiere Pro timeline.
4 Point Editing in Premiere Pro
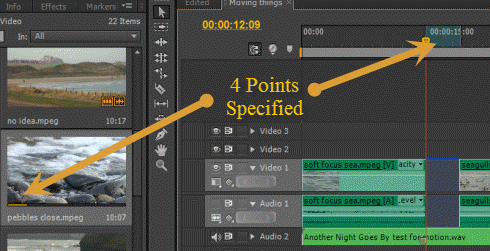
Well, a four point edit will have IN and OUT points on both the clip AND the timeline. However, as you can image it is highly improbable that the length of the clip from IN to OUT and the length of the space in the timeline from IN to OUT will be the same.
Timeline AND Clip with IN and OUT Points Specified
Thus, because of this mismatch, when you hit the point or full-stop key (.) to overwrite the clip into the timeline you get the following ‘Fit Clip’ options box.
Fit Clip Option Box
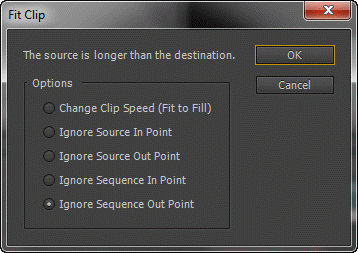
This box is basically telling you, ‘OK, the clip IN and OUT points won’t match the IN and OUT you’ve specified in your timeline so what do you want me to do about it? The default setting is simply to ignore the sequence (timeline) OUT point and let the clip flow along down the timeline, but what do you want?’
As you can see the options include ignoring both clip and sequence (timeline) IN or OUT points or – at the very top – ‘Change Clip Speed (Fit to Fill)’. This option will either speed the clip up to fit into a space smaller than the length of the clip OR slow the clip down if the clip is shorter than the space you want it to fit into – which can be a really useful option. One note though, this option will affect the audio of the clip. So, if you end up speeding up the clip the audio will get higher pitched and, if you slow it down, the audio will get lower pitched which may not be what you want to do (however, you can always strip out the audio after the fact).
Use 3 and 4 point editing in your Premiere Pro timeline to get precise control over your edits!


