A Frame At A Time: How to Nudge Clips in FCP 7 or FCPX

In this post, we’ll take a look at moving clips (or groups of clips) forward or backward in a Final Cut Pro 7 or Final Cut Pro X timeline.
Quite often I get clients who ask me to make very subtle changes to the position of clips in a project timeline. I hear things like “Can you move that shot a few frames forward” or “Bring in those graphics 5 or 10 frames later”. To do this I could grab the clip (or clips) and drag them in the timeline… but in fact, there is a simpler (and more precise) way. Using a simple shortcut gives you accurate control over moving clips in the timeline frame by frame (also called “nudging”). Although the basic operation remains the same, this shortcut and it’s effect varies between Final Cut Pro 6/7 and Final Cut Pro X.
How to Nudge Clips
In either program…highlight the clip or clips you’d like to move. If you are selecting multiple clips, they can span multiple layers/tracks. I’ve found it helps if the clips are clustered around each other, but they don’t necessarily have to be. In fact, you can nudge an ENTIRE sequence if you’d like (something I actually do regularly). By using the shortcut COMMAND + A to select all the clips in a sequence and then using the shortcut below, I can actually move them all. This is useful for adding a few frames of black at the top of a timeline.
After selecting the clips…
In FCP 6/7, nudge them forward or backward in the timeline using the shortcut OPTION + LEFT, RIGHT, UP or DOWN ARROW keys. Left and right arrows will move clips left or right in the timeline, while the up or down arrows will move the clips up or down tracks.
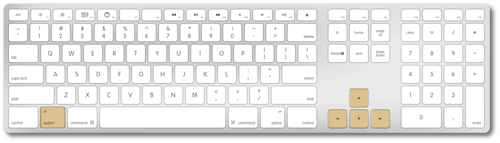
In FCPX, nudge them forward or backward using just the , or . keys

Each time you tap the left/right arrows or punctuation keys, the clips will move just one frame. This is helpful for “tapping out” the number of frames you want to move. You’ll be able to quickly tell a client with confidence “Moved ’em forward 5 frames!”
FCP7 & FCPX: Differences in Nudging Behavior
So what happens when you nudge clips and they bump up against other elements in the timeline?
In FCP 6/7, clips will move forward or backward in the timeline UNTIL they bump up against another unselected element. At this point, the shortcut will cease to have any effect…unless the Image + Wireframe view is turned on (you can cycle through views using the shortcut “W” or choose one from the Menu Bar > View). If Image+Wireframe is turned on and you continue to use the shortcut after it’s collided with an unselected clip, the video image will move left or right a pixel at a time in the Canvas. Confused? Let’s break it down…
1. Select the clip(s).
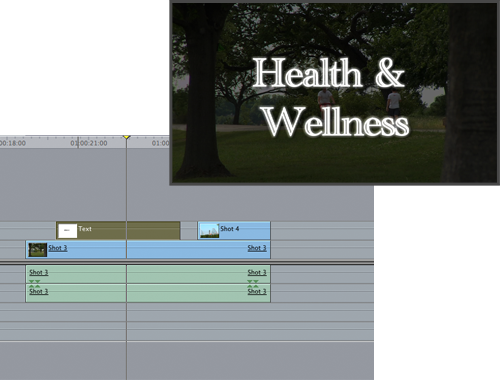
2. Holding OPTION and tapping right arrow moves the clip right in the timeline.

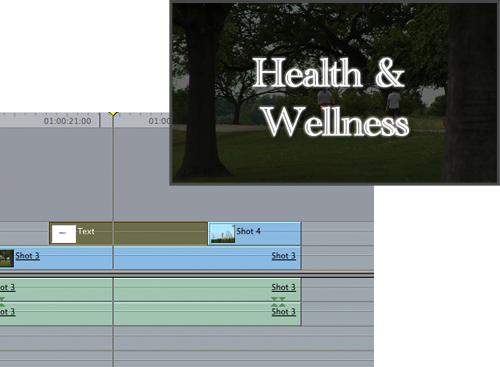
3. Eventually the clip collides with another.
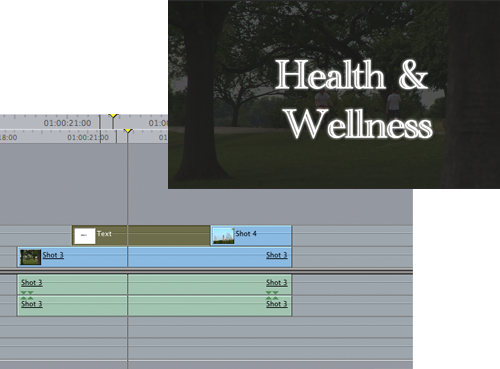
4. Now, using the same shortcut will move the position of the element in the frame (notice how the text has shifted right).
In FCPX, clip collisions are handled a bit more simply when using the above shortcut. If a selected clip and unselected clip collide, the selected clip will OVERRIDE the unselected one. Each tap of the shortcut will move the clip(s) one frame — regardless if it takes over another.
This is one shortcut that I use every single time I sit down with FCP. As I’m still primarily a FCP7 user, I’ve found that using the shortcut and the Image + Wireframe view is actually quite beneficial in making subtle positioning adjustments of graphic elements in the frame. Force yourself to use this shortcut a few times and no doubt it will become part of your editing repertoire as well.