
Video Tutorial: Introducing Premiere’s New Lumetri Curves

In our latest video tutorial, learn how you can adjust hue, saturation, and luminance values with Adobe Premiere Pro 2019.
With Creative Cloud 2019, Adobe has outfitted Premiere Pro with five new curve tools. These new tools allow users to perform selective color grading via the hue, saturation, and luminance values of your image. You can call them the VS curves, HSL curves, or selective grading tools; whatever you call them, they provide a lot of versatility when it comes to color correction.
Let’s take a closer look.
The New Curve Tools

To find the new curves, go to the Lumetri Color panel and select the Curves tab, and then open Hue Saturation Curves. These new curve tools can perform overall adjustments to the hue, the saturation, or the luminance based on either the hue or luminance values you select. In case you need a quick refresher, the hue is the color, the saturation is the intensity of the color, and the luminance is the brightness value.
Each curve pairs two properties together: one mapped horizontally and one vertically. The first attribute is what you’re selecting, the second attribute is what you are affecting. Essentially, the first value adjusts the second. You’ll find five new Curves tools, including the following:
- Hue vs. Saturation
- Hue vs. Hue
- Hue vs. Luma
- Luma vs. Saturation
- Saturation vs. Saturation
Now let’s figure out how to use these new tools.
How the Tools Work

Manually select colors by clicking on the horizontal curve line, or use the color picker tool. Using the color picker will automatically set three points on the curve, with the selected color point in the middle of the three points. If the selection isn’t perfect, you can manually adjust the points as needed. The key to using these curves is to make very subtle adjustments to the image. Pushing things too far can make some images fall apart very quickly.
The first three Curves tools give you a preview via a vertical bar when you select and hold a point on the curve. For example, when using the Hue vs. Saturation curve, you’ll see the vertical bar previewing the saturation levels. Highly saturated values are at the top, with desaturated values at the bottom. For Hue vs. Hue, you’ll see the hue values spread across the vertical preview bar. Each curve has an on/off checkbox, allowing users to quickly view changes. Now that we understand how they work, let’s take a look at how we can use them.
Using the Tools

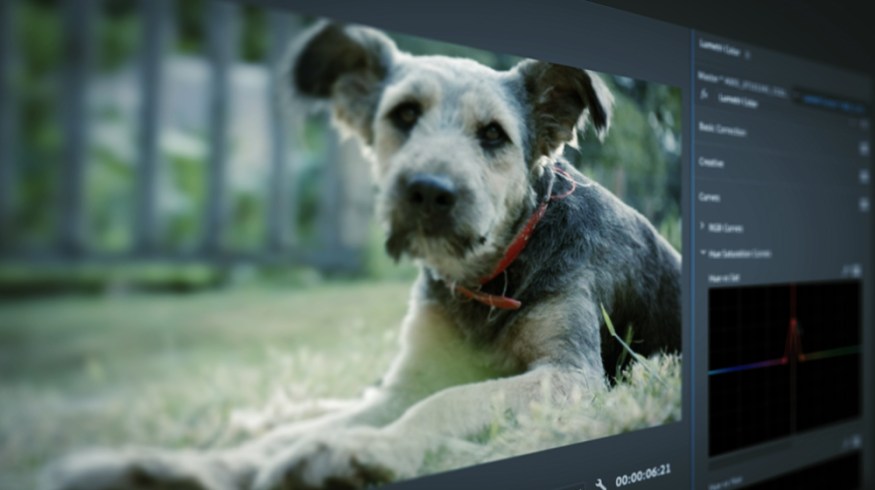
They’re called selective grading tools because that’s exactly what they do. Take this sample shot of a dog. To isolate the red collar, I’ll first grab the color picker and then click directly on the dog’s collar. Once selected, you’ll notice that three points have been added to the curve. This selection includes not only that particular color but also the additional two points so I can manipulate this particular color without affecting the rest of the hues in the shot.

Using the different curve tools, I can isolate this color and perform a number of changes. I can use Hue vs. Hue to change the color of the collar to green. I can use Hue vs. Sat to desaturate just the collar. And this is just the beginning. There are a variety of additional techniques you can perform with these tools, including fine-tuning skin tones, lowering the saturation of shadows, and a handful of other creative results.

Looking for more Premiere tutorials? Check these out.


