
Premiere Pro: Rotation, Anchor Points and Picture-in-Picture
Creating a picture-in-picture effect in Premiere Pro is simple, but understanding the animation fundamentals to pull it off is imperative. In this post, we dig into animating fixed effects in Adobe Premiere Pro.

As we explore the fixed effects in Adobe Premiere Pro we’ll be using a picture-in-picture (PIP) effect for demonstration purposes. First we’ll explore exactly what ‘fixed effects’ are and then we’ll put this dig through the Premiere Effects Control Panel and put this knowledge into action. This is fundamental knowledge for ALL Premiere Pro video editors. Here is the final product of what a PIP effect will look like:
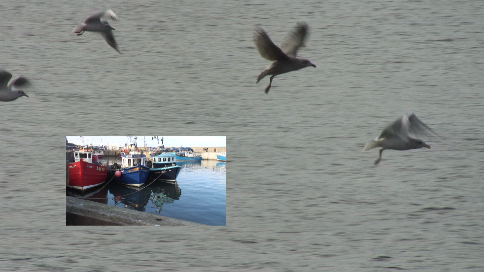
Fixed Effects in Premiere Pro
When you select any clip in a Premiere Pro video editing timeline, and go to the ‘Effect Controls’ panel, you have access to what are called the fixed effects for that clip. Unlike more specialized effects, fixed effects are applied to every clip in the timeline. No matter if it’s a video clip or a PSD file (Photoshop), all elements in your timeline will have fixed effects.
Note: the only difference between which fixed effects are available is based on whether the clip has audio or not. If it has audio it will also have audio fixed effects, if not it will only have the video fixed effects.
Fixed Effects for a Clip in the Timeline with Audio
(Motion Tab ‘Twirled’ down)
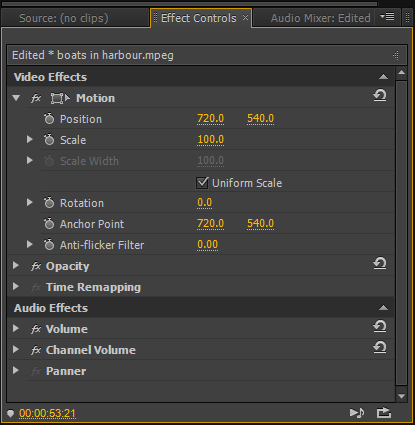
First, notice the yellow numbers next to some of the properties. These are the current assigned values for the property. You can either numerically change these values or hover over the values and scrub.
As shown below, by hovering your mouse over the values and holding down the mouse button, you can change the values (more negative or positive) by pulling left or right with your mouse.
Icon Showing the Numbers can be ‘Scrubbed’ to Change Their Values
![]()
PRO TIP: You can scrub faster by holding down the Shift key while scrubbing. For a slower, more nuanced srub down down Control (on a PC) or Command (on a Mac) while scrubbing.
Additionally, you can adjust some of these values in the Program Monitor as well. Scale, rotate or move your clips. To do this in the program monitor (without having to modify the text) click the word Motion in the Effects Control Panel. After, you will see the following in your program monitor:
Handles and Anchor Point Show When the Word ‘Motion’ is Selected

By selecting any of the handles on the outer edge of the frame (marked above) you can rescale the clip as needed. By clicking on the clip in the Program Monitor you can drag with your mouse anywhere in the frame. Working directly in the Program Monitor may not be as precise as modifying the numerical values, but it is a quick way to eyeball adjustments.
Additionally, you can also rotate clips in the Program Monitor. The same as above, you’ll first need to select Motion in the Effects Control Panel. Then, hover slightly above and outside of any of the corner handles until you see the following icon. Click and drag to rotate the clip as you require.
Rotate Icon on a Clip in the Program Monitor
![]()
In the Effects Control Tab you’ll also see a Anti-Flicker filter. This is useful when you are working with interlaced footage and you are getting a moire effect in your shot (common when talent is wearing a striped or tightly patterened shirt). Dial in the flicker filter to blur the video fields to reduce the strobing effect. Add too much of this effect and you’ll over soften your image – so use with care!
Anchor Points in Premiere Pro
One effects parameter that can often cause some confusion is the ‘Anchor Point’ of your footage. This confusion often stems from the fact that it starts at the same number as position. In fact, anchor point and position are two very different parameters!
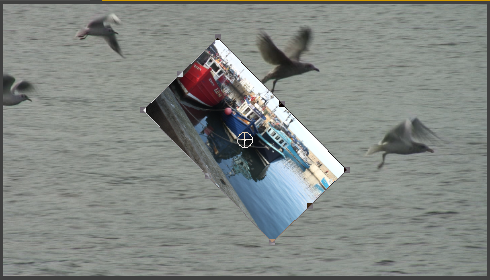
The anchor point is the place where all the other fixed effects will work from. In other words, if I rotate my clip it will rotate around the anchor point.So, if the anchor point is in the middle of the clip (as it is by default) then it will rotate around the middle of my clip. However, if I were to move my anchor point to the top left of my clip then the clip would rotate around the top left of my clip (as shown below).
Rotation Around the Default Central Placement of the Anchor Point
(Scale set at 38% for demonstration)
Rotation Around a Moved Anchor Point to the Top Left of my Clip
(Scale set at 38% for demonstration)
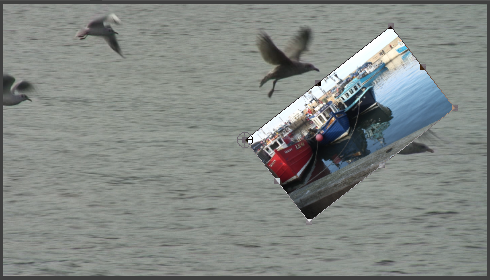
It is worth noting that the top left of the clip is actually the 0, 0, point on the X and Y axis. So when you set the anchor point position to something like 720, 540 it tells you that the anchor point of the clip is 720 pixel across from the top left corner of the clip and 540 pixels down from the top left of the clip.
If you look at the second screenshot above, you will see that the anchor point is still in the middle of the screen but is also at the top left of the clip! This means that the position of the clip is 720 pixels across and 540 pixels down from the top left of the program monitor while the anchor point is at 0, 0 ( it is locked to the top left hand corner of the clip). If I now moved the clip’s position to 0, 0, with the anchor point also set to 0,0 it would be locked to the top left hand corner of the program monitor as shown below.
Clip Anchor Point at 0, 0 and Clip Position Moved to 0, 0
(Scale set at 38% for demonstration)
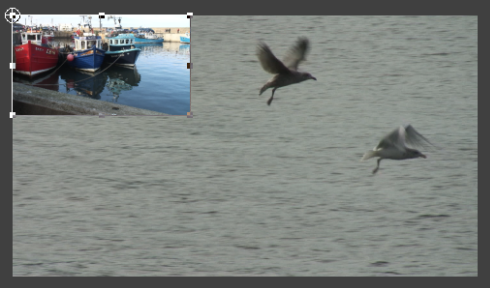
But, if I reset my Anchor Point to its default settings of 720, 540 but keep position at 0, 0 I would get the following effect.
Default Anchor Point (720, 540) With Position at 0, 0
(Scale set at 38% for demonstration)
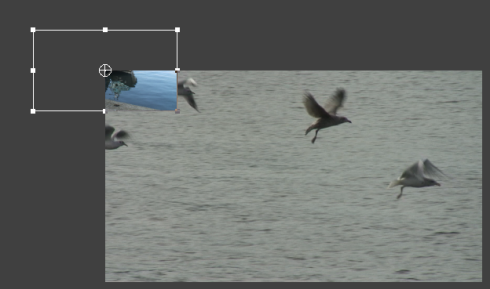
As you can see, where your anchor point is set will make a big difference as to how your clip will behave. It’s best to experiment with anchor point position to get a handle on the concept, and see how it differs from the position of the clip in the frame.
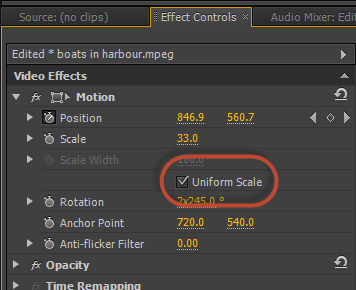
The only other thing to mention at this point is that sometimes you may want to scale an item in a non-uniform way. To turn off Uniform Scale in Premiere just un-check the box in the Effects Controls Panel. Now, you will be able to scale X (across) and Y (up and down) separately. Use intentionally, as it can cause some quite odd aspect ratios!
Uniform Scale Checkbox
Are you a Premiere Pro power user?
Share your tips and advice in the comments below!


