How to Create an Animated Circle Burst in Adobe After Effects
In our latest video tutorial, learn how you can use circle burst animations to quickly spice up a motion graphics project.
You can throw these elements behind an animated logo to illustrate movement, or add them to text graphics for some dynamic and interesting results. The circle burst is extremely easy to create, and it’s incredibly versatile. Let’s take a step-by-step look at how to create one in Adobe After Effects.
Step 1: Create an Ellipse

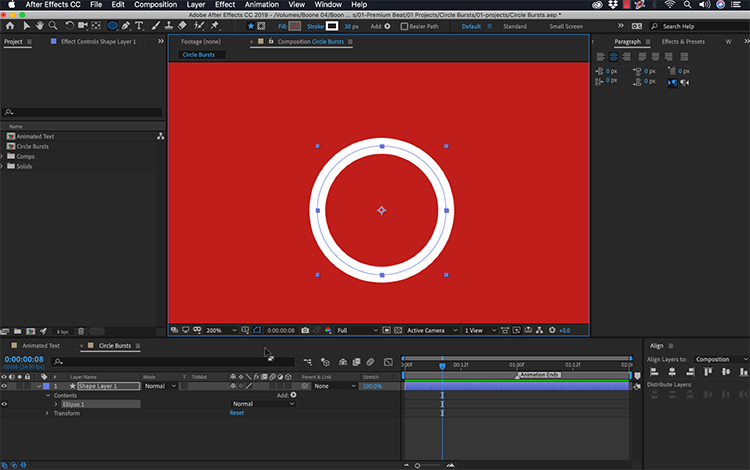
First, I’ll use the Ellipse Tool to create a simple circle. To get the look I want, I’ll turn off the fill and set the stroke to white, with a width of 35 pixels. It’s important to center the anchor point to the ellipse shape so that it will animate properly. If it’s not already centered, simply select the layer and go to Layer > Transform > Center Anchor Point in Layer Content. Then use the “Align” panel to center the circle within the composition. Now the shape is prepped for animation.
Step 2: Animate the Shape

To create a circle burst, I only need to animate two properties — “Stroke Width” and “Scale.” I want the animation to be roughly one second in length, so I’ll add a sequence marker to quickly visualize where to place the end keyframes. First, I’ll animate the width of the stroke. I want it to disappear, so I’ll animate the width from 30 down to 0. Next, I’ll open up the “Transform” properties of the ellipse and animate the “Scale” from 0 to 100. It’s important to not animate the scale of the shape layer, as you want control over this attribute later.
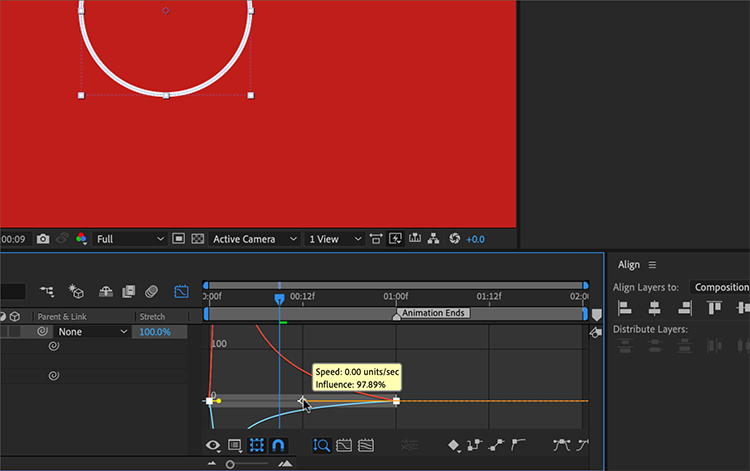
To smooth out the animation and give it a more natural look, I’ll change the first keyframes to “Easy Ease Out” and the last keyframes to “Easy Ease In.” Then I can open up the graph editor and ramp up the speed at the beginning, slowing it down toward the end. Now it looks more like it’s following the laws of physics.
I can quickly make variations of my circle burst by duplicating and slightly adjusting the keyframes or other settings. For example, I can change the scale of one, or add a slight rotation. I can even add dashes to the stroke to give the burst a completely different look. Now I’m ready to bring these in and use them with other elements.
Step 3: Incorporate in a Project

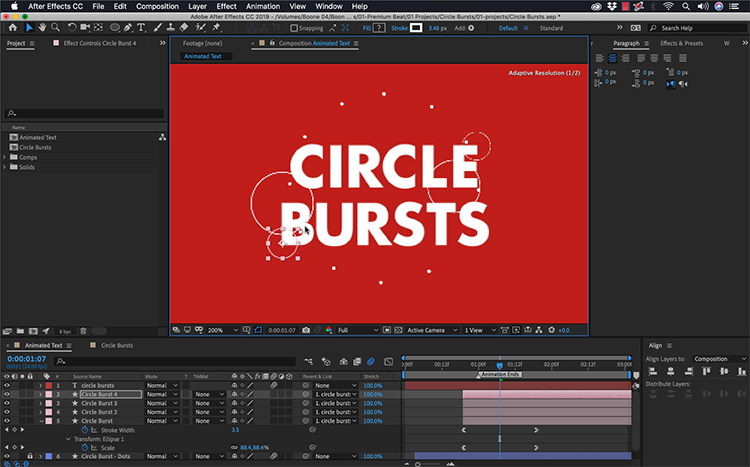
So here I have an animated title that I want to spruce up a bit. The text has a simple scale and rotation animation flying it onto the screen. I can bring my circle bursts in to add some extra movement and detail. For this particular graphic, I’m going to place two large circle bursts behind my text. I’ll parent the circles to the text, so it will follow the text as it moves. I’ll also add smaller circles on the edges of the text, parenting them to the text layer as well.
The key to making this animation work is tweaking each circle burst, making sure they don’t match. It’s a simple rule of duplicating, repositioning, and retiming. Repeat these steps until you get a look with which you’re happy.
Take a look at my final animation.

Looking for more motion graphics tips? Check out these videos.


