How to Create and Change a Solid Color Layer in After Effects
Learn about the many interesting and effective ways you can work with Solid Color Layers in After Effects.
If you’re a seasoned editor or designer still feeling lukewarm about jumping into After Effects, I encourage you to finally give it a go. Video editors may feel perfectly comfortable working entirely inside their preferred NLE, and designers may feel daunted by the technical side of video, and that’s perfectly understandable. However, After Effects provides a lot of powerful tools distinctly more advanced than those in Premiere Pro and Photoshop.
If you’re still pretty new to the application, here’s a chance to dig in a little deeper. Let’s demystify one of the most basic and essential elements of After Effects — the Solid Color Layer.
What Exactly Is a Solid Color Layer?
So what exactly is a Solid Color Layer in After Effects? Simply put, it’s a plain single-color layer. More specifically, it’s a vector-based, two-dimensional object generated with minimal data — just a rectangle with color, height, and width values assigned to it.
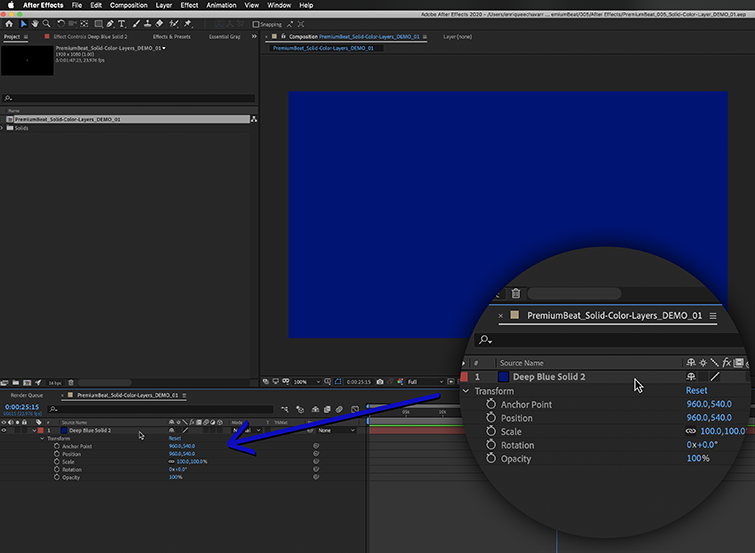
A Solid Color Layer inside After Effects.
The Solid Color Layer is one of several basic layer types in After Effects. Other layer types include Shape Layers, Adjustment Layers, Cameras, Lights, and Null Objects. Each has unique functions and parameters, some more advanced than others. If you’re relatively new to After Effects, keep it simple. Begin with understanding the Solid Color Layer first. Once you get the hang of using Solids in conjunction with images and video, you’ll be ready to start leveraging the full breadth of layer types.
Although Solids are an older layer type inside After Effects, they persist in relevance due to their simplicity. For instance, a Solid Layer can achieve much of the same results as a Shape layer, but if all you need is a simple rectangular shape, then a Solid Layer will be much lighter-weight in terms of processing and memory. Additionally, many powerful effects and plugins are designed to be applied specifically to Solid Layers, such as Element 3D. This simple yet robust functionality is precisely why Solid Color Layers are foundational to working in After Effects.
How Do I Create a Solid Layer in After Effects?
Creating a Solid Color Layer is simple. Go to the Layer drop-down menu and under New select Solid… or just use the key command (Command+Y on Mac, Control+Y on a PC).
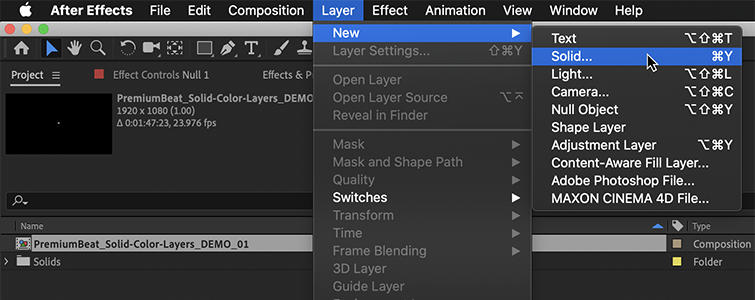
To create a new Solid Color Layer, you can either go to the Layer menu and under “New” select “Solid…”
Inside the Solid Settings panel, you can adjust the dimensions, aspect ratio, and color of your new Solid Color Layer. If you would like the dimensions of your Solid to match that of your Composition, simply click Make Comp Size. If later you need to adjust the dimensions or color of your Solid, use the key command Shift+Command+Y on a Mac and Shift+Control+Y on a PC.
I’ve Created a Solid Color Layer. How Do I Use it?
Once you’ve created your Solid Color Layer, there are a lot of ways to use it. Here I’ll go over some of the most common applications for this essential layer type.
Backgrounds
The solid-colored background of your composition is purely for working in After Effects, and effectively represents transparency.
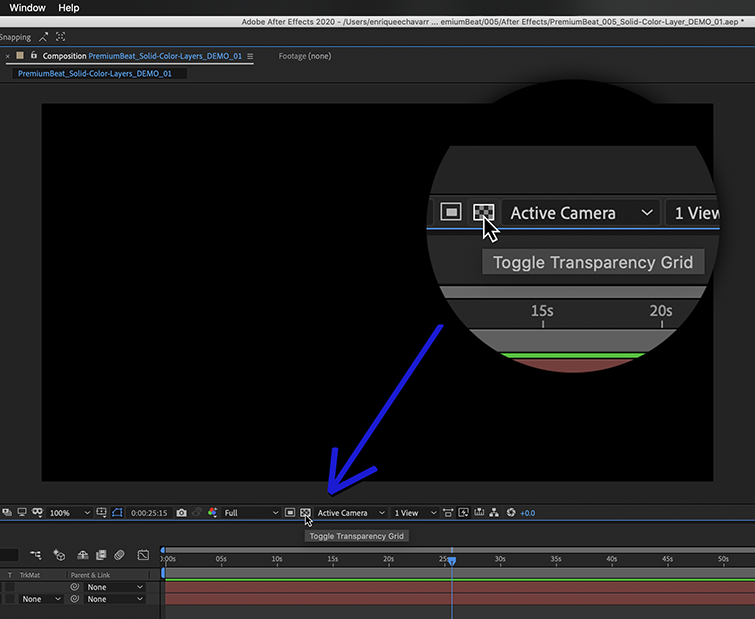
Perhaps the most essential use of a Solid Color Layer is creating a background for your Composition. Sure, you can set a background color in your Composition Settings, but this function is purely for working inside After Effects. That means the solid-colored background of your Composition is only there to show you transparency. In fact, you can toggle this colored background off to reveal the transparency grid we’ve come to know having worked in Photoshop or Illustrator.
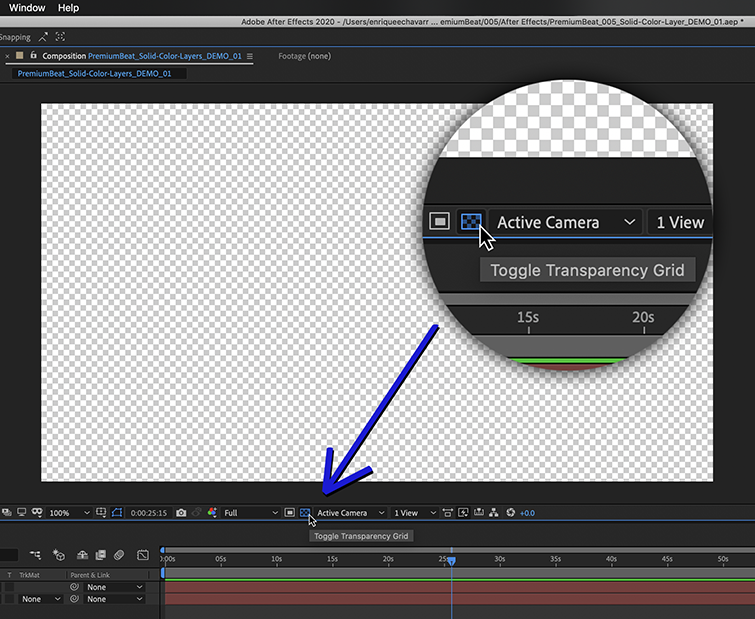
In fact, you can toggle this button to reveal the Transparency Grid.
Because of this, it is best to use a Solid Color Layer as your background color, even if all you need is a plain black backdrop. Since Solids are technically 2D objects, they can remain stationary in your composition even when under dynamic animation and 3D objects. I personally like to add a bit of depth to a backdrop by giving my background layer a vignette with an Effect. I’ll explain more about applying an Effect later.

This 3D scene has a 3D Solid Color Layer as it’s background.
Faux-3D
While a Solid Color Layer is a 2D object, you may turn it into a 3D Layer inside your composition. In fact, the same is true for any 2D object, such as an image or a video. To turn a 2D Layer into a 3D Layer, just toggle the box under the little cube icon in your timeline or right-click the layer and select 3D layer.
To turn a 2D Layer into a 3D Layer, toggle the box under the little cube icon in the timeline.
Although still technically a 2D object, turning Solids, Images, and Videos into 3D layers allow your flat images to float in 3D space. This flat object will have no side profile, but will have a front and back face that exists in a sort of parallax.
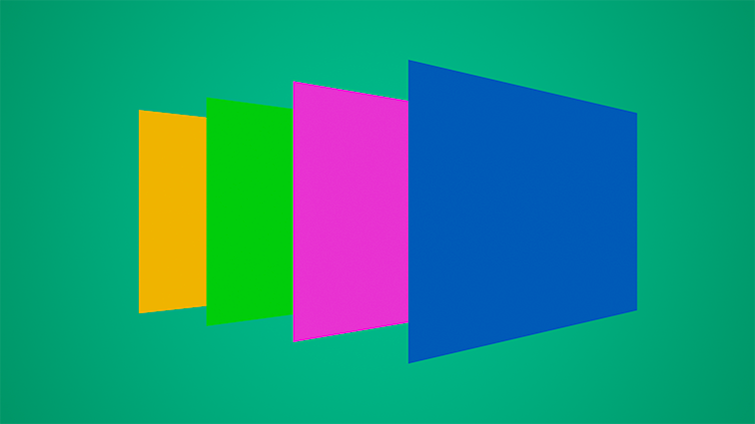
2D objects can float in 3D space when switched into 3D Layers.
You can use this function to create simple environments for a 3D scene, or even construct crude but effective three-dimensional shapes in a pinch.
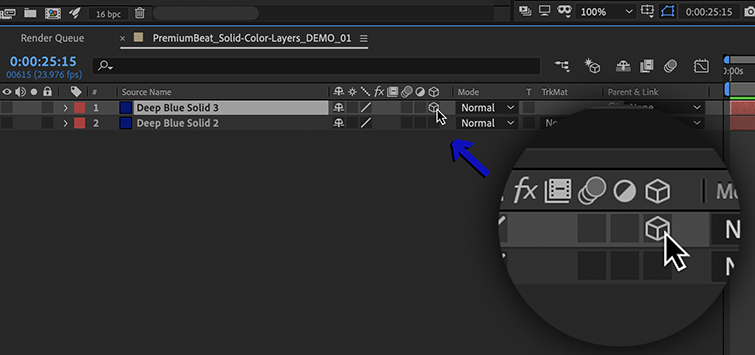
Effects
Many effects are designed to alter and adjust an image or video you’ve imported into After Effects. However, some effects are made specifically to generate new imagery and render simulated objects, rather than simply manipulate an image. To utilize this sort of effect, you’ll need a layer on which to place it. That’s where Solids come in.
Right-click the Solid Color Layer to apply an Effect.
To add an Effect to your Solid Color Layer, you can either right-click the layer and go to Effect or highlight the layer in your composition and go to the Effect menu at the top of your screen.
Here I’ve applied a Gradient Ramp Effect to a Solid. I can adjust this Effect’s settings in either the Effect Controls Panel or in my timeline.

You can adjust an effect’s settings in either the Effect Controls Panel or in the timeline.
Masks
Applying a Mask to a Solid is a great way to keep vector art inside your After Effects Project. Much like working in Illustrator, you can create vector shapes directly onto a layer using the Pen Tool. Once you’ve created an enclosed mask path, you’ll be able to use to reveal (add) or cover (subtract) portions of that layer.
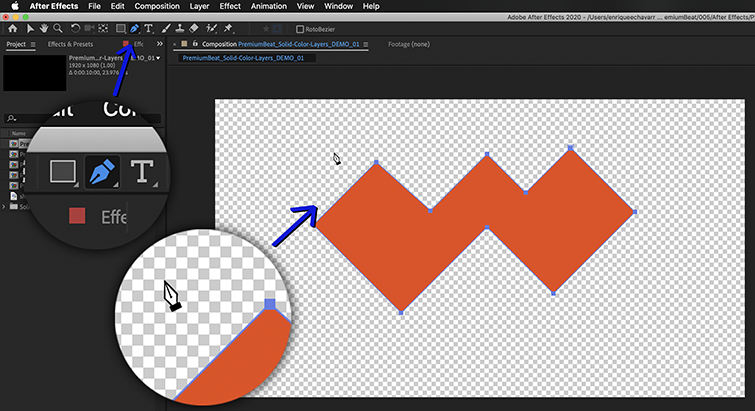
Create vector shapes directly onto Solid Color Layers with the Pen Tool.
In fact, you can paste vector paths from Illustrator directly into After Effects. With both your After Effects and Illustrator projects open, go to Illustrator to select the vector shape you want to transfer and copy it (Mac: Command+C, PC: Control+C). Then move over to After Effects, select the Solid Color Layer you wish to work with, and simply paste (Mac: Command+V, PC: Control+V).
A vector art pasted onto a layer in After Effects becomes several editable Mask Paths.
You can certainly paste vector paths onto a Shape Layer path, but the process can be a bit more involved. For more complex vector art, it’s best to stick with Solids, since they are lighter on your memory and much easier to paste masks onto.
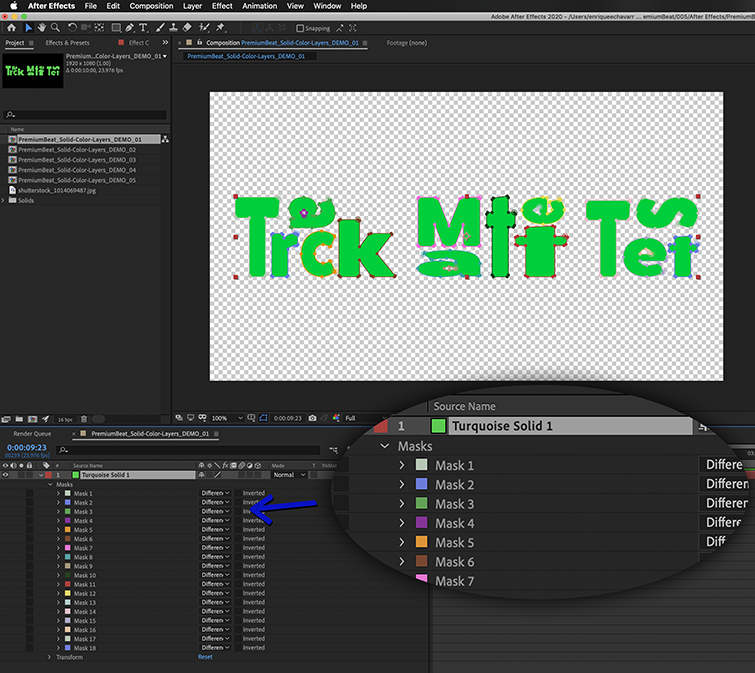
By pasting vector shapes directly into After Effects, you effectively keep all vector art contained inside of your After Effects Project. You can also animate a mask by keyframing the mask path in your timeline, providing much more flexibility than just importing vector art into your project.
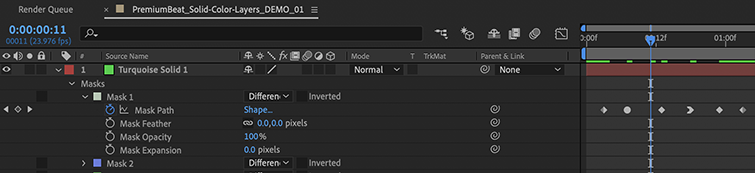
You can animate a Mask Path in After Effects. Just edit the path and set keyframes along your timeline.
Track Matte
One more very robust way to use a Solid is as a Track Matte. A Track Matte is a layer used to reveal another layer directly beneath it in a Composition. More specifically, the layer directly beneath a Track Matte will be revealed in precisely the same shape as the layer acting as the matte.

A Track Matte can be used to reveal a layer in precisely the same shape as the layer above it.
To use a Solid Layer as a Track Matte, you’ll want to toggle the Track Matte setting of the layer you wish to reveal. To do this, you must first place that layer directly below the layer serving as your Track Matte inside your timeline. Then find the column in your timeline marked TrkMat and follow it down to the drop-down for the layer you want to reveal.
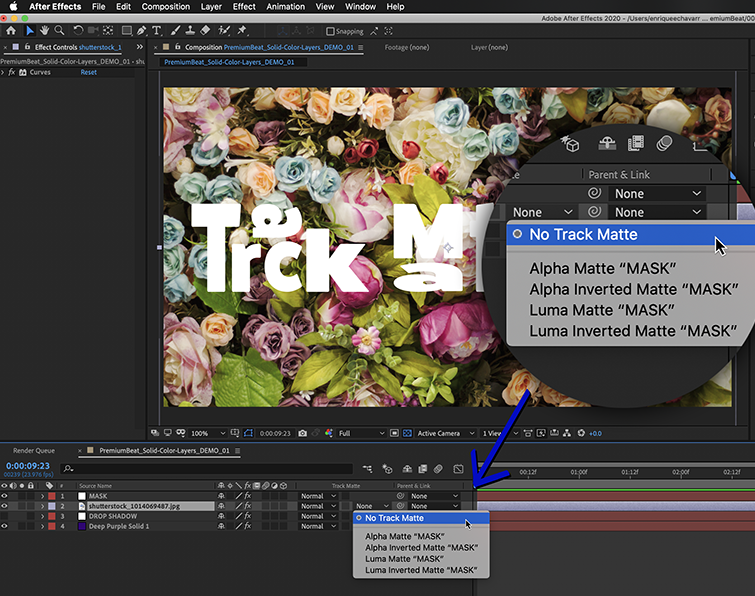
Under the column marked “TrkMat” you can apply a Track Matte to a layer.
You’ll have four options to choose from — Alpha, Alpha Inverted, Luma, and Luma Inverted. Alpha will reveal your image in the shape of the matte.
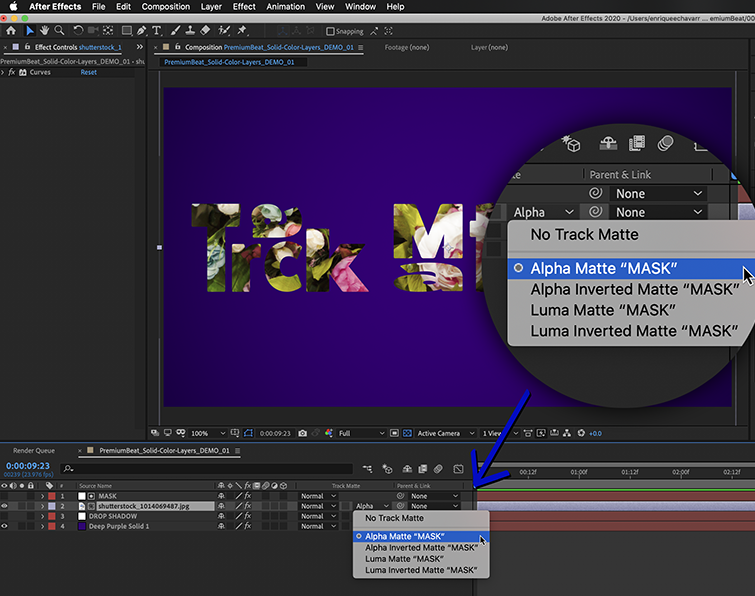
An Alpha Matte will reveal a layer in the shape of a masked Solid.
Alpha Inverted will give you the inverse, revealing everything outside of the shape of the matte.
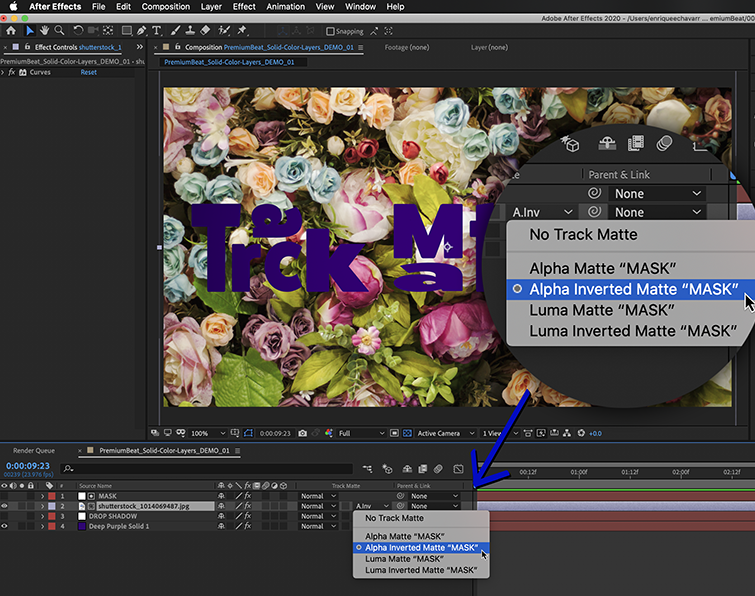
Meanwhile, an Alpha Inverted Matte will achieve the opposite.
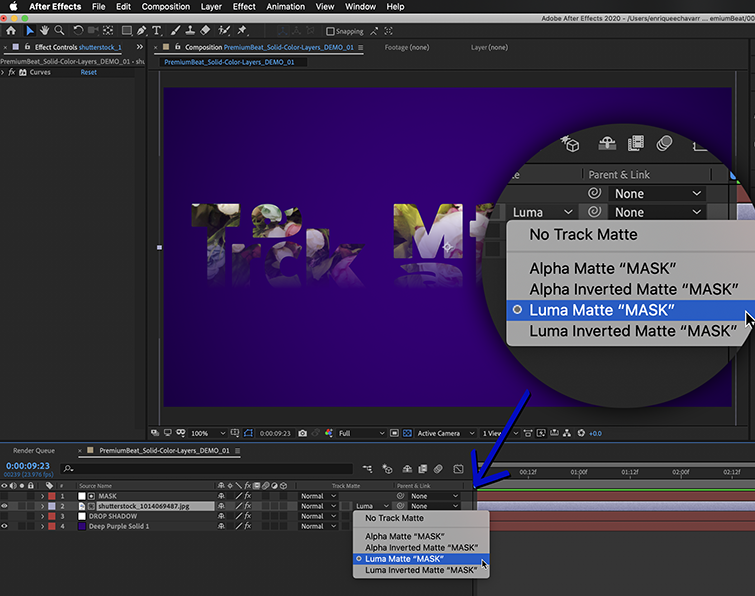
Luma and Luma Inverted work a bit differently. If you’re familiar with Photoshop, they work a lot like a Layer Mask, revealing an image along a grayscale value.
A Luma Matte will revealing a layer along a grayscale value.
For instance, if you were to add the Gradient Ramp effect to your Track Matte layer, applying the Luma Track Matte to your image will show more of your image under the lighter parts of your gradient, and gradually hide your image as the gradient becomes darker. Luma Inverted will achieve the inverse, naturally.
Here’s a Luma Matte applied under a masked Solid with a gradient.
This method works great for creating smooth wipe transitions or using more visually complex Matte Layers.
Understand The Solid to Unlock Its Potential
These are just a few of the many ways to use Solid Color Layers. There are so many more graphic effects and animations one can achieve with this layer type, precisely because of its simplicity. In fact, working with After Effects is an everlasting exercise in visual problem solving. Think of it as a creative logic problem, rooted in layers and values, and just waiting to be solved. Once you’ve mastered the logic, the possibilities are endless.
Dig in deeper to all things After Effects with this helpful content: