DaVinci Resolve Tutorial: Using Offline Reference Clips
Using offline clips is important when establishing yourself as a serious colorist. Learn how in this DaVinci Resolve Tutorial.
Developing an ability to match shots quickly is of tantamount importance when first learning to grade. However, managing technical details before your clients arrive is just as important.
These are the parts of the job that your clients aren’t concerned about, because they’re only interested in making the image look its best. Using offline clips from the editorial department is extremely crucial for a session.
Your worst-case scenario is a client who knows the timeline better than you do. You don’t want them calling out a shot you’re grading as wrong. It’s the easiest and fastest way to lose credibility, and the client will question everything else in the session from that point on.
Now that I’ve sufficiently scared you, let’s take a look at how to work with offline clips and how they can be used throughout the session.
What are Offline Clips?
First, a bit of terminology. In this context, the term “offline” describes a reference movie file from an offline nonlinear editorial (NLE) system like Premiere or Final Cut Pro. Over the last few years, NLEs have become sophisticated enough to function as online tools for many workflows, so the term has become a bit of a misnomer for some.
Think of the terms “offline” and “rough cut” as synonymous. For those working in a commercial environment, however, it’s customary to use a high-end finishing system to design effects, handle versioning and titling, and otherwise assist in outputting the final online picture.
Offline clips are usually a single Quicktime file of the EDL, XML or AAF you’ll be grading. The clip doesn’t have to have all the effects and filters taken off to be useful, and they can contain reference audio as well. Since the file is a reference clip, it also doesn’t function like normal media that can be added to the Media Pool.
You can add the reference clip as a piece of media as well, but you can’t have a reference file and a media file that points to the same media in the same folder. To get around this, create another folder in your Media Pool and call it something like “Reference.” You can keep yourself organized by keeping all of the references there, with your media at the root Master folder.
You can then add your offline media clip to the end of the sequence to play for clients or grab reference stills as needed.
Bringing in the Offline Clip
In the Media tab, navigate to where your reference picture is in the Browser and right-click on it to bring up the shot’s options. Select Add as Offline Reference Clip. When the clip is brought in, you’ll see it has a sort of transparency grid icon next to it, which is how offline clips are denoted.
Navigate to your reference, right-click, and choose “Add as Offline Reference Clip”:
The grid icon denotes an offline reference clip:
Once you have the reference clip loaded, load your EDL, XML or AAF as usual inside the Edit tab. Right-click on the imported timeline, choose Link Offline Reference Clip and select your rough cut.
Right-click and link the proper reference to your sequence:
Next, select the first icon underneath the left monitor, conveniently looking like the grid icon we noticed earlier, and scrub through your timeline shot by shot to check that your offline file matches the imported timeline. If each cut point is just a few frames off from what it should be, you can slip the reference cut in the box next to the zoom percentage.
Click the offline reference icon (red circle) to compare it to your imported sequence. Slip the rough cut by single frames (blue circle):
If you’re not seeing your picture at all, chances are your reference Quicktime has lost its timecode when you brought it in (usually reset to 00:00:00:00) and the timeline starts at a different time.
This can happen if your reference filename is too long. Timecode can also be lost in compressing to another format. Not to worry. You can change the timeline’s starting timecode by right-clicking it in the Edit tab and choosing Starting Timecode…
Right-click your sequence to change its starting timecode:
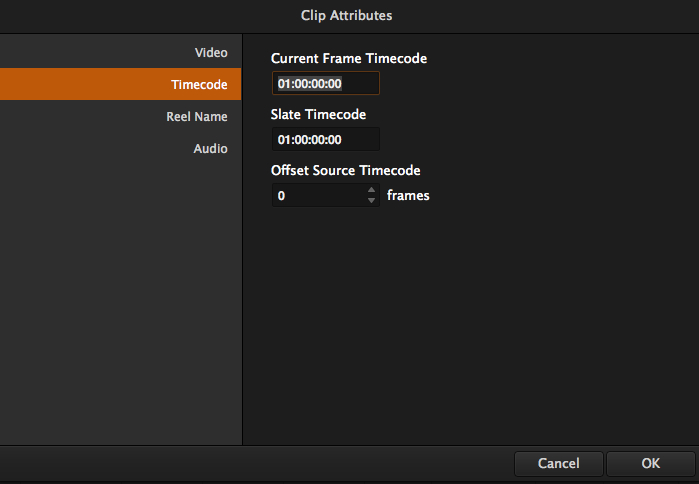
Alternately, the starting timecode of the offline reference can be changed in the Media page. Right-click the reference and choose Clip Attributes and then the Timecode tab and set it to the sequence’s timecode.
Changing a clip’s attributes back in the Media page:
Change that pesky timecode to what you want:
It’s common to have some problems with your timeline import. It’s the reason I get to the session earlier than the client, even diagnosing technical issues the previous day if time allows. I appreciate having the luxury of time to address any issues without the client breathing down my neck. It’s possible on large or unorganized projects to get issues like duplicate timecodes or inaccurate frames due to varying frame rates. Using an offline reference will make those errors easy to spot so you can go in and diagnose.
Using the Offline Clip During the Session
When working with clients, you can switch your reference modes from using gallery stills to your offline reference. To do this, right-click on the main monitor while in the Color tab, select Reference Mode and then choose Offline. Now when you select the command for Play Still you’ll see the offline instead. This is useful for the client to see how the editor’s grade differed from yours, and can be instrumental for you to see the overall tone the client is going for.
Reference modes aren’t just for gallery stills:
A horizontal wipe comparison of your grade and the offline. Your clients will exclaim, “Look how far we’ve come!”
Viewing the reference is useful at the end of the session for matching shot repositions and blowups. When working with oversized RED footage being mastered to HD resolution, it is standard operating procedure for the colorist to match the editor’s repositionings.
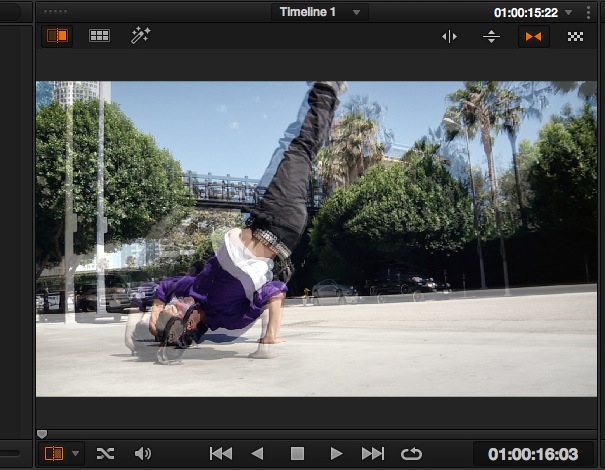
Instead of opting for the default horizontal wipe style for Play Still, right-click the main monitor and select Mix under Wipe Style. This will create an overlay “double” effect that allows for matching blowups with much greater accuracy. You can change the amount the rough cut mixes with your graded timeline by clicking and dragging left and right on the monitor, and evaluate your work by toggling Play Still on and off.
An easier way of visualizing and matching blowups is to use the Mix option:
Trippy! No, your eyes aren’t playing tricks on you. The mix allows you to match blowups. When the doubling effect goes away, you’ve matched the repositioning:
I must reiterate on how critical it is to use the offline feature. Not only does it establish your credibility as a serious colorist, it’s also necessary in jobs that require blowups. Use it in your next session, as it’s a must for any project.
Here are a few more posts that will get you on your way to becoming an expert with DaVinci Resolve.
- Color Grading: Using DaVinci Resolve’s Multiple Split Screens
- The Isolated Color Look in DaVinci Resolve
- Utilizing Remote Grades in DaVinci Resolve
Hopefully you found this DaVinci Resolve Tutorial helpful. Let us know in the comments below if there are any other tips, tricks, or techniques you’d like to see covered here on the PremiumBeat Blog.


